Introduction
There’s nothing quite like the comforting aroma of freshly baked bread wafting through your home. And when it comes to ultimate comfort and deliciousness, homemade milk bread stands in a league of its own. This isn’t just any bread; it’s a culinary hug, a tender embrace for your taste buds that will quickly become a beloved staple in your kitchen. Milk bread, with its characteristic soft, fluffy, and slightly sweet crumb, is a true delight.
Originating from Asian bakeries, this style of bread has captivated palates worldwide due to its incredibly delicate texture and rich, yet subtle, flavor. What makes milk bread so special is often attributed to a technique called tangzhong, a cooked flour and water (or milk) paste that pre-gelatinizes starches, allowing the dough to absorb more liquid and stay moist and tender for longer. While some traditional milk bread recipes use tangzhong, this particular recipe focuses on achieving that signature softness through careful ingredient ratios and proper dough handling, making it accessible even for novice bakers. It’s the kind of bread that begs to be pulled apart, each strand revealing its airy, cloud-like interior.
Whether you’re looking for the perfect foundation for your morning toast, a pillowy soft sandwich bread, or simply a comforting treat to enjoy with a cup of tea, these easy homemade milk bread loaves are the answer. The satisfaction of transforming simple ingredients into such beautiful, golden-brown loaves is immense, and the taste is unparalleled. Prepare to impress your family and friends, and most importantly, yourself, with this incredibly rewarding baking project. Get ready to fill your kitchen with warmth and the irresistible scent of freshly baked goodness!
Nutritional Information
Per serving (approximate values, based on 12 servings from 3 loaves):
- Calories: 290
- Protein: 8g
- Carbohydrates: 50g
- Fat: 6g
- Fiber: 2g
- Sodium: 290mg
Ingredients
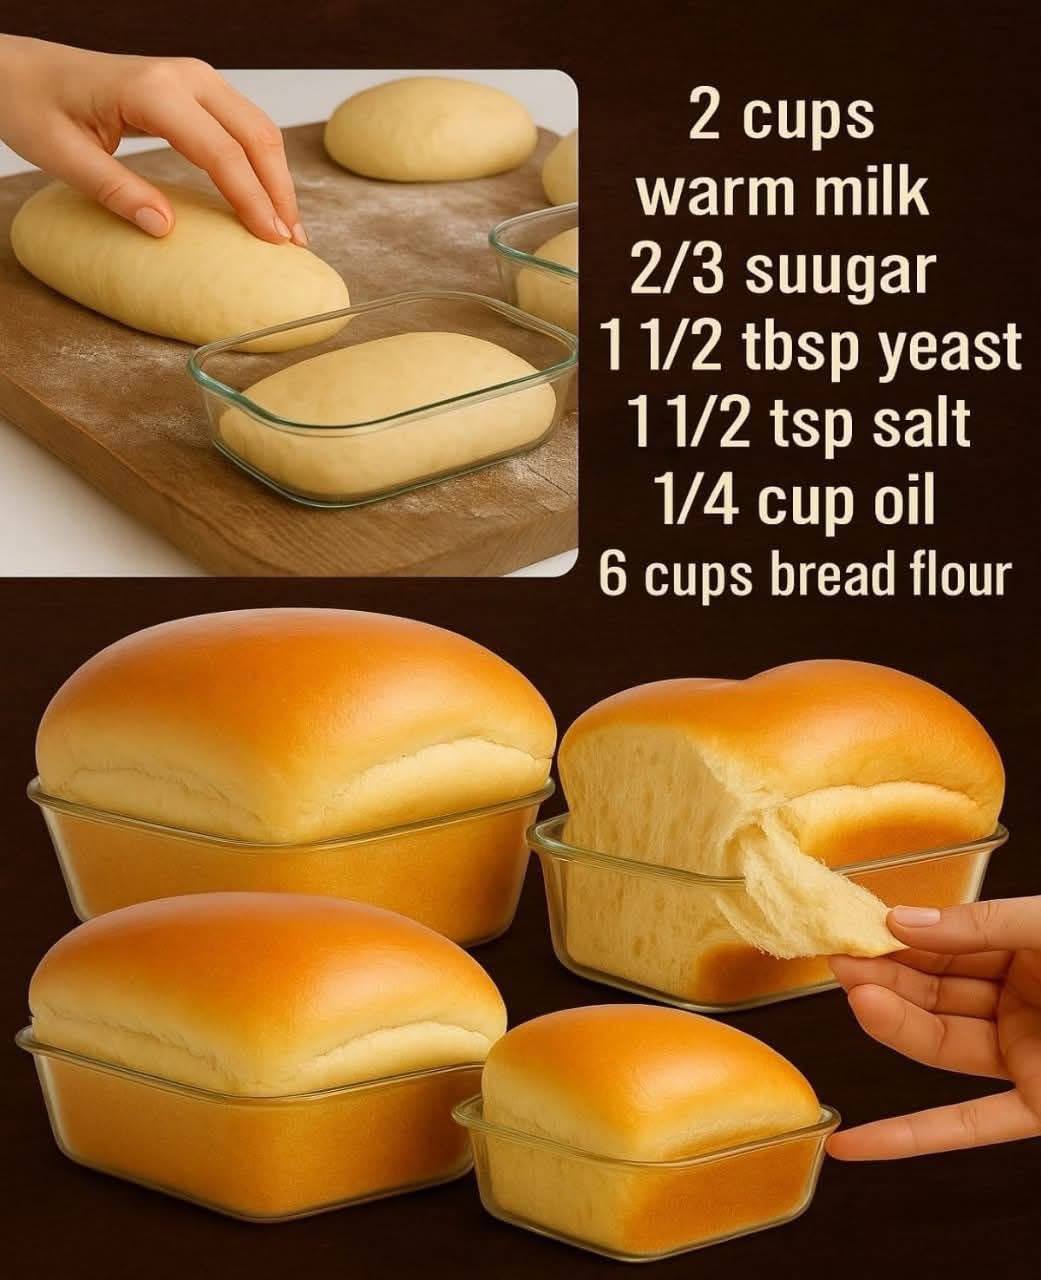
- 2 cups warm milk (105-115°F / 40-46°C)
- 2/3 cup granulated sugar
- 1 ½ tablespoons active dry or instant yeast
- 6 cups bread flour, plus extra for dusting
- 1 ½ teaspoons salt
- ¼ cup vegetable oil or melted unsalted butter
- 1 large egg, lightly beaten (for egg wash, optional)
Instructions
- Activate the Yeast: In a large mixing bowl or the bowl of a stand mixer, combine the warm milk and 1 tablespoon of the granulated sugar. Sprinkle the yeast over the top and let it sit for 5-10 minutes, or until foamy. This indicates that the yeast is active and ready to work. If it doesn’t foam, your milk might have been too hot or too cold, or your yeast may be old; discard and start again with fresh yeast.
- Combine Wet and Dry Ingredients: To the yeast mixture, add the remaining granulated sugar, salt, and vegetable oil (or melted butter). Mix briefly to combine. Gradually add 3 cups of the bread flour, mixing on low speed with a dough hook attachment (or stirring with a wooden spoon) until just combined.
- Knead the Dough: Continue adding the remaining 3 cups of bread flour, about 1 cup at a time, mixing thoroughly after each addition. Once all the flour is added and a shaggy dough forms, increase the mixer speed to medium-low and knead for 8-10 minutes, or until the dough is smooth, elastic, and pulls away cleanly from the sides of the bowl. If kneading by hand, turn the dough out onto a lightly floured surface and knead vigorously for 10-15 minutes, until it’s smooth and passes the “windowpane test” (you can stretch a small piece of dough thin enough to see light through it without it tearing).
- First Rise (Bulk Fermentation): Lightly grease a clean large bowl with a little oil. Transfer the kneaded dough to the bowl, turning it once to coat the entire surface. Cover the bowl tightly with plastic wrap or a clean kitchen towel. Place the bowl in a warm, draft-free place for 1 to 1.5 hours, or until the dough has doubled in size. The exact time will depend on the warmth of your environment.
- Punch Down and Divide: Once the dough has doubled, gently punch it down to release the air. Turn the dough out onto a lightly floured surface. Divide the dough into 3 equal portions (for three standard loaf pans) or 4 equal portions (for smaller loaves, as seen in the image). You can use a kitchen scale for more accurate division.
- Shape the Loaves: For each portion of dough, gently flatten it into a rectangle. Fold the top edge down to the center, then fold the bottom edge up to meet the top, pressing the seam to seal. Rotate the dough 90 degrees, then gently roll it tightly from one end to the other, creating a log shape. Pinch the seam closed at the bottom.
- Second Rise (Proofing): Lightly grease your loaf pans (three 8.5×4.5-inch pans or four smaller pans). Place each shaped dough log into a prepared loaf pan, seam-side down. Cover the loaf pans loosely with plastic wrap or clean kitchen towels. Let the loaves rise in a warm, draft-free place for another 45-60 minutes, or until they have nearly doubled in size and are puffy.
- Preheat Oven and Prepare Egg Wash (Optional): About 15-20 minutes before the end of the second rise, preheat your oven to 375°F (190°C). If you desire a golden, shiny crust, lightly beat one large egg with 1 tablespoon of water or milk to create an egg wash.
- Bake the Bread: Once the loaves have risen sufficiently, gently brush the tops with the egg wash if using. Place the loaf pans in the preheated oven. Bake for 25-35 minutes, or until the tops are golden brown and an instant-read thermometer inserted into the center of a loaf registers an internal temperature of 190-200°F (88-93°C). If the tops are browning too quickly, you can loosely tent them with aluminum foil for the last 10-15 minutes of baking.
- Cool the Loaves: Once baked, carefully remove the loaves from the oven. Let them cool in their pans for about 5-10 minutes. Then, invert the loaves onto a wire rack to cool completely. Cooling on a wire rack allows air to circulate around the entire loaf, preventing the bottom from becoming soggy and ensuring a perfect texture throughout. Resist the urge to slice into them while hot, as this can affect the crumb texture.
Cooking Tips and Variations
Tips for Best Results:
- Measure Flour Correctly: For accurate measuring, spoon flour into your measuring cup and then level it off with a straight edge. Scooping directly from the bag can compact the flour, leading to too much flour and a dry, dense bread.
- Don’t Rush the Rise: The rising times are estimates. The actual time depends on the temperature and humidity of your kitchen. Look for the dough to double in size, not just a specific time. A warm, draft-free spot is crucial for proper rising. You can create a warm environment by placing the bowl in a cold oven with just the oven light on, or by placing it in a warm (not hot) sunny spot.
- Knead Thoroughly: Proper kneading is essential for developing gluten, which gives milk bread its characteristic elasticity and soft texture. Don’t cut this step short. The dough should be smooth, pliable, and pass the windowpane test.
- Internal Temperature is Key: While visual cues are helpful, using an instant-read thermometer to check for an internal temperature of 190-200°F (88-93°C) is the most reliable way to ensure your bread is fully baked without being overbaked and dry.
- Cool Completely: As tempting as it is, slicing into hot bread can result in a gummy texture. The bread continues to cook and set as it cools. Allow it to cool completely on a wire rack before slicing for the best texture.
- Egg Wash Alternatives: If you don’t want to use egg, you can brush the tops of the loaves with milk or heavy cream before baking for a slightly less shiny but still golden crust, or simply leave them plain for a rustic look.
Recipe Variations:
- Sweetened Milk Bread: For an even sweeter treat, you can increase the sugar by another 1/4 cup. You could also add 1 teaspoon of vanilla extract to the wet ingredients for a subtle vanilla flavor.
- Tangzhong Method: For an even softer and longer-lasting bread, incorporate the tangzhong method. Whisk together 3 tablespoons of bread flour with 1 cup of milk in a small saucepan. Cook over medium-low heat, stirring constantly, until the mixture thickens to a paste (about 150°F / 65°C). Let it cool completely before adding it to your yeast mixture in step 1, reducing the overall milk in the recipe by 1 cup.
- Savory Loaves: Reduce the sugar to 1/4 cup. You can add 1/2 cup of shredded cheddar cheese, 2 tablespoons of dried herbs (like rosemary or oregano), or 1/4 cup of finely chopped chives to the dough during the last few minutes of kneading.
- Whole Wheat Milk Bread: Substitute up to 2 cups of the bread flour with whole wheat flour for a heartier loaf. Note that this will result in a slightly denser texture and may require a little more liquid.
- Enriched Milk Bread: For an even richer crumb, you can substitute half of the vegetable oil with melted unsalted butter.
- Seed Topping: Before baking, after applying the egg wash, sprinkle the tops of the loaves with sesame seeds, poppy seeds, or a mix of “everything bagel” seasoning for added flavor and texture.
- Individual Rolls: Instead of shaping into loaves, divide the dough into 12-16 equal pieces after the first rise. Shape each piece into a round bun and place them close together in a greased 9×13-inch baking pan. Reduce baking time to 20-25 minutes.
Storage and Reheating
Storage:
- Room Temperature: Homemade milk bread is best enjoyed fresh, ideally within 2-3 days of baking. Store cooled loaves in an airtight container or a large resealable plastic bag at room temperature. This will help maintain its softness and prevent it from drying out. Avoid storing in the refrigerator, as this can actually make bread go stale faster.
- Freezing: For longer storage, milk bread freezes exceptionally well. Once the loaves are completely cooled, wrap them tightly in plastic wrap, then an additional layer of aluminum foil. You can freeze whole loaves or slice them first and freeze individual slices. Frozen milk bread will keep for up to 2-3 months.
Reheating:
- From Room Temperature: To refresh slightly stale bread, you can lightly toast slices in a toaster or toaster oven. For a whole loaf, wrap it in foil and warm in a preheated 300°F (150°C) oven for 10-15 minutes, or until warmed through.
- From Frozen (Slices): Pop individual slices directly into a toaster or toaster oven until lightly golden and heated through.
- From Frozen (Whole Loaf): Unwrap the frozen loaf. You can let it thaw at room temperature for several hours. For a quicker refresh, wrap the thawed or partially thawed loaf in aluminum foil and bake in a preheated 325°F (160°C) oven for 20-30 minutes, or until thoroughly warmed and soft.
Frequently Asked Questions
Why is my milk bread not as soft as I expected?
There are several reasons your milk bread might not achieve that signature softness. The most common culprits include not kneading the dough enough (which means gluten hasn’t fully developed), adding too much flour (which makes the dough dry), or overbaking. Ensure you knead until the dough is smooth and elastic, measure your flour accurately, and use an internal thermometer to avoid overbaking. Also, make sure your yeast is active and your rising environment is warm enough.
Can I make this recipe without a stand mixer?
Absolutely! While a stand mixer makes the kneading process easier, you can certainly knead the dough by hand. It will require a bit more effort and time, typically 10-15 minutes of vigorous kneading on a lightly floured surface, until the dough is smooth and elastic. The principles of kneading and rising remain the same whether done by hand or machine.
What is the best way to store leftover milk bread?
To maintain its freshness and softness, store leftover milk bread at room temperature in an airtight container or a large resealable plastic bag. Avoid refrigerating it, as the cool, dry environment of a refrigerator can actually accelerate the staling process of bread. For longer storage, milk bread freezes exceptionally well when wrapped properly.
My dough isn’t rising. What went wrong?
If your dough isn’t rising, the most likely issue is inactive yeast. This can happen if the yeast is old or if the liquid used to activate it was too hot (killing the yeast) or too cold (not activating it). Ensure your warm milk is between 105-115°F (40-46°C). Also, make sure your rising environment is warm and draft-free. If the yeast doesn’t foam in the initial step, it’s best to discard and start again with fresh yeast.