Introduction
There’s something undeniably comforting and utterly delicious about a perfectly cooked savory pancake. Forget the syrupy breakfast stacks for a moment; we’re diving into a world of umami-rich, herb-infused flatbreads that can grace your table at any time of day. These Savory Herb Pancakes, often recognized in various forms across global cuisines, are a testament to simple ingredients coming together to create extraordinary flavor. From the bustling street food stalls of Asia, where their scallion-studded cousins are a beloved staple, to the humble kitchens of home cooks seeking a quick and satisfying bite, these thin, pliable, and often crispy-edged delights offer a versatile canvas for your culinary creativity.
What makes these savory pancakes so special? It’s their incredible adaptability and ease of preparation. With just a handful of pantry staples and some fresh herbs, you can whip up a batch that’s perfect as a light breakfast, a delightful snack, a unique appetizer, or even a flavorful side dish to complement a larger meal. Their inviting aroma fills the kitchen as they sizzle gently in the pan, promising a mouthful of tender texture and aromatic goodness. Whether you’re a seasoned chef or a kitchen novice, mastering these pancakes is a rewarding experience that opens the door to endless customization and delicious possibilities.
Our recipe today focuses on crafting a batch of these exquisite Savory Herb Pancakes, drawing inspiration from the best elements of various flatbread traditions. We’ll guide you through creating a simple yet effective batter, infusing it with vibrant green herbs, and pan-frying it to golden perfection. The result is a thin, slightly chewy pancake with delightful crispy edges, bursting with fresh flavor. Get ready to discover your new favorite go-to recipe for a quick, comforting, and incredibly satisfying meal that everyone will adore!
Nutritional Information
Per serving (approximate values):
- Calories: 220
- Protein: 6g
- Carbohydrates: 30g
- Fat: 8g
- Fiber: 2g
- Sodium: 250mg
Ingredients
- For the Pancakes:
- 1 ½ cups all-purpose flour
- 1 cup warm water (roughly 100-110°F or 38-43°C)
- ½ teaspoon salt
- ¼ teaspoon baking powder (optional, for a slightly fluffier texture)
- ½ cup finely chopped fresh green onions (scallions), white and green parts
- 2 tablespoons finely chopped fresh chives
- 1 tablespoon olive oil (for the batter)
- Vegetable oil or other neutral oil for pan-frying
- For the Optional Dipping Sauce:
- 2 tablespoons soy sauce
- 1 tablespoon rice vinegar
- 1 teaspoon sesame oil
- ½ teaspoon sugar
- ¼ teaspoon red pepper flakes (optional, for a kick)
- 1 clove garlic, minced (optional)
- 1 teaspoon toasted sesame seeds (optional)
Instructions
- Prepare the Batter: In a medium-sized mixing bowl, whisk together the all-purpose flour, salt, and baking powder (if using).
- Gradually pour in the warm water, whisking continuously until a smooth, lump-free batter forms. The consistency should be similar to thin pancake batter or thick crepe batter – pourable but not watery.
- Stir in the finely chopped green onions, chives, and 1 tablespoon of olive oil into the batter. Mix until well combined.
- Cover the bowl with plastic wrap or a clean kitchen towel and let the batter rest at room temperature for at least 15-20 minutes. This resting period allows the gluten to relax, resulting in a more tender pancake.
- Prepare the Dipping Sauce (Optional): While the batter rests, whisk together all the dipping sauce ingredients in a small bowl until the sugar dissolves. Set aside.
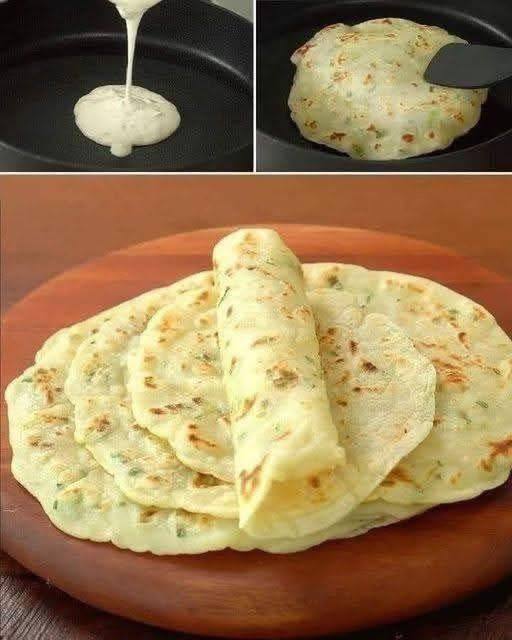
- Heat the Pan: Heat a large non-stick skillet or cast-iron pan over medium heat. Add about 1-2 teaspoons of vegetable oil to coat the bottom of the pan. Swirl to distribute evenly.
- Cook the Pancakes: Once the oil is shimmering, pour about ¼ cup of batter into the hot pan for each pancake. You might be able to cook 2-3 pancakes at a time, depending on the size of your pan, but avoid overcrowding.
- Gently tilt the pan to spread the batter into a thin, even circle, about 4-5 inches in diameter.
- Cook for 2-3 minutes per side, or until the edges are golden brown and slightly crispy, and the center is cooked through. You should see small bubbles forming on the surface as it cooks.
- Using a spatula, carefully flip the pancake and cook for another 2-3 minutes on the second side until golden and cooked.
- Keep Warm and Serve: Transfer the cooked pancakes to a plate. If making multiple batches, you can keep them warm by covering the plate with foil or placing them in a warm oven (around 200°F or 90°C) while you finish cooking the rest.
- Serve the Savory Herb Pancakes immediately, either stacked, folded, or rolled, with the optional dipping sauce on the side.
Cooking Tips and Variations
Achieving the perfect Savory Herb Pancake is all about a few key techniques and a willingness to experiment. Here are some tips to ensure your pancakes are consistently delicious, along with ideas to keep things exciting:
Batter Consistency is Key: The ideal batter should be smooth and pourable, but not too thin. If your batter seems too thick after resting, add a tablespoon of warm water at a time until it reaches the desired consistency. If it’s too thin, a sprinkle of flour can help. A good test is to lift the whisk; the batter should drip off slowly in a steady stream.
Don’t Overcrowd the Pan: Cooking too many pancakes at once can lower the pan’s temperature, leading to uneven cooking and less crispness. Give each pancake enough space to breathe and cook properly. This also makes flipping much easier.
Medium Heat is Best: Resist the urge to crank up the heat. Medium heat allows the pancakes to cook through evenly without burning the exterior. If the pan is too hot, the outside will brown too quickly, leaving the inside raw. If it’s too low, the pancakes will absorb too much oil and become greasy.
Oil Wisely: Use just enough oil to coat the bottom of the pan for each batch. Too much oil will make the pancakes greasy; too little will cause them to stick. A small amount, about 1-2 teaspoons, is usually sufficient.
Rest the Batter: Don’t skip the resting step! This allows the flour to fully hydrate and the gluten to relax, resulting in a more tender and pliable pancake. It also helps to prevent a “gummy” texture.
Flavor Variations:
- Cheesy Goodness: Fold in ¼ cup of shredded cheddar, mozzarella, or parmesan cheese into the batter for an extra layer of savory flavor.
- Spice It Up: Add a pinch of garlic powder, onion powder, a dash of white pepper, or even a tiny bit of ginger powder to the batter for a more complex flavor profile.
- Vegetable Power: Finely grated carrots, zucchini (squeezed of excess moisture), or corn kernels can be folded into the batter for added texture and nutrients.
- Herbal Twist: Experiment with other fresh herbs like cilantro, parsley, dill, or even a hint of mint for different aromatic experiences.
- Spicy Kick: A pinch of red pepper flakes or a dash of your favorite hot sauce can be added directly to the batter for those who like a bit of heat.
- Sesame Sensation: Toast some sesame seeds and incorporate them into the batter for a nutty flavor and delightful crunch.
Serving Suggestions: While delicious on their own, these pancakes truly shine with a good dipping sauce. Besides our suggested soy-based sauce, consider a dollop of chili garlic sauce, a tangy yogurt dip, or even a simple squeeze of lime juice. They also make an excellent accompaniment to soups, stews, or grilled meats.
Storage and Reheating
These Savory Herb Pancakes are best enjoyed fresh off the pan, but they store and reheat surprisingly well, making them a great option for meal prepping or enjoying leftovers.
Storing Leftover Batter: If you have any uncooked batter left, transfer it to an airtight container and store it in the refrigerator for up to 2 days. Give it a good whisk before cooking, and you might need to add a touch more water if it has thickened.
Storing Cooked Pancakes: Allow the cooked pancakes to cool completely before storing. Stack them with a small piece of parchment paper between each pancake to prevent sticking. Place the stack in an airtight container or a resealable bag. They can be stored in the refrigerator for up to 3-4 days. For longer storage, cooked pancakes can be frozen for up to 1 month. Wrap individual pancakes tightly in plastic wrap, then place them in a freezer-safe bag.
Reheating:
- Skillet/Pan: This is the best method for restoring some crispness. Heat a non-stick skillet over medium heat with a tiny bit of oil. Reheat the pancakes for 1-2 minutes per side until warmed through and slightly crispy.
- Oven/Toaster Oven: Preheat your oven or toaster oven to 350°F (175°C). Place the pancakes in a single layer on a baking sheet and heat for 5-7 minutes, or until warmed through. This also helps to crisp them up.
- Microwave: While convenient, the microwave tends to make pancakes soft and less crispy. Reheat individual pancakes for 15-30 seconds, or until warm. This method is best if you don’t mind a softer texture.
Frequently Asked Questions
Can I make these pancakes gluten-free?
Yes, you can! Substitute the all-purpose flour with a 1:1 gluten-free all-purpose flour blend. Make sure your blend contains xanthan gum, or add about ¼ teaspoon per cup of flour, as this helps with the structure and elasticity of the pancake. The resting time for gluten-free batter is still beneficial.
What if my pancakes are sticking to the pan?
If your pancakes are sticking, there are a few potential culprits. First, ensure your pan is truly non-stick and well-seasoned if it’s cast iron. Second, make sure the pan is adequately heated before adding the batter – a cold pan is a sticky pan. Lastly, ensure you’re using enough oil to create a thin barrier between the pancake and the pan surface. Don’t be afraid to add a tiny bit more oil between batches if needed.
Can I prepare the batter ahead of time?
Absolutely! Preparing the batter ahead of time is a fantastic way to save time, especially for busy mornings or quick weeknight meals. You can mix the batter (without the baking powder, if using) and store it in an airtight container in the refrigerator for up to 1-2 days. Add the baking powder and a tiny splash of water (if needed to adjust consistency) just before cooking. Give it a good whisk to re-incorporate everything before pouring.
How do I get the pancakes to be thin and even?
Getting thin, even pancakes comes with practice! A few tips: ensure your batter consistency is right – it should be pourable. Use a consistent amount of batter for each pancake, usually ¼ cup is a good starting point. Immediately after pouring, gently tilt and swirl the pan to encourage the batter to spread into a thin circle. Don’t be afraid to use the back of your spoon or a spatula to gently guide the batter if it’s not spreading evenly on its own.