Introduction
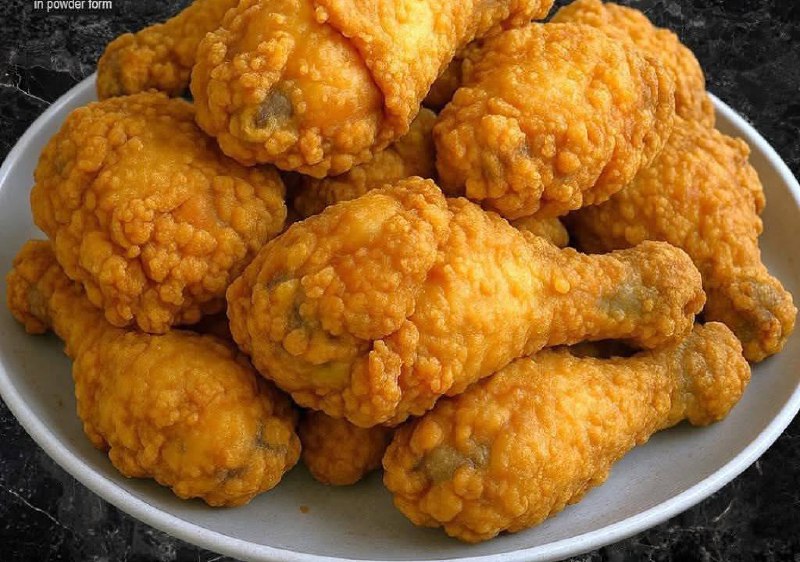
There’s something undeniably magical about a plate piled high with perfectly fried chicken drumsticks. The mere sight of that craggy, golden-brown crust promises an explosion of flavor and texture. It’s a culinary icon, a dish that evokes comfort, celebration, and pure, unadulterated joy. From backyard barbecues to family dinners, fried chicken has cemented its place in hearts and on tables worldwide. But let’s be honest, achieving that elusive balance of an ultra-crispy exterior and a supremely juicy, tender interior can feel like a culinary quest. Many have tried, some have succeeded, and others have ended up with either soggy skin or dry, overcooked meat.
Fear not, aspiring fried chicken masters! This guide is your definitive roadmap to crafting drumsticks that will have everyone reaching for seconds, and probably thirds. We’re talking about chicken so crunchy, you’ll hear it across the room, and so moist, it practically melts in your mouth. Forget the greasy, bland versions you might have encountered; this recipe focuses on technique, temperature, and a killer seasoning blend to deliver the fried chicken experience you’ve always dreamed of. Prepare to elevate your home cooking and become the hero of your next gathering with these irresistible, golden-fried beauties.
What makes this recipe truly special is our meticulous approach to every step, from the crucial brining process that locks in moisture and flavor, to the double-dredging method that creates that enviable, craggy crust. We’ll delve into the science of frying, ensuring your oil temperature is just right for maximum crispness without sacrificing internal juiciness. Get ready to transform humble drumsticks into a masterpiece of texture and taste – a dish that’s simple in its components but profound in its deliciousness.
Nutritional Information
Per serving (approximate values):
- Calories: 350-450
- Protein: 30-35g
- Carbohydrates: 15-20g
- Fat: 20-30g
- Fiber: 1-2g
- Sodium: 600-800mg
Ingredients
- 12 bone-in, skin-on chicken drumsticks (about 3-4 pounds total)
- For the Brine:
- 4 cups buttermilk
- 2 tablespoons salt
- 1 tablespoon black pepper
- 1 tablespoon garlic powder
- 1 tablespoon onion powder
- 1 teaspoon cayenne pepper (optional, for a little heat)
- For the Dry Dredge:
- 3 cups all-purpose flour
- 1/2 cup cornstarch (for extra crispiness)
- 2 tablespoons salt
- 1 tablespoon black pepper
- 1 tablespoon paprika (smoked or sweet)
- 1 tablespoon garlic powder
- 1 tablespoon onion powder
- 1 teaspoon dried thyme
- 1 teaspoon dried oregano
- 1/2 teaspoon cayenne pepper (adjust to your spice preference)
- 1/2 teaspoon baking powder (helps with crispness and lift)
- For Frying:
- 6-8 cups vegetable oil, peanut oil, or canola oil (enough to submerge chicken halfway in your pot)
Instructions
- Prepare the Brine: In a large bowl or a gallon-sized resealable bag, combine the buttermilk, 2 tablespoons salt, 1 tablespoon black pepper, 1 tablespoon garlic powder, 1 tablespoon onion powder, and 1 teaspoon cayenne pepper (if using). Whisk until the salt is dissolved and the spices are well distributed.
- Brine the Chicken: Add the chicken drumsticks to the buttermilk mixture, ensuring they are fully submerged. Cover the bowl or seal the bag and refrigerate for at least 4 hours, or preferably overnight (up to 24 hours). Brining is crucial for tender, flavorful, and juicy chicken.
- Prepare the Dry Dredge: In a large, shallow dish or another gallon-sized resealable bag, combine the all-purpose flour, cornstarch, 2 tablespoons salt, 1 tablespoon black pepper, 1 tablespoon paprika, 1 tablespoon garlic powder, 1 tablespoon onion powder, 1 teaspoon dried thyme, 1 teaspoon dried oregano, 1/2 teaspoon cayenne pepper, and 1/2 teaspoon baking powder. Whisk or shake vigorously to combine all the dry ingredients thoroughly.
- Remove and Dry Chicken: Once brining is complete, remove the chicken drumsticks from the buttermilk mixture. Do NOT rinse them. Allow excess buttermilk to drip off, then place the drumsticks on a wire rack set over a baking sheet. This step is important to allow some of the excess moisture to evaporate, which contributes to a crispier crust. Pat them lightly with paper towels if they seem overly wet.
- Dredge the Chicken (Double Dredge for Extra Crispiness): Working with one or two drumsticks at a time, place them into the dry dredge mixture. Toss to coat completely, pressing the flour mixture firmly onto the chicken to ensure every crevice is covered. For an extra craggy, crispy crust, dip the floured chicken back into the remaining buttermilk brine (just a quick dip to re-moisten the flour), then immediately return it to the dry dredge for a second coating. Press the flour on firmly again. Shake off any excess flour. Place the double-dredged drumsticks back on the wire rack. Repeat with all remaining chicken pieces.
- Rest the Dredged Chicken: Allow the breaded chicken to rest on the wire rack for at least 15-30 minutes at room temperature. This resting period allows the flour coating to hydrate and adhere better to the chicken, preventing it from falling off during frying and contributing to a crispier crust.
- Preheat Frying Oil: While the chicken rests, pour 6-8 cups of vegetable oil (or your preferred frying oil) into a large, heavy-bottomed pot or Dutch oven. The oil should be deep enough to submerge the drumsticks halfway. Attach a deep-fry thermometer to the side of the pot and heat the oil over medium-high heat until it reaches a consistent temperature of 325-350°F (160-175°C). Maintaining the correct oil temperature is critical for perfectly cooked fried chicken.
- Begin Frying: Carefully lower 3-4 drumsticks into the hot oil, ensuring not to overcrowd the pot. Overcrowding will drastically drop the oil temperature, leading to greasy, soggy chicken.
- Fry the Chicken: Fry the chicken for 6-8 minutes per side, turning occasionally with tongs, until deep golden brown and cooked through. The total frying time will typically be between 12-18 minutes, depending on the size of the drumsticks and the consistency of your oil temperature. Use your deep-fry thermometer to monitor the oil temperature, adjusting the heat as needed to keep it within the 325-350°F range. If the temperature drops too low, the chicken will absorb too much oil; if it gets too high, the outside will burn before the inside cooks.
- Check for Doneness: The best way to ensure chicken is cooked through is to use an instant-read meat thermometer. Insert it into the thickest part of a drumstick, avoiding the bone. The internal temperature should register 165°F (74°C).
- Drain and Rest: Once cooked, carefully remove the drumsticks from the oil and place them on a clean wire rack set over a baking sheet lined with paper towels. This allows excess oil to drip off and helps maintain crispness. Season lightly with a pinch of extra salt immediately after removing from the oil.
- Repeat and Serve: Allow the oil to return to the proper temperature before frying the next batch of chicken. Serve your crispy golden fried chicken drumsticks hot, with your favorite sides.
Cooking Tips and Variations
Achieving truly exceptional fried chicken often comes down to mastering a few key techniques and being open to delightful variations. Here are some pointers to elevate your frying game and customize your drumsticks.
The Importance of Brining: Do not skip the buttermilk brine! It’s not just for flavor; the lactic acid in buttermilk tenderizes the chicken meat, making it incredibly juicy. The salt in the brine also helps the chicken retain moisture during cooking. For an extra flavor boost, infuse your buttermilk with fresh herbs like rosemary or sage, or a few smashed garlic cloves.
Achieving the Craggy Crust: The secret to that beautiful, bumpy, extra-crispy crust lies in a few steps. First, the cornstarch in the dry dredge is crucial; it helps create a lighter, crispier coating than flour alone. Second, the double-dredging method (chicken into dry, back into wet, then back into dry) builds layers that fry up into those desirable crags. Finally, the baking powder in the dry dredge reacts with the heat, creating tiny air bubbles that contribute to a lighter, more airy crispness.
Oil Temperature is King: This cannot be stressed enough. Invest in a good deep-fry thermometer. If the oil is too cold, your chicken will be greasy and soggy as it slowly absorbs the oil. If it’s too hot, the outside will burn before the inside fully cooks. Aim for a consistent 325-350°F (160-175°C). Overcrowding the pot will drop the temperature, so fry in batches.
Don’t Rush the Rest: Allowing the breaded chicken to rest for 15-30 minutes before frying is a small step with a big impact. It gives the flour mixture time to absorb moisture from the chicken and the buttermilk, creating a stronger bond that’s less likely to slough off in the hot oil. This also contributes to a thicker, more adherent crust.
The Right Pot Matters: Use a heavy-bottomed pot or Dutch oven. These types of pots distribute heat more evenly and retain heat better, which helps maintain a consistent oil temperature, even when you add cold chicken.
Seasoning Beyond the Dredge: A final sprinkle of salt (and sometimes a pinch of your favorite spice blend) immediately after the chicken comes out of the hot oil is a game-changer. The hot oil helps the salt adhere and enhances the overall flavor.
Variations for Flavor:
- Spicy Kick: Increase the cayenne pepper in both the brine and the dry dredge. You can also add a tablespoon of your favorite hot sauce to the buttermilk brine.
- Herb Garden: Incorporate finely chopped fresh herbs like rosemary, thyme, or sage into your dry dredge for an aromatic twist.
- Smoky Flavor: Use smoked paprika in your dry dredge for a deeper, richer flavor profile. A pinch of chipotle powder can also add a subtle smokiness and heat.
- Garlic Lover’s Dream: Double the garlic powder in both the brine and dredge, and consider adding a teaspoon of granulated garlic to the dry dredge for an intense garlic flavor.
- Gluten-Free Option: While the texture will be slightly different, you can substitute the all-purpose flour with a gluten-free all-purpose flour blend (one that contains xanthan gum) and cornstarch.
Serving Suggestions: Classic pairings include creamy mashed potatoes, tangy coleslaw, fluffy biscuits, or sweet corn on the cob. For a lighter touch, serve with a crisp green salad. Don’t forget a side of your favorite hot sauce or honey for dipping!
Storage and Reheating
While fried chicken is undoubtedly best enjoyed fresh, hot, and crispy straight from the fryer, sometimes you’ll have leftovers. With proper storage and reheating techniques, you can still enjoy delicious, albeit slightly less crispy, chicken the next day.
Storage:
- Cool Completely: Before storing, allow the fried chicken to cool completely on a wire rack at room temperature. Placing warm chicken directly into an airtight container will trap moisture, making the crust soggy.
- Airtight Container: Once cooled, transfer the drumsticks to an airtight container. You can place a paper towel at the bottom of the container to absorb any residual moisture, and another one on top before sealing.
- Refrigeration: Store the container in the refrigerator for up to 3-4 days.
- Freezing: For longer storage, frozen fried chicken can last for up to 2-3 months. Arrange cooled drumsticks in a single layer on a baking sheet and freeze until solid (this prevents them from sticking together). Once frozen, transfer them to a freezer-safe bag or container, removing as much air as possible.
Reheating:
The key to reheating fried chicken is to get it hot and crispy again without drying it out. Avoid the microwave if you want any semblance of crispness; it will only make the crust soggy.
- Oven Method (Best for Crispness):
- Preheat your oven to 375°F (190°C).
- Place a wire rack on a baking sheet. Arrange the cold fried chicken drumsticks in a single layer on the wire rack, ensuring there’s space between each piece for air circulation.
- Bake for 15-25 minutes, or until the chicken is heated through and the skin is crispy again. For frozen chicken, you may need to increase the baking time to 30-45 minutes.
- Check the internal temperature with a meat thermometer; it should reach 165°F (74°C).
- Air Fryer Method (Excellent for Crispness):
- Preheat your air fryer to 350°F (175°C).
- Place the cold drumsticks in a single layer in the air fryer basket, ensuring not to overcrowd. Work in batches if necessary.
- Air fry for 8-12 minutes, flipping halfway through, until heated through and crispy. For frozen chicken, add an additional 5-10 minutes.
- Check the internal temperature to ensure it reaches 165°F (74°C).
- Skillet Method (Good for a quick crisp-up):
- Heat a cast iron skillet or heavy-bottomed pan over medium heat with a tablespoon or two of oil.
- Once hot, add the cold drumsticks and cook for 3-5 minutes per side, until the skin is crispy and the chicken is heated through.
- This method works best for just a few pieces and can be a bit more hands-on.
Frequently Asked Questions
Why is my fried chicken soggy instead of crispy?
Soggy fried chicken is a common frustration, often caused by a few key issues. The most frequent culprit is oil temperature that is too low. When the oil isn’t hot enough, the chicken coating absorbs too much oil instead of quickly crisping up. Overcrowding the pot also lowers the oil temperature significantly. Other factors include not allowing the breaded chicken to rest before frying (which helps the coating adhere), not draining excess oil on a wire rack after frying, or storing it in an airtight container while still warm, which traps steam and makes the crust soft.
How do I ensure my chicken is cooked through without burning the outside?
The secret here lies in precise oil temperature control and using a meat thermometer. Maintain your frying oil between 325-350°F (160-175°C). If the oil gets too hot, the exterior will brown too quickly. If it’s too cool, it will cook too slowly and become greasy. Frying in batches helps maintain temperature. Always use an instant-read meat thermometer inserted into the thickest part of the drumstick (avoiding the bone) to ensure an internal temperature of 165°F (74°C). This guarantees the chicken is safely cooked without being overdone or undercooked.
Can I make this recipe with other cuts of chicken?
Absolutely! This recipe works wonderfully with other bone-in, skin-on chicken pieces like thighs, wings, or even breasts (though breasts can dry out more easily). The key is to adjust frying times accordingly. Thighs will take a similar amount of time to drumsticks, while wings will cook faster (around 8-12 minutes total). Chicken breasts might require a slightly lower oil temperature (around 320°F / 160°C) and careful monitoring to prevent drying. Always use a meat thermometer to ensure proper doneness for any cut.
What’s the purpose of cornstarch and baking powder in the dredge?
Both cornstarch and baking powder play crucial roles in achieving that irresistible crispy, craggy crust. Cornstarch, when added to flour, helps to create a lighter, crispier, and more delicate coating because it contains less gluten than wheat flour. This results in a superior crunch that holds up well. Baking powder, on the other hand, is a leavening agent. When it comes into contact with the hot oil, it releases carbon dioxide bubbles, which expand and create tiny pockets of air within the coating. This makes the crust lighter, puffier, and even more craggy and crisp, giving it an almost shattering texture.