Introduction
Imagine a dish that’s a warm embrace on a plate, a symphony of rich tomato sauce, creamy cheese, and perfectly cooked pasta. That, my friends, is Italian Stuffed Shells. This classic comfort food holds a special place in the hearts of many, instantly transporting you to a bustling Italian-American kitchen, perhaps on a Sunday afternoon, where the aroma of garlic and simmering sauce fills the air. It’s a dish that speaks of tradition, family gatherings, and the simple joy of sharing a homemade meal.
Stuffed shells, or “conchiglioni ripieni” as they’re known in Italy, have evolved into an iconic fixture in American cuisine, particularly within Italian-American communities. While the concept of stuffing pasta is ancient, the generous, cheesy filling we associate with stuffed shells today is a testament to the culinary ingenuity of immigrants who adapted traditional recipes with readily available ingredients. It’s more than just a meal; it’s a celebration of heritage, a dish passed down through generations, each family adding their unique touch.
What makes this particular recipe special is its perfect balance of authentic flavor and ease of preparation. We’re going to guide you through creating a lusciously creamy ricotta filling, encased in tender pasta shells, all swimming in a vibrant marinara sauce and crowned with bubbly, golden-brown mozzarella. Whether you’re a seasoned cook or a kitchen novice, this recipe promises a hearty, satisfying, and undeniably delicious meal that will become a beloved staple in your home.
Nutritional Information
Per serving (approximate values, based on 8 servings with meat):
- Calories: 550
- Protein: 35g
- Carbohydrates: 45g
- Fat: 28g
- Fiber: 4g
- Sodium: 950mg
Ingredients
- 1 (12-ounce) box large pasta shells (conchiglioni)
- 1 tablespoon olive oil
- 1 pound ground beef or Italian sausage (mild or hot), optional
- 1 medium yellow onion, finely diced
- 3 cloves garlic, minced
- 1 (15-ounce) container whole milk ricotta cheese
- 2 cups shredded low-moisture, part-skim mozzarella cheese, divided
- 1/2 cup grated Parmesan cheese, plus more for topping
- 1 large egg, lightly beaten
- 1/4 cup fresh parsley, chopped, plus more for garnish
- 1 teaspoon dried oregano
- 1/2 teaspoon salt, or to taste
- 1/4 teaspoon black pepper, or to taste
- Pinch of red pepper flakes (optional)
- 1 (24-ounce) jar high-quality marinara sauce, or 3 cups homemade
Instructions
- Preheat your oven to 375°F (190°C). Lightly grease a 9×13-inch baking dish.
- Cook the pasta shells according to package directions, but reduce the cooking time by 2-3 minutes to ensure they are al dente and slightly firm. You want them pliable but not mushy, as they will finish cooking in the oven. Drain well and rinse with cold water to prevent sticking. Lay them out on a baking sheet or clean kitchen towel to cool slightly.
- If using meat, heat the olive oil in a large skillet over medium heat. Add the ground beef or Italian sausage and cook, breaking it up with a spoon, until browned and cooked through. Drain off any excess fat and set aside.
- In the same skillet (if using meat) or a separate pan, add the diced onion and cook until softened, about 5-7 minutes. Add the minced garlic and cook for another minute until fragrant. Remove from heat and let cool slightly.
- In a large bowl, combine the ricotta cheese, 1 cup of the shredded mozzarella, 1/2 cup Parmesan cheese, the lightly beaten egg, chopped fresh parsley, dried oregano, salt, black pepper, and red pepper flakes (if using). If you cooked meat, add the cooled ground beef or sausage and the cooked onion and garlic mixture to the cheese mixture. Mix everything until well combined. Taste the filling and adjust seasonings as needed.
- Spread about 1 cup of marinara sauce evenly over the bottom of the prepared 9×13-inch baking dish. This prevents the shells from sticking and adds moisture.
- Carefully stuff each cooked pasta shell with the cheese and meat filling. You can use a small spoon or, for easier and cleaner stuffing, transfer the filling to a piping bag (or a large Ziploc bag with the corner snipped off) and pipe it into the shells.
- Arrange the stuffed shells snugly in a single layer in the baking dish over the marinara sauce.
- Pour the remaining marinara sauce evenly over the stuffed shells, ensuring most of them are covered.
- Sprinkle the remaining 1 cup of shredded mozzarella cheese and a little extra Parmesan cheese over the top of the shells and sauce.
- Cover the baking dish tightly with aluminum foil.
- Bake for 25 minutes.
- Remove the foil and continue baking for another 15-20 minutes, or until the cheese is melted, bubbly, and lightly golden brown, and the sauce is simmering.
- Remove from the oven and let the stuffed shells rest for 5-10 minutes before serving. This allows the cheese and filling to set, making them easier to serve without the filling oozing out.
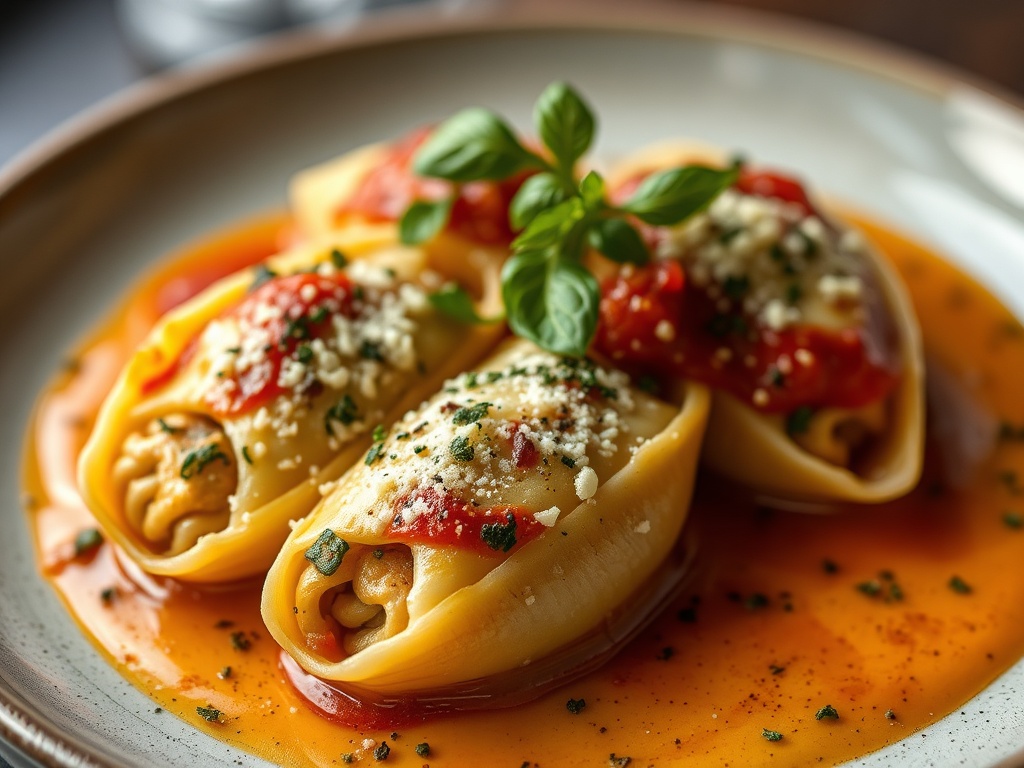
- Garnish with additional fresh parsley or Parmesan cheese, if desired, and serve hot.
Cooking Tips and Variations
For the creamiest filling, always opt for whole milk ricotta cheese. The higher fat content contributes significantly to its luxurious texture. If you’re concerned about excess moisture, you can drain the ricotta for about 30 minutes in a fine-mesh sieve lined with cheesecloth before mixing it with other ingredients. This step is particularly helpful if your ricotta seems very wet, preventing a watery filling.
When cooking the pasta shells, remember the “al dente” rule, but take it a step further by undercooking them slightly. They should still have a good bite to them. If they are too soft, they will tear easily during stuffing and become mushy in the oven. Rinsing them with cold water after draining not only stops the cooking process but also prevents them from sticking together, making the stuffing process much smoother.
Don’t skip the step of spreading a thin layer of sauce at the bottom of the baking dish. This acts as a protective barrier, preventing the pasta shells from drying out and sticking to the pan, ensuring every bite is moist and flavorful. Similarly, covering the dish with foil for the initial baking period is crucial. It traps steam, allowing the shells to finish cooking gently and the flavors to meld without the cheese browning too quickly or the pasta drying out. Removing the foil at the end then allows for that irresistible golden, bubbly cheese crust.
For a delightful vegetarian option, swap out the meat for a sautéed mixture of spinach and mushrooms. To do this, sauté 10 ounces of fresh spinach until wilted, then squeeze out as much excess liquid as possible before adding it to the ricotta mixture. Sauté 8 ounces of sliced mushrooms until browned and the liquid has evaporated, then incorporate them into the filling as well. You can also add other roasted vegetables like diced bell peppers or zucchini for added flavor and texture.
Experiment with different cheeses to customize the flavor profile. While ricotta, mozzarella, and Parmesan are the holy trinity, consider adding a touch of provolone for a sharper flavor, or some smoked mozzarella for a smoky undertone. For a tangier twist, a small amount of goat cheese can be mixed into the ricotta filling. If you’re feeling adventurous, try a creamy béchamel sauce or a spicy vodka sauce instead of marinara for a different take on the classic.
If you prefer a lighter meat option, ground turkey or even shredded cooked chicken can be used in place of ground beef or Italian sausage. Ensure the ground turkey is well-seasoned, as it can be milder in flavor. For an extra layer of flavor, consider adding a tablespoon of tomato paste to the meat as it browns, allowing it to caramelize slightly before adding the onions and garlic.
Storage and Reheating
Italian Stuffed Shells are fantastic for make-ahead meals and leftovers. If you plan to assemble them ahead of time, prepare the dish up to the point of baking, but do not bake. Cover the baking dish tightly with plastic wrap and refrigerate for up to 2 days. When ready to bake, remove from the refrigerator at least 30 minutes before baking to allow it to come closer to room temperature, then bake as directed, adding an extra 10-15 minutes to the covered baking time to ensure it heats through properly.
For freezing, stuffed shells freeze exceptionally well, making them an excellent meal-prep option. You can freeze them either baked or unbaked. If freezing unbaked, assemble the shells in a freezer-safe baking dish, cover tightly with several layers of plastic wrap and then aluminum foil, and freeze for up to 3 months. To bake from frozen, remove the plastic wrap, cover with foil, and bake at 375°F (190°C) for about 60-75 minutes, then remove the foil and bake for an additional 15-20 minutes, or until bubbly and heated through.
If freezing baked shells, allow the dish to cool completely. You can freeze the entire dish or individual portions in airtight containers. Thaw overnight in the refrigerator before reheating. Leftover baked stuffed shells can be stored in an airtight container in the refrigerator for up to 3-4 days.
To reheat individual portions from the refrigerator, you can use a microwave on medium power until heated through, stirring occasionally. For larger portions or to retain a crispier cheese topping, reheat in a preheated oven at 350°F (175°C), covered with foil, for 20-30 minutes, or until heated through. Uncover for the last few minutes if you want to crisp up the cheese. If the sauce seems a little dry, you can add a splash of water or extra marinara before reheating.
Frequently Asked Questions
Can I make stuffed shells without cooking the pasta first?
While some recipes for lasagna or certain baked pasta dishes allow for uncooked pasta, it is generally not recommended for stuffed shells. The large shells need to be pliable enough to stuff without breaking, and cooking them al dente beforehand ensures they reach the perfect texture when baked. Attempting to bake them from raw would likely result in undercooked, hard pasta or shells that completely fall apart.
How can I prevent my stuffed shells from being watery?
Several factors can contribute to a watery filling. First, ensure you use whole milk ricotta, which is less prone to releasing excessive liquid than part-skim or fat-free varieties. If your ricotta seems particularly wet, drain it in a fine-mesh sieve lined with cheesecloth for at least 30 minutes before mixing. Additionally, if using spinach, make sure to squeeze out all excess water after cooking. Finally, a good quality, thick marinara sauce will also help prevent the dish from becoming watery.
Can I prepare the filling ahead of time?
Absolutely! The filling can be prepared up to 24 hours in advance. Store it in an airtight container in the refrigerator. This is a great time-saving tip for busy days. When you’re ready to assemble, simply take the filling out of the fridge about 30 minutes beforehand to make it easier to work with, as it will have firmed up slightly when chilled.
What’s the best way to stuff the shells without making a mess?
For a clean and efficient stuffing process, a piping bag (or a large freezer bag with one corner snipped off) is your best friend. Fill the bag with the cheese mixture, then pipe the filling directly into each shell. This method is much tidier and often faster than using a spoon, especially for larger batches. If using a spoon, a small teaspoon or a demitasse spoon works well, allowing for precise placement of the filling.