Introduction
There’s a certain magic that happens when sizzling strips of marinated chicken and vibrant bell peppers hit a hot pan, filling your kitchen with an irresistible aroma. That’s the allure of fajitas! Originating from the Texas-Mexico border regions, where “faja” (meaning “strip” or “belt”) referred to the cut of meat, fajitas have evolved into a global favorite. While traditionally served on a sizzling cast-iron skillet, our take transforms this beloved dish into convenient, customizable, and utterly delicious wraps, perfect for any night of the week.
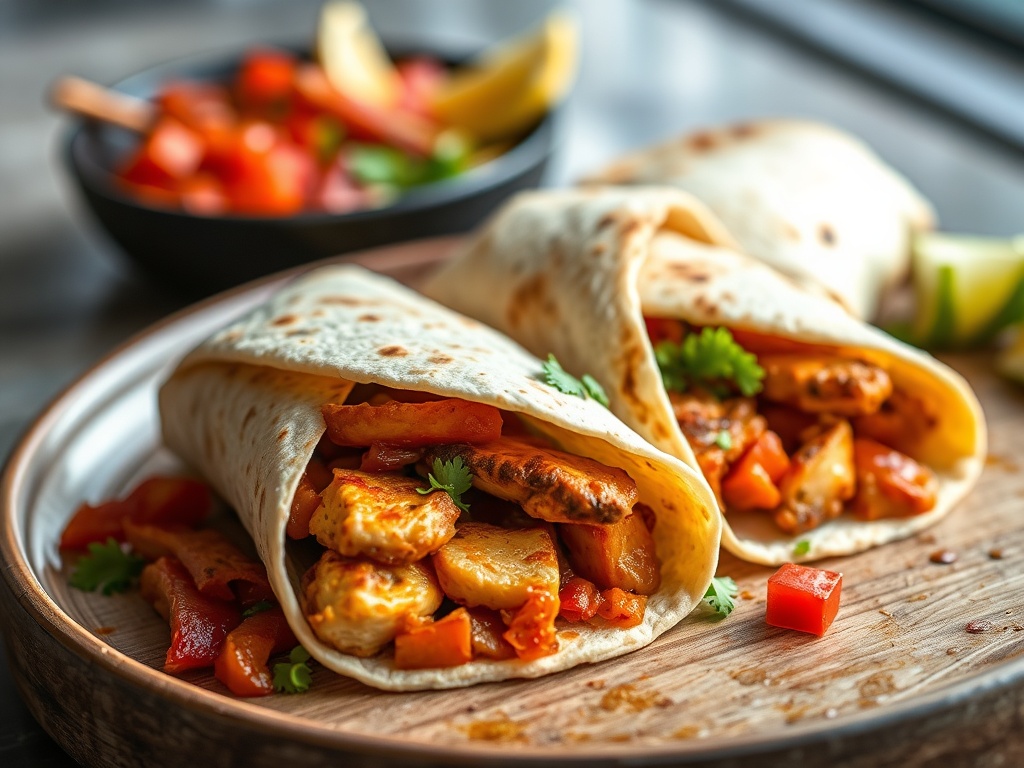
These Sizzling Chicken Fajita Wraps are more than just a meal; they’re a flavor fiesta! Picture tender, juicy chicken, perfectly seasoned and cooked to perfection, mingling with sweet, tender-crisp bell peppers and onions. All wrapped up in a warm tortilla with your favorite toppings, it’s a dish that promises both excitement and comfort. We’ve streamlined the process to make it incredibly easy and quick, proving that even on the busiest weeknights, you can bring an explosion of authentic Mexican-inspired flavors to your family’s table. Forget takeout – this homemade version is guaranteed to become a new family favorite.
What makes these fajita wraps truly special is their blend of convenience, customization, and incredible taste. They’re a fantastic solution for a quick meal that doesn’t compromise on flavor. Whether you’re a seasoned chef or a kitchen novice, this recipe guides you through creating a dish that’s both satisfying and visually appealing. The vibrant colors, the tantalizing smells, and the interactive assembly make it a fun and engaging meal for everyone. Get ready to experience the deliciousness and simplicity of these sensational chicken fajita wraps!
Nutritional Information
Per serving (approximate values):
- Calories: 450 kcal
- Protein: 35g
- Carbohydrates: 30g
- Fat: 22g
- Fiber: 5g
- Sodium: 850mg
Ingredients
- 1.5 lbs boneless, skinless chicken breasts or thighs, thinly sliced against the grain
- 2 tablespoons olive oil, divided
- 1 large yellow onion, thinly sliced
- 3 bell peppers (any color – red, yellow, green, orange), thinly sliced
- 8-10 medium flour tortillas (6-8 inches)
- 2 tablespoons fresh lime juice
-
For the Homemade Fajita Seasoning:
- 1 tablespoon chili powder
- 1 teaspoon ground cumin
- 1 teaspoon smoked paprika
- 1/2 teaspoon garlic powder
- 1/2 teaspoon onion powder
- 1/4 teaspoon dried oregano
- 1/2 teaspoon salt (or to taste)
- 1/4 teaspoon black pepper (or to taste)
-
For Serving (Optional Toppings):
- Sour cream or Greek yogurt
- Salsa (store-bought or homemade)
- Guacamole or sliced avocado
- Shredded cheese (cheddar, Monterey Jack, or a blend)
- Fresh cilantro, chopped
- Jalapeños, sliced (fresh or pickled)
- Hot sauce
Instructions
- Prepare the Chicken and Marinade: In a medium bowl, combine the thinly sliced chicken with 1 tablespoon of olive oil, 2 tablespoons of fresh lime juice, and all the homemade fajita seasoning ingredients (chili powder, cumin, smoked paprika, garlic powder, onion powder, oregano, salt, and pepper). Toss well to ensure the chicken is evenly coated. For best flavor and tenderness, allow the chicken to marinate for at least 30 minutes at room temperature, or in the refrigerator for up to 2 hours. Do not marinate with lime juice overnight, as it can “cook” the chicken and alter its texture.
- Sauté the Vegetables: Heat the remaining 1 tablespoon of olive oil in a large skillet or cast-iron pan over medium-high heat. Add the sliced onions and bell peppers. Sauté for 5-7 minutes, stirring occasionally, until the vegetables are tender-crisp and slightly charred. You want them to retain a bit of bite and not become mushy. Remove the cooked vegetables from the skillet and set them aside on a plate.
- Cook the Chicken: Increase the heat to high. Add the marinated chicken to the hot skillet in a single layer, ensuring not to overcrowd the pan. If necessary, cook the chicken in batches to achieve a good sear. Cook for 3-5 minutes per side, or until the chicken is cooked through, golden brown, and slightly charred at the edges. Cook time will vary based on the thickness of your chicken strips.
- Combine and Finish: Once the chicken is fully cooked, return the sautéed bell peppers and onions to the skillet with the chicken. Toss everything together for 1-2 minutes to combine the flavors and ensure the vegetables are heated through. Remove the skillet from the heat.
- Warm the Tortillas: While the chicken and vegetables are cooking, warm your tortillas. You can do this in several ways:
- Dry Pan: Heat a dry skillet over medium-high heat. Place one tortilla at a time in the hot pan for 15-20 seconds per side, until soft and pliable with a few browned spots.
- Microwave: Wrap a stack of 5-6 tortillas in a damp paper towel and microwave for 30-60 seconds, or until warm and flexible.
- Oven: Wrap a stack of tortillas in aluminum foil and bake at 300°F (150°C) for 10-15 minutes.
Keep the warmed tortillas wrapped in a clean kitchen towel or foil to maintain their warmth and flexibility.
- Assemble and Serve: Bring the sizzling chicken and vegetable mixture, warmed tortillas, and all your desired toppings to the table. Encourage everyone to build their own fajita wraps. Spoon a generous amount of the chicken and veggie mixture onto a warm tortilla, then add your favorite toppings such as sour cream, salsa, guacamole, shredded cheese, fresh cilantro, or jalapeños. Fold and enjoy immediately!
Cooking Tips and Variations
Achieving the perfect fajita experience is all about flavor and texture. For the most tender chicken, always slice it against the grain. This shortens the muscle fibers, resulting in a more pleasant bite. Don’t be afraid to crank up the heat when cooking both the chicken and vegetables; high heat is crucial for that authentic “sizzle” and a delicious sear without overcooking. When searing the chicken, avoid overcrowding your pan. Cooking in batches ensures each piece gets direct contact with the hot surface, leading to better caramelization and preventing the chicken from steaming. Remember, the marinade is your best friend here; it not only infuses flavor but also helps tenderize the meat, making it less prone to drying out during cooking.
Customization is at the heart of fajitas. If you prefer a spicier kick, increase the amount of chili powder or add a pinch of cayenne pepper to your seasoning blend. A dash of red pepper flakes during cooking will also do the trick. For those who love a smoky flavor, a few drops of liquid smoke can be added to the marinade, or you can use smoked paprika, as suggested. If you’re looking for a vegetarian alternative, this recipe is incredibly versatile. Portobello mushrooms, sliced halloumi cheese, or your favorite plant-based chicken strips make excellent substitutes for the chicken. Simply follow the same cooking steps, adjusting times as needed for your chosen ingredient. For a gluten-free option, swap out flour tortillas for corn tortillas or serve your fajita mixture in lettuce cups or over rice for a delicious fajita bowl. Don’t forget that fajitas can extend beyond wraps; they make fantastic salad toppers or even a filling for quesadillas. The possibilities are endless!
Storage and Reheating
Storing your leftover chicken fajita mixture properly ensures you can enjoy it for days to come. Allow the cooked chicken and vegetable mixture to cool completely to room temperature before transferring it to an airtight container. Refrigerate promptly within two hours of cooking. It will stay fresh in the refrigerator for up to 3-4 days. This makes fajitas an excellent option for meal prepping; you can cook a larger batch and portion it out for lunches or quick dinners throughout the week. Store any leftover toppings, such as salsa, guacamole, or sour cream, in separate airtight containers in the refrigerator as well.
When it comes to reheating, you want to preserve the delicious flavors and textures. For the best results, reheat the chicken and vegetable mixture in a skillet over medium heat. Add a splash of water or chicken broth to prevent drying and stir occasionally until heated through, about 5-7 minutes. This method helps to restore some of that initial “sizzle.” Alternatively, you can reheat it in the microwave in a microwave-safe dish. Cover loosely and heat in 1-minute intervals, stirring in between, until piping hot. Be careful not to overheat, as this can make the chicken dry. Always warm your tortillas fresh each time you serve to keep them soft and pliable, as reheated tortillas can become stiff or brittle.
Frequently Asked Questions
What’s the best way to slice chicken for fajitas?
For the most tender chicken, slice it against the grain into thin strips, about 1/4 to 1/2 inch thick. Slicing against the grain shortens the muscle fibers, which results in a more tender and enjoyable bite. If using chicken breasts, you might want to butterfly them first to create thinner pieces before slicing into strips.
Can I make the fajita seasoning ahead of time?
Absolutely! Preparing your homemade fajita seasoning in advance is a great time-saver. Simply mix all the seasoning ingredients together and store them in an airtight container in a cool, dark place. It will stay fresh and potent for several months, making it readily available whenever a fajita craving strikes.
What if I don’t have fresh lime juice?
While fresh lime juice offers the best flavor and acts as a natural tenderizer, you can use bottled lime juice as a substitute in a pinch. However, be aware that the flavor might not be as bright. If you have no lime juice at all, a splash of white vinegar or even a little orange juice can provide some acidity to the marinade, though the flavor profile will shift slightly.
How can I prevent my tortillas from breaking when I roll them?
The key to pliable, easy-to-roll tortillas is proper warming. Cold or dry tortillas will inevitably crack. Always warm your tortillas just before serving. Whether you use a dry skillet, microwave, or oven, ensure they are heated until soft and flexible. Keeping them wrapped in a clean kitchen towel after warming will also help retain their heat and moisture, preventing them from drying out.