Introduction
There’s something undeniably comforting and utterly delicious about a freshly made savory flatbread, especially one infused with vibrant herbs. Imagine a delicate, golden-brown disc, crispy at the edges yet wonderfully tender within, each bite bursting with the aromatic essence of fresh green onions and other delightful seasonings. This isn’t just any pancake; it’s a versatile culinary chameleon, equally at home as a quick breakfast, a satisfying snack, or a delightful accompaniment to a more elaborate meal. Its popularity spans cultures, from the iconic Chinese scallion pancake to various herb-infused griddle breads found across Asia and beyond, cherished for its simplicity and profound flavor.
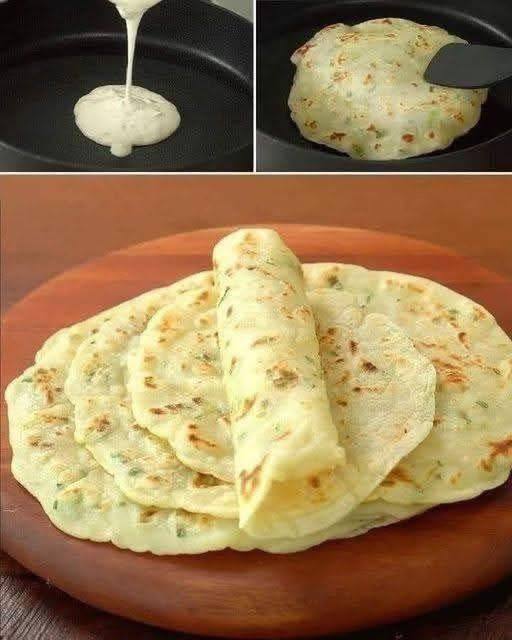
What makes this particular savory flatbread so special is its incredible balance of textures and tastes. The thin batter, when expertly cooked in a hot pan, transforms into a light, almost crepe-like base that serves as the perfect canvas for the herbaceous additions. The subtle sweetness of the flour combined with the sharp, fresh notes of green onions creates a harmonious flavor profile that is both familiar and exciting. It’s a dish that evokes a sense of home cooking, a testament to the idea that some of the most memorable meals are often the least complicated. Plus, the visual appeal of those bright green flecks against the golden backdrop is simply irresistible.
Beyond its deliciousness, this savory herb flatbread is also remarkably easy to prepare, making it an ideal choice for both novice cooks and seasoned culinary enthusiasts looking for a quick yet impactful dish. With a handful of pantry staples and a few fresh herbs, you can whip up a batch of these delectable flatbreads in no time. The process is straightforward, involving a simple batter, a hot pan, and a little patience to achieve that perfect golden hue. Once you master the basic technique, the possibilities for customization are endless, allowing you to tailor the flavors to your exact preferences. Get ready to impress your taste buds and your loved ones with this truly irresistible creation!
Nutritional Information
Per serving (approximate values, based on 1 of 6 flatbreads):
- Calories: 210 kcal
- Protein: 6g
- Carbohydrates: 30g
- Fat: 7g
- Fiber: 2g
- Sodium: 250mg
Ingredients
- 1 ½ cups all-purpose flour
- ½ teaspoon baking powder
- ¼ teaspoon salt
- ¼ teaspoon black pepper
- 1 cup cold water (or milk for a richer flavor)
- 3 large green onions (scallions), thinly sliced (about ½ cup)
- 2 tablespoons fresh parsley, finely chopped
- 1 tablespoon fresh cilantro, finely chopped (optional)
- 1 tablespoon neutral oil (such as vegetable, canola, or grapeseed) for the batter
- 2-3 tablespoons neutral oil for cooking (more as needed)
- Optional: Pinch of red pepper flakes for a subtle kick
Instructions
- In a large mixing bowl, whisk together the all-purpose flour, baking powder, salt, and black pepper. If using red pepper flakes, add them now.
- Gradually pour in the cold water (or milk) into the dry ingredients, whisking continuously until a smooth batter forms. The batter should be slightly thinner than pancake batter, pourable but not watery. Ensure there are no lumps of flour.
- Stir in the thinly sliced green onions, finely chopped parsley, and optional cilantro into the batter. Add 1 tablespoon of neutral oil to the batter and stir gently to combine. This helps to create a more tender flatbread.
- Cover the bowl with plastic wrap or a clean kitchen towel and let the batter rest at room temperature for at least 15-20 minutes. This allows the flour to fully hydrate, resulting in a more tender and pliable flatbread.
- Heat a large non-stick skillet or griddle over medium heat. Add about 1 teaspoon of neutral oil to the pan and swirl to coat the bottom evenly.
- Once the pan is hot (a drop of water should sizzle), pour approximately ¼ cup of the batter into the center of the pan. Immediately tilt and swirl the pan to spread the batter into a thin, even circle, about 6-8 inches in diameter. You might need to adjust the amount of batter depending on your desired thickness and pan size.
- Cook for 2-3 minutes on the first side, or until the edges begin to look set and the bottom is golden brown and speckled. You’ll see small bubbles forming on the surface.
- Carefully slide a thin spatula underneath the flatbread and flip it over. Cook for another 1-2 minutes on the second side, until golden brown and cooked through. The flatbread should feel firm to the touch when gently pressed.
- Remove the cooked flatbread from the pan and place it on a plate. If serving immediately, you can stack them or roll them loosely.
- Repeat the process with the remaining batter, adding a little more oil to the pan before cooking each subsequent flatbread, if needed. Keep the cooked flatbreads warm by covering them loosely with foil or placing them in a low oven (around 200°F / 95°C) while you finish cooking the rest.
- Serve warm, either plain or with your favorite dipping sauce.
Cooking Tips and Variations
For the best results with your savory herb flatbreads, attention to a few key details can make all the difference. Firstly, the consistency of your batter is crucial. It should be thin enough to pour and spread easily in the pan, allowing for a delicate and tender flatbread, but not so thin that it’s watery and lacks body. If your batter seems too thick after resting, add a tablespoon of cold water at a time until the desired consistency is achieved. Conversely, if it’s too thin, a spoonful of flour can help thicken it. Don’t skip the resting time for the batter; this allows the gluten to relax and the flour to fully absorb the liquid, leading to a much more tender and less “gummy” flatbread.
Heat management is another vital aspect. Cook these flatbreads over medium heat. If the pan is too hot, the outside will burn before the inside cooks through, resulting in a charred exterior and a raw interior. If the pan is too cool, the flatbreads will take too long to cook, becoming dry and tough. A good indicator of the right temperature is when a drop of water sizzles gently on the pan’s surface. Use just enough oil to lightly coat the pan for each flatbread; too much oil will make them greasy, while too little will cause them to stick. A pastry brush can be helpful for evenly distributing a small amount of oil.
When it comes to variations, the possibilities are vast. Feel free to experiment with different herbs; chives, dill, or even a touch of finely minced rosemary can add wonderful depth. For a spicier kick, increase the red pepper flakes or add a pinch of cayenne pepper to the batter. You can also incorporate finely grated vegetables like carrots or zucchini (ensure they are well-drained to prevent a watery batter) for added nutrition and texture. A sprinkle of grated Parmesan cheese or nutritional yeast in the batter can introduce a savory, umami note. For a heartier option, consider adding a tablespoon of cooked, crumbled bacon or finely diced ham. You can also try using a mix of flours, such as a portion of whole wheat flour for a nuttier flavor and increased fiber, though this may require a slight adjustment in liquid. Finally, don’t be afraid to adjust the seasoning to your taste; a little more salt or pepper can really bring out the flavors.
Storage and Reheating
Proper storage and reheating are key to enjoying your savory herb flatbreads beyond their initial fresh-from-the-pan glory. Once cooled completely, these flatbreads can be stored in an airtight container or a resealable plastic bag. They will keep well in the refrigerator for up to 3-4 days. Stacking them with small pieces of parchment paper between each flatbread can prevent them from sticking together, making them easier to retrieve individually.
For longer storage, these flatbreads freeze beautifully. Again, ensure they are completely cooled. Stack them with parchment paper in between, then wrap the stack tightly in plastic wrap and place it in a freezer-safe bag or container. They can be stored in the freezer for up to 2-3 months. When ready to enjoy, you can reheat them directly from frozen.
Reheating is straightforward and can be done using several methods, depending on your desired outcome. The quickest method is often the microwave; heat individual flatbreads for 15-30 seconds, or until warmed through. Be careful not to overheat, as they can become tough. For a crispier texture that mimics their freshly cooked state, reheat them in a dry skillet over medium heat for 1-2 minutes per side, until hot and slightly crispy. You can also use a toaster oven or conventional oven preheated to 350°F (175°C); place the flatbreads directly on the rack or on a baking sheet and heat for 3-5 minutes, or until warmed through and lightly re-crisped. If reheating from frozen, simply add a few minutes to the cooking time for any of these methods. Avoid reheating them multiple times, as this can degrade their texture and flavor.
Frequently Asked Questions
What kind of dipping sauces pair well with these savory flatbreads?
These savory herb flatbreads are incredibly versatile and can be enjoyed with a wide array of dipping sauces. Classic choices include a simple soy sauce mixed with a dash of rice vinegar and a pinch of sesame seeds for an Asian-inspired flavor. For a bit of heat, add chili garlic sauce or a drizzle of chili oil to your soy sauce mix. A creamy yogurt-based dip, perhaps seasoned with garlic and dill, offers a cooling contrast. You could also try a sweet chili sauce, a vibrant pesto, or even a simple squeeze of fresh lemon juice with a sprinkle of flaky sea salt for a minimalist approach. Don’t hesitate to experiment with what you have on hand!
Can I make this recipe gluten-free?
Yes, you can absolutely adapt this recipe to be gluten-free. The easiest way is to substitute the all-purpose flour with a high-quality gluten-free all-purpose flour blend. Look for blends that are specifically formulated for baking and include xanthan gum, as this helps with the structure and elasticity that gluten provides. You might find that the batter’s consistency is slightly different, and you may need to adjust the amount of liquid slightly. Start with the recommended amount of water and add more if the batter is too thick, or a bit more gluten-free flour if it’s too thin. The cooking process remains the same, aiming for a golden-brown and tender flatbread.
Why are my flatbreads sticking to the pan or not getting crispy?
There are a few common reasons why your flatbreads might be sticking or not achieving that desirable crispiness. Sticking usually indicates that the pan isn’t hot enough when the batter is poured, or there isn’t enough oil in the pan. Ensure your non-stick skillet is properly preheated to medium heat and has a thin, even layer of oil before adding the batter. If they’re not getting crispy, it could be due to cooking at too low a temperature, which steams them rather than crisps them. Increase the heat slightly to medium-high if needed, but watch carefully to prevent burning. Overcrowding the pan can also lower the temperature and release too much moisture, hindering crispiness. Cook one or two at a time, depending on your pan size, to maintain consistent heat and allow proper browning.