Introduction
There’s something truly magical about a perfectly crafted flatbread – warm, soft, and with just the right amount of chew. But when that flatbread boasts layers upon layers of flaky goodness, it transcends into a whole new realm of culinary delight. This recipe for Flaky Layered Flatbread, often known as Paratha or a similar regional variation, is a testament to how simple ingredients, combined with a clever technique, can yield an extraordinary result. Imagine tearing into a golden-brown disc, steam gently rising, to reveal an intricate, airy interior that practically melts in your mouth. This isn’t just a side dish; it’s an experience, a comfort food that warms the soul and satisfies the palate.
Across cultures, from South Asia to the Middle East and beyond, layered flatbreads hold a cherished place in daily meals and festive celebrations. They are incredibly versatile, serving as the perfect accompaniment to rich curries, savory stews, or even as a standalone treat with a dollop of yogurt or a sprinkle of sugar. What makes this particular flatbread so special is its signature flakiness, achieved through a simple yet ingenious method of rolling, oiling, and folding the dough. It’s a technique that might seem daunting at first glance, but with a little practice, it becomes intuitive, transforming humble flour and water into a culinary masterpiece. The beauty lies in its simplicity and the profound satisfaction it brings.
This recipe aims to demystify the art of making flaky layered flatbreads, guiding you through each step to ensure success, whether you’re a seasoned baker or a curious beginner. We’ll explore the secrets to a pliable dough, the precise folding techniques that create those coveted layers, and the perfect cooking method to achieve that irresistible golden crispness. Get ready to embark on a culinary journey that will fill your kitchen with inviting aromas and your table with a stack of these delectable, ethereal flatbreads. They are more than just bread; they are a celebration of tradition, flavor, and the joy of homemade goodness.
Nutritional Information
Per serving (approximate values):
- Calories: 280
- Protein: 7g
- Carbohydrates: 45g
- Fat: 8g
- Fiber: 2g
- Sodium: 280mg
Ingredients
- 3 cups (360g) all-purpose flour, plus extra for dusting
- 1 teaspoon salt
- 1 tablespoon granulated sugar (optional, for slight sweetness and browning)
- 1 cup (240ml) warm water, plus more if needed
- 4 tablespoons (60ml) vegetable oil or ghee, melted, plus extra for brushing and cooking
Instructions
- Prepare the Dough: In a large mixing bowl, combine the all-purpose flour, salt, and granulated sugar (if using). Mix well. Gradually add the warm water, a little at a time, mixing with your hands or a wooden spoon until a shaggy dough forms.
- Knead the Dough: Transfer the dough to a lightly floured surface. Knead for 8-10 minutes until the dough is smooth, elastic, and no longer sticky. It should be soft and pliable. If it’s too dry, add a tiny bit more water; if too sticky, add a little flour.
- Rest the Dough (First Rest): Form the dough into a ball. Lightly grease the bowl with a little oil, place the dough ball in it, and turn to coat. Cover the bowl with a damp cloth or plastic wrap and let it rest at room temperature for at least 30 minutes, or up to 2 hours. This resting period is crucial for relaxing the gluten, making the dough easier to roll and more tender.
- Divide the Dough: After resting, gently punch down the dough and transfer it back to a lightly floured surface. Divide the dough into 8 equal portions. Roll each portion into a smooth ball.
- Form the Layers (The Folding Technique):
- Take one dough ball and lightly dust your work surface with flour. Using a rolling pin, roll the dough ball into a very thin circular or oval shape, about 8-10 inches in diameter. The thinner, the better, but be careful not to tear it.
- Brush the entire surface of the rolled dough generously with melted oil or ghee.
- Sprinkle a light dusting of dry flour over the oiled surface. This helps create separation between the layers.
- Starting from one end, tightly roll the dough into a log.
- Once you have a log, gently stretch it a little (about an inch or two) to lengthen it.
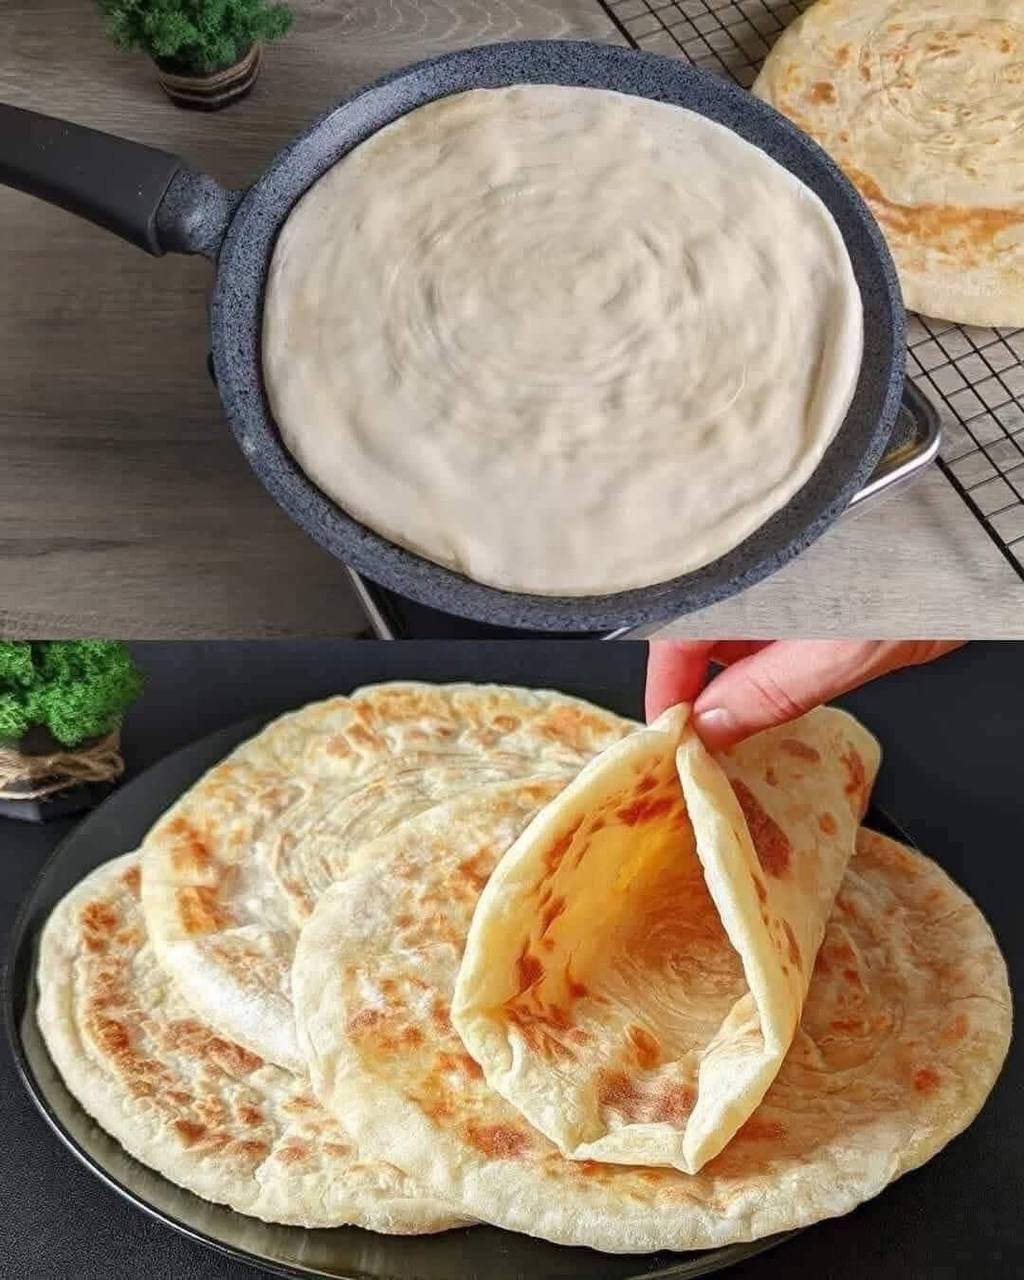
- Now, coil the log into a spiral shape, like a snail shell. Tuck the end of the log underneath the coil to secure it.
- Gently flatten the coiled dough with your palm.
- Repeat this layering process for all remaining dough balls.
- Rest the Dough (Second Rest): Arrange the flattened, coiled dough balls on a lightly floured tray or plate. Cover them again with a damp cloth or plastic wrap and let them rest for another 15-20 minutes. This second rest allows the dough to relax again, making it much easier to roll out evenly without resistance.
- Roll and Cook the Flatbreads:
- Heat a cast iron skillet or a non-stick griddle over medium-high heat.
- While the pan is heating, take one rested, coiled dough ball. Lightly dust your work surface with flour and gently roll it out into a 6-7 inch circle. Do not press too hard; aim for an even thickness without tearing the layers.
- Once the pan is hot, place one rolled flatbread onto the dry pan.
- Cook for about 30 seconds to 1 minute, until you see small bubbles forming on the surface and the edges start to look dry.
- Flip the flatbread. Brush a teaspoon of oil or ghee over the cooked side.
- Cook for another 30 seconds to 1 minute, until golden brown spots appear.
- Flip again and brush the other side with another teaspoon of oil or ghee. Cook until both sides are beautifully golden brown and the flatbread is cooked through and slightly puffed.
- Once cooked, remove the flatbread from the pan and immediately place it on a clean kitchen towel. Gently crush or scrunch the hot flatbread between your hands a few times (this helps separate the layers and makes it flakier).
- Repeat the rolling and cooking process for the remaining dough balls. Stack the cooked flatbreads, keeping them covered with a towel to stay warm and soft until serving.
Cooking Tips and Variations
Dough Consistency is Key: The dough should be soft, pliable, and slightly sticky initially, but become smooth and elastic after kneading. A stiff dough will result in tough, hard flatbreads. Don’t be afraid to adjust with tiny amounts of water or flour during kneading to get it just right.
Don’t Skimp on Resting: Both resting periods are non-negotiable. The first rest allows gluten to relax, making kneading easier. The second rest, after layering, prevents the dough from snapping back when you try to roll it, ensuring thin, even flatbreads.
Generous Oiling for Flakiness: Be generous when brushing oil or ghee on the rolled-out dough before folding. This fat is what creates the separation between layers, leading to that signature flakiness. The dusting of flour also aids in this separation.
Hot Pan, Medium Heat: Start with a hot pan to get a quick sear and prevent the flatbread from becoming dry. However, maintain a medium heat throughout cooking to ensure even cooking without burning. If the heat is too low, the flatbreads will dry out; if too high, they’ll burn before cooking through.
The “Crush” Technique: After taking the hot flatbread off the pan, gently crush or scrunch it between your palms. This helps to open up the layers and make it even flakier. Do this while it’s still hot.
Variations:
- Garlic Herb: Mix finely minced garlic and fresh herbs (like cilantro or parsley) into the melted oil/ghee before brushing it on the rolled dough.
- Spicy Kick: Add a pinch of red chili powder or finely chopped green chilies to the dough or mix it into the oil/ghee for a subtle heat.
- Cheese Stuffed: After rolling out the coiled dough ball, place a small amount of grated cheese (like mozzarella or cheddar) in the center, gather the edges to seal, and then gently re-roll.
- Sweet Treat: Sprinkle a mixture of sugar and ground cardamom or cinnamon onto the oiled dough before rolling it into a log. Serve with a drizzle of honey or maple syrup.
- Whole Wheat Option: You can substitute up to half of the all-purpose flour with whole wheat flour for a healthier, nuttier flavor. You might need slightly more water.
Storage and Reheating
Storage:
Once cooled, stack the flatbreads with parchment paper in between to prevent sticking, then place them in an airtight container or a resealable plastic bag. They can be stored at room temperature for 2-3 days. For longer storage, they can be refrigerated for up to a week. For even longer storage, these flatbreads freeze beautifully. Wrap individual flatbreads tightly in plastic wrap, then place them in a freezer-safe bag or container. They can be frozen for up to 2-3 months.
Reheating:
The key to reheating flaky layered flatbreads is to restore their softness and flakiness without drying them out.
- On the Stovetop: This is the best method for retaining texture. Heat a dry non-stick pan or griddle over medium heat. Place a flatbread in the pan and heat for 30-60 seconds per side, or until warm and soft. You can lightly brush with a tiny bit of oil or ghee if desired.
- In the Microwave: While convenient, the microwave can sometimes make flatbreads a bit chewy. Place one or two flatbreads on a microwave-safe plate, cover with a damp paper towel, and heat for 15-30 seconds, or until warm.
- In the Oven/Toaster Oven: Preheat your oven or toaster oven to 350°F (175°C). Wrap the flatbreads loosely in aluminum foil to prevent them from drying out. Heat for 5-10 minutes, or until thoroughly warmed through.
Always serve reheated flatbreads immediately for the best experience.
Frequently Asked Questions
What is the difference between this layered flatbread and a regular roti or chapati?
The primary difference lies in the layering technique and the use of fat. A regular roti or chapati is typically a single layer of unleavened bread, rolled out and cooked plain, sometimes with a little oil. This layered flatbread, however, involves brushing oil or ghee and dusting with flour on the rolled dough, then folding or coiling it multiple times before the final roll. This intricate process creates distinct, flaky layers that give it a unique texture, making it richer and more indulgent than a simple roti.
My flatbreads are tough and not flaky. What went wrong?
Several factors can lead to tough, non-flaky flatbreads. The most common culprit is insufficient kneading or not allowing the dough to rest long enough. If the dough isn’t kneaded until smooth and elastic, or if the gluten isn’t relaxed through proper resting periods, it will be hard to roll thinly and will result in a tough texture. Additionally, not using enough fat (oil/ghee) between the layers, or not rolling the dough thin enough before layering, can also prevent the formation of those desirable flaky layers. Ensure your pan isn’t too low in heat, as this can dry out the bread rather than cook it quickly.
Can I make the dough ahead of time?
Absolutely! Preparing the dough in advance is a great time-saver. You can prepare the dough up to the first resting stage (after kneading) and store it in an airtight container or a well-oiled bowl covered with plastic wrap in the refrigerator for up to 24 hours. When you’re ready to make the flatbreads, take the dough out of the fridge about 30 minutes to an hour before you plan to roll it out, allowing it to come closer to room temperature. You can also prepare the dough, form it into the coiled balls, and then refrigerate them, again bringing them to room temperature before the final rolling and cooking.
What do I serve with these flaky layered flatbreads?
These versatile flatbreads are an excellent accompaniment to a wide variety of dishes. They are traditionally served with rich, flavorful curries (like chicken curry, dal, or paneer butter masala), stews, or vegetable dishes. They also pair wonderfully with simple sides like yogurt (plain or raita), pickles, chutneys, or a fried egg for breakfast. For a sweet treat, you can enjoy them with a sprinkle of sugar, a drizzle of honey, or jam. Their flaky texture makes them perfect for scooping up sauces and gravies, enhancing every bite.