Introduction
Get ready to tantalize your taste buds with a spread that’s anything but ordinary: Strawberry-Honey Jalapeño Jam! This vibrant, sweet, and subtly spicy concoction takes classic strawberry jam to an exhilarating new level. Imagine the juicy sweetness of ripe strawberries, deepened by the golden warmth of honey, all finished with a surprising, yet gentle, kick from fresh jalapeños. It’s a flavor profile that dances between comforting familiarity and exciting innovation, making it an instant favorite for anyone who loves a little adventure in their food.
What makes this jam truly special is its incredible versatility. While it’s absolutely divine slathered on morning toast, scones, or muffins, its complex character opens up a world of culinary possibilities. Picture it as the star of your next cheese board, offering a delightful counterpoint to creamy brie or sharp cheddar. Envision it as a glossy glaze for roasted chicken or pork, adding a sticky-sweet and spicy crust. Or perhaps, stir a spoonful into plain yogurt for an instant gourmet upgrade, or even experiment with it as a unique cocktail mixer. Its captivating blend of fruit, sweetness, and heat ensures it will be a conversation starter at any gathering and a staple in your pantry.
Beyond its delicious taste, making your own Strawberry-Honey Jalapeño Jam is a deeply rewarding experience. You have complete control over the quality of your ingredients, ensuring only the freshest strawberries and the finest honey go into your batch. This also means you can customize the spice level to your preference – leave a few seeds in for an extra fiery punch, or remove them all for a milder warmth. There are no artificial preservatives here, just pure, wholesome goodness. Plus, the process itself is surprisingly straightforward and incredibly satisfying, transforming simple ingredients into a gourmet preserve that’s perfect for gifting or simply enjoying yourself.
Nutritional Information
Per serving (approximate values for 2 tablespoons):
- Calories: 65
- Protein: 0.2g
- Carbohydrates: 17g
- Fat: 0.1g
- Fiber: 0.5g
- Sodium: 1mg
Ingredients
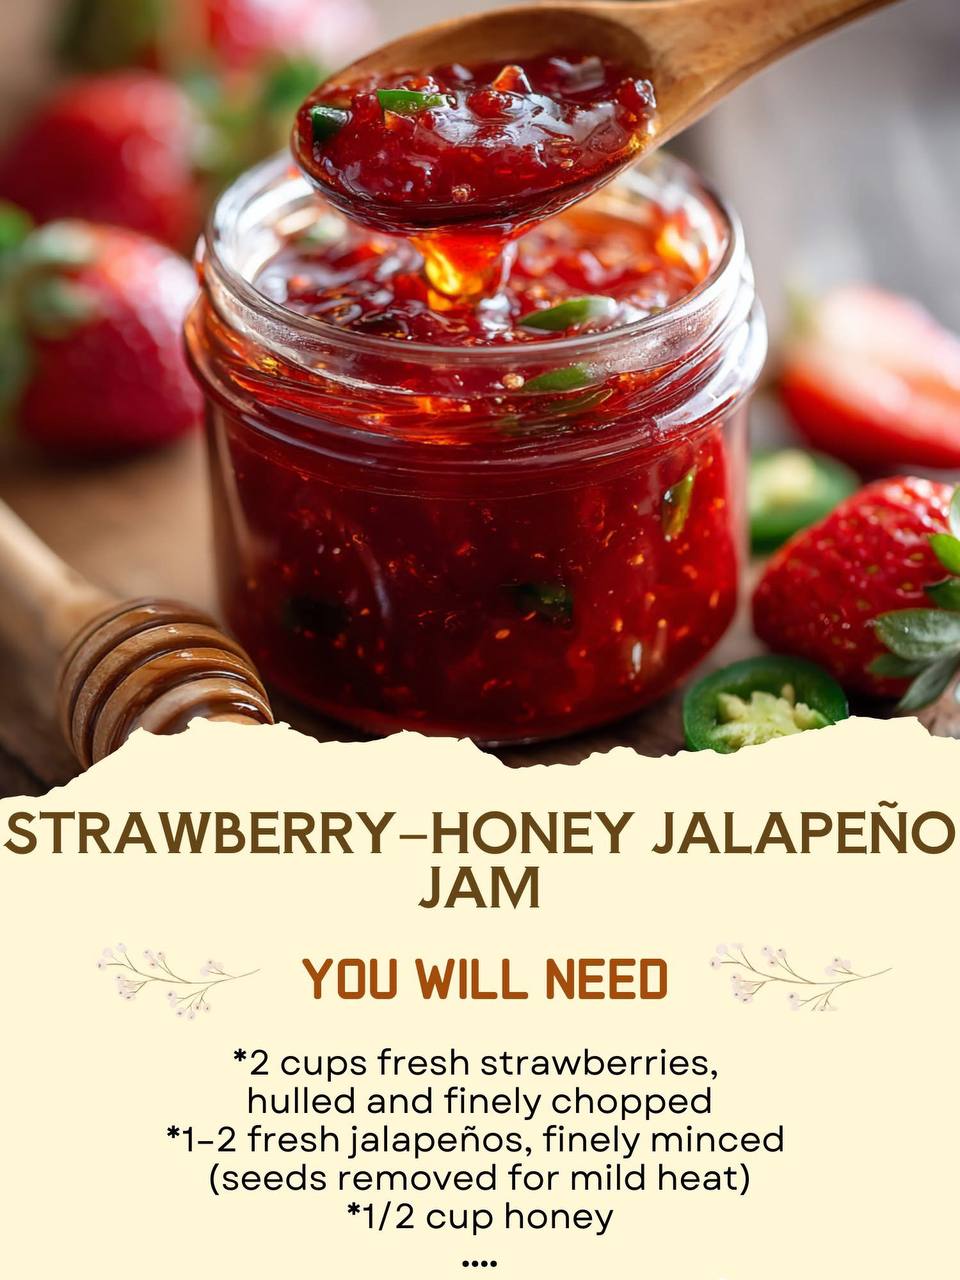
- 2 cups fresh strawberries, hulled and finely chopped
- 1-2 fresh jalapeños, finely minced (seeds removed for mild heat, some seeds left for more spice)
- 1/2 cup honey
- 1 tablespoon fresh lemon juice (optional, but recommended for brightness and set)
- 1/4 teaspoon salt (optional, to enhance flavors)
- 1/2 teaspoon fruit pectin (optional, for a firmer set, especially if strawberries are not super ripe)
Instructions
- Begin by thoroughly washing your strawberries and jalapeños. Hull the strawberries, removing the green tops, then finely chop them into small, consistent pieces. The smaller the pieces, the more evenly they will distribute in the jam.
- For the jalapeños, carefully slice them in half lengthwise. For a milder jam, use a small spoon to scrape out all the seeds and the white pith inside. For a spicier jam, you can leave some of the seeds in. Finely mince the jalapeño flesh. Remember to wear gloves when handling jalapeños to prevent skin irritation, and avoid touching your face or eyes.
- Combine the chopped strawberries, minced jalapeños, honey, lemon juice (if using), and salt (if using) in a large, heavy-bottomed pot or Dutch oven.
- If you are using fruit pectin, sprinkle it evenly over the fruit mixture now and stir well to combine. This helps ensure a good set.
- Place the pot over medium-high heat. Bring the mixture to a rolling boil, stirring frequently to prevent sticking and ensure the honey dissolves evenly.
- Once boiling, reduce the heat to medium-low and allow the mixture to simmer gently. Continue to stir occasionally, mashing the strawberries slightly with the back of your spoon as they soften.
- Cook for approximately 25-40 minutes, or until the jam has thickened to your desired consistency. The cooking time will vary depending on the water content of your strawberries and the heat level. As it cooks, the jam will darken slightly and become more translucent.
- To test for doneness, perform a “cold plate test.” Place a small plate in the freezer before you start cooking. When you think the jam is ready, spoon a small amount onto the chilled plate. Return the plate to the freezer for 1-2 minutes. Then, push the jam with your finger; if it wrinkles and holds its shape, it’s ready. If it’s still too runny, continue cooking for another 5-10 minutes and retest.
- Once the jam has reached the desired consistency, carefully remove the pot from the heat.
- Ladle the hot jam into sterilized jars, leaving about 1/4 inch of headspace. Wipe the rims clean with a damp cloth, then secure with lids and bands.
- Allow the jars to cool completely at room temperature. As they cool, you should hear the lids “pop” as they seal.
- Once cooled, check the seals by pressing on the center of each lid. If it doesn’t flex, the jar is sealed. Store sealed jars in a cool, dark place. Unsealed jars should be refrigerated and consumed within 2-3 weeks.
Cooking Tips and Variations
For the most vibrant flavor, always choose the freshest, ripest strawberries you can find. They should be bright red, plump, and fragrant, as their natural sweetness and pectin content will significantly impact the final jam. While the recipe suggests a specific amount of honey, don’t hesitate to adjust it to your personal preference. Taste the fruit mixture before it starts to thicken too much and add a little more honey if you desire a sweeter jam, keeping in mind that honey’s sweetness is more intense than granulated sugar. However, be aware that significantly altering the sugar/honey content can affect the jam’s final set, especially if you’re not using added pectin.
When it comes to the jalapeño heat, you are truly in control. For a very mild jam with just a hint of warmth, be meticulous about removing all seeds and the white membrane (pith) from the jalapeños, as these contain most of the capsaicin, the compound responsible for the heat. If you crave more of a fiery kick, feel free to leave some or all of the seeds in one or both of the jalapeños. Always wear gloves when handling jalapeños to prevent skin irritation, and wash your hands thoroughly afterward. For an even spicier variation, consider adding a pinch of dried red pepper flakes to the cooking jam, or even a small amount of habanero for a truly bold flavor.
Ensuring your jam sets properly is key to a good preserve. The “cold plate test” is your best friend here. Keep that small plate in the freezer and check frequently towards the end of the cooking time. If your jam seems too runny after the cold plate test, don’t panic! Simply continue simmering for another 5-10 minutes and retest. Sometimes, a little more cooking time is all it needs. Conversely, avoid overcooking, as this can lead to a jam that is too stiff, gummy, or loses its fresh, fruity flavor. The jam will continue to thicken slightly as it cools in the jars.
For long-term storage and food safety, sterilizing your jars and lids is crucial. You can do this by boiling them in water for at least 10 minutes, running them through a hot dishwasher cycle, or heating them in an oven. Always ensure your jars are hot when you ladle in the hot jam to prevent thermal shock and potential cracking. Beyond the core recipe, feel free to experiment! A small amount of ginger, either fresh grated or dried, can add another layer of warm spice. A splash of vanilla extract added at the very end can also deepen the flavor profile. You could also try swapping out a portion of the strawberries for raspberries or blackberries for a different berry twist, or even adding a tiny amount of finely minced bell pepper for a more complex savory note.
Storage and Reheating
Proper storage is essential for enjoying your homemade Strawberry-Honey Jalapeño Jam safely and for an extended period. If you have properly sealed your jars (using the hot water bath canning method, which is highly recommended for shelf-stable preserves), the jam can be stored in a cool, dark pantry for up to one year. Always check the seals before opening; if the lid is bulging or doesn’t “pop” when opened, or if there are any signs of mold or off-smell, discard the jam immediately. Once a jar is opened, it must be refrigerated and consumed within 2-3 weeks, as exposure to air will cause it to spoil more quickly.
For any unsealed jars, or if you prefer not to go through the full canning process, the jam should be stored in the refrigerator immediately after it has cooled. In the refrigerator, it will keep well for approximately 2-3 weeks. Freezing is another excellent option for longer-term storage without canning. Simply cool the jam completely, then transfer it to freezer-safe containers, leaving about 1/2 inch of headspace to allow for expansion. Frozen jam can last for up to 6 months. To use, simply thaw in the refrigerator overnight.
Reheating jam is generally not necessary, as it is typically enjoyed at room temperature or chilled. However, if you are using it as a glaze for meats or want a warmer consistency for a specific application, you can gently warm a small amount in a saucepan over low heat, stirring constantly to prevent scorching. Be careful not to overheat, as this can alter the texture and flavor. For glazes, it’s often best to apply the jam warm to ensure it spreads evenly and creates that beautiful, sticky coating.
Frequently Asked Questions
How do I know if my jam has set properly without pectin?
The best way to check for a proper set without added pectin is the “cold plate test.” Place a small ceramic plate in the freezer before you start cooking. When you think the jam is ready, spoon a small amount onto the chilled plate. Return the plate to the freezer for 1-2 minutes. Then, push the jam with your finger; if it wrinkles and holds its shape, it’s ready. If it’s still too runny, continue cooking for another 5-10 minutes and retest. The jam will also thicken further as it cools.
Can I use frozen strawberries for this recipe?
Yes, you can absolutely use frozen strawberries for this jam! There’s no need to thaw them beforehand. Simply add the frozen strawberries directly to the pot with the other ingredients. Keep in mind that frozen strawberries will release more liquid as they cook, so the cooking time might be slightly longer to achieve the desired consistency. Make sure to chop them finely even when frozen, or chop them after they’ve cooked down for a bit and softened.
What if my jam is too runny after cooling?
If your jam turns out too runny after it has cooled, don’t despair! You can re-cook it. Pour the jam back into a large, heavy-bottomed pot. Bring it to a boil over medium-high heat, stirring constantly. Continue to boil, performing the cold plate test every 5-10 minutes, until it reaches the desired set. You may also consider adding a small amount of fruit pectin (mixed with a little sugar first to prevent clumping) during the re-cooking process to help it set more reliably.