Introduction
There’s a special kind of magic that fills your kitchen when homemade bread is baking. The aroma alone is enough to transport you to a place of comfort and warmth, a stark contrast to the sterile scent of store-bought loaves. This recipe for Homemade Soft Sandwich Bread isn’t just about making bread; it’s about crafting an experience. Imagine slicing into a loaf that’s still warm, its crust a perfect golden hue, and the inside unbelievably tender and fluffy. This isn’t just for special occasions; it’s an everyday luxury, designed to elevate your morning toast, revolutionize your lunch sandwiches, and provide the perfect accompaniment to any meal.
What makes this particular sandwich bread so extraordinary? It’s the perfect balance of simple, wholesome ingredients expertly combined to create an unbeatable texture. We’re talking about a crumb that yields effortlessly to the touch, a subtle sweetness that complements any filling, and a crust that’s just substantial enough to hold everything together without being tough. Forget dry, crumbly, or dense bread. This recipe focuses on achieving that ideal softness and springiness, making it a true delight for everyone from picky eaters to gourmet enthusiasts. It’s comforting, satisfying, and incredibly versatile, proving that sometimes, the simplest things are truly the best.
This recipe is designed to be approachable for bakers of all skill levels. We’ll walk through each step, from activating the yeast to achieving that perfect golden-brown crust, ensuring your success. You’ll learn the secrets to a perfectly kneaded dough, the importance of proper rising, and how to tell when your bread is baked to perfection. The result? A loaf so superior to anything you can buy, you’ll wonder why you ever settled for less. Get ready to fill your home with the irresistible scent of freshly baked bread and enjoy the unparalleled taste of your very own Homemade Soft Sandwich Bread.
Nutritional Information
Per serving (approximate values):
- Calories: 150
- Protein: 5g
- Carbohydrates: 28g
- Fat: 2g
- Fiber: 1g
- Sodium: 220mg
Ingredients
- 1 ½ cups (360ml) warm water (105-115°F / 40-46°C)
- 2 ¼ teaspoons (1 packet or 7g) active dry yeast
- ¼ cup (50g) granulated sugar, plus 1 teaspoon for yeast activation
- 1 teaspoon salt
- 3 tablespoons (42g) unsalted butter, melted and cooled, plus extra for greasing
- 4 cups (480g) all-purpose flour, plus more for dusting
Instructions
- Activate the Yeast: In a large mixing bowl, combine the warm water and 1 teaspoon of granulated sugar. Sprinkle the active dry yeast over the mixture. Stir gently and let it sit for 5-10 minutes, or until the mixture becomes foamy. This indicates the yeast is active and ready to work. If it doesn’t foam, your water might have been too hot or too cold, or your yeast may be old; discard and start again with fresh yeast.
- Combine Wet Ingredients: To the activated yeast mixture, add the remaining ¼ cup (50g) of granulated sugar, the salt, and the melted and cooled butter. Stir well to combine all the wet ingredients thoroughly.
- Add Flour and Mix: Gradually add the all-purpose flour, one cup at a time, mixing with a wooden spoon or a dough hook on a stand mixer until a shaggy dough forms. Once all the flour is added, the dough will be sticky.
- Knead the Dough: If using a stand mixer, attach the dough hook and knead on medium-low speed for 8-10 minutes, or until the dough is smooth, elastic, and pulls away from the sides of the bowl. If kneading by hand, turn the dough out onto a lightly floured surface and knead for 10-15 minutes, pushing and folding the dough until it becomes smooth and elastic. The dough should pass the “windowpane test” – you should be able to stretch a small piece of dough thinly enough to see light through it without it tearing.
- First Rise (Bulk Fermentation): Lightly grease a large clean bowl with butter or cooking spray. Place the kneaded dough into the bowl, turning it once to coat the top. Cover the bowl tightly with plastic wrap or a clean kitchen towel. Place the bowl in a warm, draft-free place (like a turned-off oven with the light on) and let it rise for 1 to 1.5 hours, or until it has doubled in size.
- Punch Down and Shape: Once the dough has doubled, gently punch it down to release the air. Turn the dough out onto a lightly floured surface. Gently shape the dough into a rectangular loaf that is roughly the same length as your loaf pan. To do this, flatten the dough into a rectangle, then fold the two long sides towards the center, overlapping slightly. Turn the dough seam-side down and gently roll it into a cylinder, tucking the ends under to create a smooth, taut top.
- Second Rise (Proofing): Grease a 9×5-inch (23x13cm) loaf pan with butter or cooking spray. Carefully place the shaped dough into the prepared loaf pan, seam-side down. Cover the loaf pan loosely with plastic wrap or a clean kitchen towel and return it to your warm, draft-free place for another 30-45 minutes, or until the dough has risen about 1 inch above the rim of the pan. During the last 15 minutes of this rise, preheat your oven to 375°F (190°C).
- Bake the Bread: Place the risen loaf pan into the preheated oven. Bake for 30-35 minutes, or until the crust is golden brown and the internal temperature of the bread reaches 200-210°F (93-99°C) when measured with an instant-read thermometer. If the top is browning too quickly, you can loosely tent it with aluminum foil during the last 10-15 minutes of baking.
- Cool Completely: Once baked, remove the loaf pan from the oven. Immediately invert the bread onto a wire rack and remove the pan. Allow the bread to cool completely for at least 1-2 hours before slicing. Slicing warm bread can cause it to become gummy and compromise its texture.
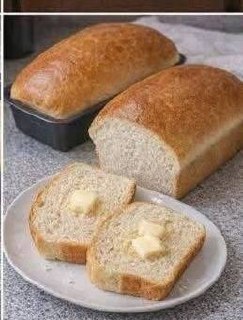
- Slice and Serve: Once fully cooled, use a serrated knife to slice the bread into desired thickness. Enjoy your homemade soft sandwich bread with your favorite fillings, toasted, or simply with a pat of butter.
Cooking Tips and Variations
Achieving the perfect loaf of homemade bread is incredibly rewarding, and a few simple tips can make all the difference. Firstly, always ensure your yeast is fresh and active. The foaming in step 1 is non-negotiable; if it doesn’t foam, your bread won’t rise. Water temperature is crucial here – too hot will kill the yeast, too cold won’t activate it. An instant-read thermometer is your best friend for checking water temperature. For the kneading process, resist the urge to add too much extra flour, even if the dough feels sticky. A slightly sticky dough often results in a softer bread. Only add a tiny bit of flour if the dough is truly unmanageable. The “windowpane test” is an excellent indicator of proper gluten development; it means your bread will have that lovely, even crumb.
For a truly professional-looking crust, consider an egg wash before baking. Whisk one egg with a tablespoon of water and brush it lightly over the top of the risen dough just before it goes into the oven. This will give you a beautiful, shiny, golden-brown crust. If you prefer a softer, slightly less crisp crust, a milk wash (simply brush with milk) works wonders. To ensure your bread is fully cooked, don’t just rely on visual cues. An internal temperature of 200-210°F (93-99°C) is the gold standard for perfectly baked bread. Under-baked bread can be gummy and dense, while over-baked bread can be dry. Patience during the cooling period is also key. Slicing warm bread traps steam, leading to a doughy texture. Let it cool completely on a wire rack to allow the internal structure to set properly.
Variations can transform this basic recipe into something new and exciting. For a richer flavor and even softer crumb, you can substitute half of the water with whole milk. If you’re looking for a slightly sweeter bread, increase the sugar by 1-2 tablespoons. For a touch of whole grain goodness, replace up to 1 cup of all-purpose flour with whole wheat flour; however, this might result in a slightly denser loaf. To add savory notes, consider incorporating herbs like dried rosemary, thyme, or even a tablespoon of garlic powder into the dough when you add the flour. For a cheesy bread, mix in ½ cup of shredded cheddar or Parmesan cheese during the last minute of kneading. You can also experiment with different fats; olive oil can be used instead of butter for a slightly different flavor profile. The possibilities are endless once you master this foundational recipe.
Storage and Reheating
Proper storage is essential to keep your homemade soft sandwich bread fresh and delicious for as long as possible. Once the bread has completely cooled (this is critical!), store it in an airtight container or a large zip-top bag at room temperature. A bread box is also an excellent option if you have one, as it provides an ideal environment for bread storage. Avoid storing homemade bread in the refrigerator, as the cool temperatures can actually accelerate staling, making the bread dry and crumbly much faster than at room temperature. Stored correctly, your soft sandwich bread will remain fresh and pliable for 3-5 days.
If you anticipate not finishing the loaf within a few days, or if you simply want to have fresh bread readily available, freezing is an excellent option. To freeze, ensure the bread is completely cool. You can freeze the entire loaf, half a loaf, or individual slices. For the best results, wrap the bread tightly in plastic wrap, then an additional layer of aluminum foil, or place it in a freezer-safe bag, pressing out as much air as possible. This double-layer protection helps prevent freezer burn. Frozen bread can be stored for up to 3 months. When you’re ready to enjoy it, simply thaw the bread at room temperature for several hours (a whole loaf will take longer than slices). For a “just baked” experience, you can warm a thawed slice or two in a toaster, toaster oven, or even a conventional oven preheated to 350°F (175°C) for a few minutes until warmed through and lightly crisped.
Reheating slices of day-old bread can bring back some of its original softness and warmth. The best way to reheat individual slices for toast or sandwiches is in a toaster. For a whole slice or two that you want to serve warm with dinner, a gentle warming in the oven is ideal. Wrap the slices loosely in foil and heat in a preheated oven at 300°F (150°C) for about 5-10 minutes, or until soft and warm. Avoid microwaving bread for reheating, as it tends to make the bread tough and chewy quickly as it cools down. If you plan to make garlic bread or croutons from slightly stale bread, a quick bake in the oven is also perfect for crisping it up.
Frequently Asked Questions
Why didn’t my bread rise?
There are several common reasons why your bread might not have risen. The most frequent culprit is inactive yeast. Ensure your water temperature is between 105-115°F (40-46°C) when activating the yeast; water that’s too hot will kill it, and water that’s too cold won’t activate it. If the yeast mixture doesn’t become foamy after 5-10 minutes, your yeast is likely dead or expired, and you should start over with fresh yeast. Other factors include using too much salt (which can inhibit yeast activity), not kneading the dough enough (which prevents proper gluten development), or placing the dough in a cold, drafty spot for its rise.
How can I tell if my dough is properly kneaded?
Properly kneaded dough should be smooth, elastic, and springy to the touch. It will no longer be sticky and should pull away cleanly from the sides of the bowl or your hands. The best test is the “windowpane test”: take a small piece of dough (about the size of a golf ball) and gently stretch it between your fingers. If you can stretch it thin enough to see light through it without it tearing, your gluten has developed sufficiently, and the dough is properly kneaded. If it tears easily, continue kneading for a few more minutes and test again.
My bread is dense and heavy. What went wrong?
A dense and heavy loaf often points to one of two main issues: either the dough was not allowed to rise enough (under-proofed), or it was over-kneaded, making the gluten too tight. Under-proofing means the yeast didn’t have enough time to produce sufficient carbon dioxide to create an airy structure. Over-kneading can make the dough tough and unable to expand properly during baking. Conversely, adding too much flour during kneading can also result in a dry, heavy crumb. Ensure you’re following the rise times, checking for the doubled-in-size indicator, and using the “windowpane test” for kneading.
Can I make this bread without a stand mixer?
Absolutely! This recipe can be made entirely by hand. While a stand mixer makes the kneading process easier, hand-kneading is a traditional and highly effective method. You’ll simply turn the dough out onto a lightly floured surface after combining the ingredients and knead it vigorously for 10-15 minutes, or until it passes the windowpane test. It’s a great workout and allows you to really feel the dough develop. All other steps, such as rising, shaping, and baking, remain the same whether you use a mixer or knead by hand.