Introduction
There’s a certain magic that fills a home when a loaf of bread is baking. The warm, yeasty aroma, the anticipation of that first golden slice, and the sheer comfort it brings. It’s a feeling deeply rooted in tradition, a culinary hug that transcends generations. Today, we’re not just baking bread; we’re mastering traditional country white bread – a recipe designed to bring that simple, profound joy right into your kitchen with reliable, delicious, and utterly achievable results.
Forget store-bought imitations; nothing compares to the tender crumb and subtly sweet, buttery flavor of homemade white bread. This isn’t just a recipe; it’s an invitation to connect with a timeless craft, to feel the dough beneath your hands, and to witness the incredible transformation of humble ingredients into something truly extraordinary. Whether you’re a seasoned baker or just starting your journey, this guide will walk you through every step, ensuring a perfect loaf every time.
What makes this particular country white bread special? It’s the perfect balance of simplicity and a deeply satisfying texture. We’ll focus on fundamental techniques – proper yeast activation, effective kneading, and patient proofing – that unlock the full potential of these classic ingredients. The result is a beautifully golden-crusted loaf with a soft, airy interior, ready to be slathered with butter, piled high with sandwich fillings, or simply enjoyed on its own. Prepare to fill your home with an irresistible aroma and your table with the best homemade bread you’ve ever tasted.
Nutritional Information
Per serving (approximate values):
- Calories: 150
- Protein: 5g
- Carbohydrates: 28g
- Fat: 2g
- Fiber: 1g
- Sodium: 200mg
Ingredients
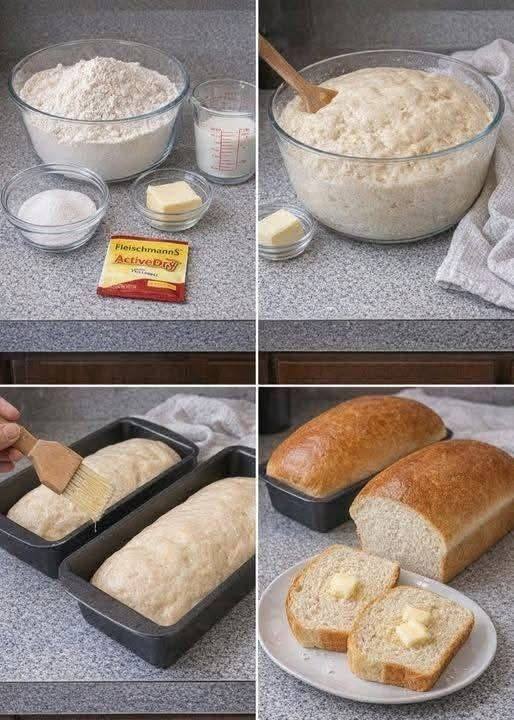
- 4 cups (480g) all-purpose flour, plus more for dusting
- 2 tablespoons granulated sugar
- 2 ¼ teaspoons (1 standard packet) active dry yeast
- 1 ½ teaspoons fine sea salt
- 1 ½ cups (360ml) warm milk (105-115°F / 40-46°C)
- ¼ cup (56g) unsalted butter, melted, plus 1 tablespoon for brushing
Instructions
- Activate the Yeast: In a large mixing bowl, combine the warm milk, 2 tablespoons of sugar, and the active dry yeast. Stir gently and let it sit for 5-10 minutes, or until the mixture becomes foamy. This indicates your yeast is active and ready to go.
- Combine Dry Ingredients: In a separate medium bowl, whisk together the 4 cups of all-purpose flour and the 1 ½ teaspoons of salt.
- Mix the Dough: Pour the melted butter into the activated yeast mixture. Gradually add the dry flour mixture to the wet ingredients, mixing with a wooden spoon or a stand mixer with a dough hook on low speed until a shaggy dough forms and all the flour is incorporated.
- Knead the Dough: Turn the dough out onto a lightly floured surface. Knead by hand for 8-10 minutes, or use a stand mixer with a dough hook on medium-low speed for 6-8 minutes. The dough should become smooth, elastic, and pass the windowpane test (you should be able to stretch a small piece thin enough to see light through it without it tearing). If the dough is too sticky, add a very small amount of flour, one teaspoon at a time.
- First Rise (Bulk Fermentation): Lightly grease a clean large bowl with a little oil. Place the kneaded dough in the bowl, turning it once to coat the top. Cover the bowl tightly with plastic wrap or a clean kitchen towel. Let the dough rise in a warm, draft-free place for 1 to 1 ½ hours, or until it has doubled in size.
- Shape the Loaves: Gently punch down the risen dough to release the air. Turn the dough out onto a lightly floured surface. Divide the dough into two equal portions. For each portion, flatten it into a rectangle, about 9×12 inches. Starting from a short end, tightly roll the dough into a log. Pinch the seam closed along the bottom and tuck the ends under to create a smooth loaf shape.
- Second Rise (Proofing in Pans): Lightly grease two 9×5-inch loaf pans. Place one shaped loaf into each prepared pan, seam-side down. Cover the pans loosely with plastic wrap or a clean kitchen towel. Let them rise again in a warm, draft-free place for 45-60 minutes, or until the dough has risen about 1 inch above the rim of the pans.
- Preheat Oven: While the loaves are proofing for the second time, preheat your oven to 375°F (190°C).
- Bake the Bread: Just before baking, you can brush the tops of the loaves with a little melted butter for a softer crust or an egg wash (1 egg beaten with 1 tablespoon water) for a shinier, golden crust. Place the loaf pans in the preheated oven. Bake for 30-35 minutes, or until the crust is golden brown and the internal temperature reaches 200-210°F (93-99°C) when measured with an instant-read thermometer. If tapping the bottom of the loaf, it should sound hollow.
- Cool and Enjoy: Remove the loaves from the oven and immediately turn them out onto a wire rack to cool completely. Cooling is crucial to prevent a gummy texture. Allow at least 1-2 hours for cooling before slicing. Slice and enjoy with your favorite spread or as part of a delicious meal.
Cooking Tips and Variations
For the best results, always measure your flour correctly. Spoon the flour into your measuring cup and then level it off with a straight edge, rather than scooping directly from the bag, which can compact the flour and lead to a denser loaf. Another crucial tip is to ensure your yeast is viable. If your yeast mixture doesn’t foam within 10 minutes, your yeast might be old or the liquid wasn’t the right temperature; it’s best to start over with fresh yeast. The temperature of your liquid for yeast activation is also key – too cold, and the yeast won’t activate; too hot, and you’ll kill it. Aim for a warm bath-like temperature, around 105-115°F.
Don’t skip the kneading! This step develops the gluten, which gives your bread its structure and chew. A well-kneaded dough will be smooth and elastic. If kneading by hand feels daunting, a stand mixer with a dough hook is a fantastic investment. For proofing, a warm, draft-free spot is ideal. Some people use a slightly warmed oven (turned off!) or a sunny spot on the counter. Always cover your dough during rises to prevent a dry skin from forming. Once baked, if you desire a softer crust, brush the warm loaves with a little extra melted butter immediately after removing them from the oven.
Ready to experiment? For a slightly nutty flavor and added texture, substitute ¼ cup of the all-purpose flour with whole wheat flour. You can also incorporate herbs like dried rosemary or thyme into the dough during the mixing stage for an aromatic loaf, or add a tablespoon of poppy seeds or sesame seeds to the top before baking for visual appeal and a subtle crunch. For a richer bread, you can increase the butter to ½ cup and reduce the milk slightly. Just be mindful that more fat can sometimes make the dough a bit heavier.
Storage and Reheating
Once completely cooled, homemade country white bread is best stored at room temperature. For optimal freshness, place the loaf in an airtight bread box, a large zip-top bag, or wrap it tightly in plastic wrap or foil. It will stay fresh for 3-4 days. Avoid storing homemade bread in the refrigerator, as it tends to dry out and become stale more quickly. If you won’t be eating the entire loaf within a few days, it freezes beautifully!
To freeze, slice the cooled bread and place the slices in a freezer-safe bag or wrap the entire loaf tightly in plastic wrap, then foil. It can be stored in the freezer for up to 3 months. To enjoy frozen bread, simply take out the desired number of slices and toast them directly from frozen. For a whole loaf, thaw it at room temperature, then refresh it by warming it in a 350°F (175°C) oven for 10-15 minutes, or until warmed through and the crust is crisp again. This also works wonderfully for day-old bread, bringing back some of its freshly baked glory.
Frequently Asked Questions
Why did my bread not rise?
There are a few common reasons. The most likely culprit is inactive yeast. Ensure your yeast is fresh and that your milk (or water) is at the correct temperature (105-115°F). Too hot will kill the yeast, too cold won’t activate it. Also, ensure your rising environment is warm and draft-free, and that your dough is covered to prevent a dry crust from forming, which can inhibit rising.
Can I use bread flour instead of all-purpose flour?
Yes, absolutely! Bread flour has a higher protein content than all-purpose flour, which means it will develop more gluten. This can result in a chewier, slightly more structured loaf, which some bakers prefer. You might find you need a tiny bit more liquid if using bread flour, as it absorbs more moisture.
How can I tell if my dough is properly kneaded?
A properly kneaded dough will be smooth, elastic, and no longer sticky. The best test is the “windowpane test.” Pinch off a small piece of dough (about the size of a golf ball) and gently stretch it with your fingers. If you can stretch it thin enough to see light through it without it tearing, your gluten is well-developed, and the dough is ready.
My crust is very hard; how can I get a softer crust?
For a softer crust, brush the top of the loaves with melted butter immediately after they come out of the oven. The butter will soak in and soften the crust as the bread cools. You can also reduce the initial baking temperature by 25°F and bake for a slightly longer time, or avoid using an egg wash, which tends to produce a crisper, shinier crust.