Introduction
There’s a special kind of magic that happens when homemade bread fills your kitchen with its warm, yeasty aroma. It’s a scent that transcends time, evoking feelings of comfort, home, and simpler days. Today, we’re not just baking any bread; we’re mastering Amish White Bread. This isn’t just a recipe; it’s an invitation to experience the pure joy of creating something truly wholesome and delicious from scratch. Imagine a loaf so incredibly soft, with a delicate crumb that practically melts in your mouth, and a golden-brown crust that offers just the right amount of chew. This is the bread that will elevate your everyday sandwiches, transform your toast into a gourmet experience, and become the undisputed star of your dinner table.
What sets Amish White Bread apart is its beautiful simplicity and unparalleled tenderness. It’s a testament to the fact that the most comforting foods often rely on a handful of basic, good-quality ingredients, combined with a little patience and a lot of love. Its slightly sweet profile makes it incredibly versatile, perfect for slathering with butter and jam, soaking up savory gravies, or holding your favorite deli meats. Whether you’re a seasoned baker who loves the meditative rhythm of kneading dough or a complete novice eager to tackle your first yeast bread, this recipe is designed to guide you to success. We’ll demystify the process, providing clear, step-by-step instructions and all the essential tips to ensure your loaves turn out perfectly golden, soft, and utterly irresistible every single time.
The beauty of mastering Amish White Bread lies not just in the delicious outcome, but in the journey itself. It’s about understanding the subtle science of yeast, feeling the dough transform under your hands, and anticipating that first incredible slice. This recipe will not only yield two magnificent loaves—one for immediate enjoyment and one for later (we’ll cover freezing tips!)—but it will also instill in you the confidence and satisfaction that comes from baking truly exceptional bread. Get ready to fill your home with the most welcoming aroma and your belly with the most comforting bread you’ve ever tasted. Let’s dive into the art of making Amish White Bread, a tradition of wholesome goodness passed down through generations, now ready for your kitchen.
Nutritional Information
Per serving (approximate values, based on 24 servings per recipe):
- Calories: 180
- Protein: 6g
- Carbohydrates: 34g
- Fat: 2g
- Fiber: 1g
- Sodium: 220mg
Ingredients
- 4 cups warm water (105-115°F / 40-46°C)
- 2/3 cup granulated sugar, divided
- 4 ½ teaspoons active dry yeast (2 packets)
- 1 tablespoon salt
- 1/4 cup vegetable oil (or melted unsalted butter)
- 10-12 cups all-purpose flour, divided, plus more for dusting
- Optional: 2 tablespoons rolled oats, for topping
Instructions
- In a very large mixing bowl (or the bowl of a stand mixer fitted with the dough hook attachment), combine the warm water and 1/3 cup of the granulated sugar. Stir gently until the sugar begins to dissolve.
- Sprinkle the active dry yeast over the sugar water. Do not stir it in immediately. Let it sit undisturbed for 5-10 minutes. During this time, the yeast should “bloom” – it will become foamy and bubbly on the surface, indicating that it’s active and ready to go. If your yeast does not bloom, your water might have been too hot or too cold, or your yeast may be old; you’ll need to start over with fresh yeast.
- Once the yeast is active, add the remaining 1/3 cup granulated sugar, the salt, and the vegetable oil to the yeast mixture. Stir well to combine.
- Begin adding the all-purpose flour, one cup at a time, stirring well after each addition. After about 6-7 cups of flour, the dough will start to become very thick and difficult to stir with a spoon.
- If using a stand mixer, switch to the dough hook attachment at this point. If mixing by hand, turn the dough out onto a lightly floured surface.
- Continue adding flour, half a cup at a time, kneading the dough as you go. For a stand mixer, knead on medium-low speed. For hand kneading, fold the dough over itself, push down and away with the heel of your hand, then rotate and repeat.
- Continue kneading and adding just enough flour until the dough is no longer sticky and is smooth and elastic. This process usually takes about 8-10 minutes with a stand mixer or 10-15 minutes by hand. The dough should feel soft and pliable, not stiff. To test for proper kneading, perform the “windowpane test”: take a small piece of dough, gently stretch it between your fingers. If you can stretch it thin enough to see light through it without it tearing, it’s ready.
- Lightly grease a large clean bowl with vegetable oil. Transfer the kneaded dough to the bowl, turning it once to coat the entire surface with oil. This prevents the dough from drying out.
- Cover the bowl tightly with plastic wrap or a clean kitchen towel. Place the bowl in a warm, draft-free place to rise for the first time (bulk fermentation). This can be a turned-off oven with the light on, or simply a warm spot in your kitchen.
- Let the dough rise until it has doubled in size, which typically takes 1 to 1.5 hours, depending on the warmth of your environment.
- Once the dough has doubled, gently punch it down to release the air.
- Lightly grease two standard 9×5-inch loaf pans.
- Turn the dough out onto a lightly floured surface. Divide the dough into two equal portions.
- Take one portion of dough and gently flatten it into a rectangle. Fold the two long sides towards the center, slightly overlapping. Then, starting from one short end, roll the dough tightly into a log. Pinch the seam closed at the bottom.
- Place the shaped dough seam-side down into one of the prepared loaf pans. Repeat with the second portion of dough for the second loaf pan.
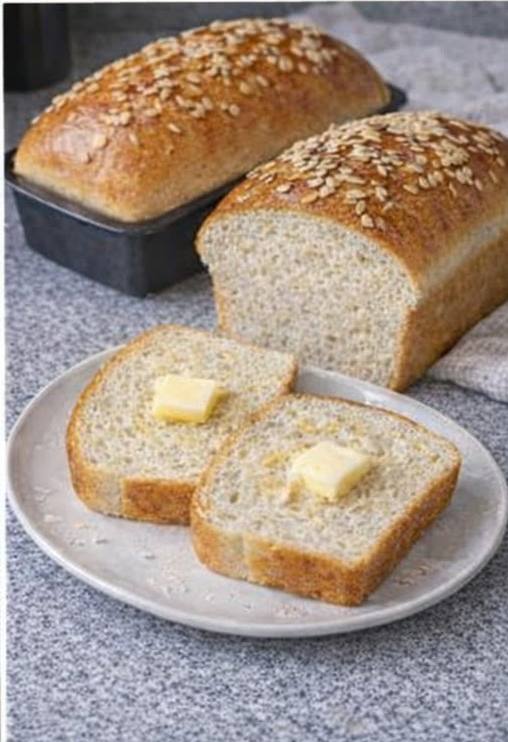
- If desired, lightly mist the tops of the loaves with water and sprinkle with rolled oats for a decorative and textural crust.
- Cover the loaf pans loosely with plastic wrap or a clean kitchen towel. Return them to your warm, draft-free place for the second rise (proofing).
- Let the loaves rise until they have nearly doubled in size and crest about 1-2 inches above the rim of the pans, which usually takes about 30-45 minutes. While the loaves are rising, preheat your oven to 375°F (190°C).
- Once the loaves have finished their second rise, carefully place them in the preheated oven.
- Bake for 30-35 minutes, or until the crust is deeply golden brown and the internal temperature of the bread reaches 190-200°F (88-93°C) when measured with an instant-read thermometer. If the tops are browning too quickly, you can loosely tent them with aluminum foil.
- Once baked, remove the loaves from the oven. Immediately run a thin knife around the edges of the pans and carefully turn the loaves out onto a wire cooling rack.
- Allow the bread to cool completely on the wire rack before slicing. This is crucial for the internal structure and texture of the bread. Slicing hot bread can result in a gummy texture.
- Once cooled, slice and enjoy your homemade Amish White Bread!
Cooking Tips and Variations
Mastering the Yeast: The temperature of your water is paramount for yeast activation. Too cold, and the yeast won’t wake up; too hot, and you’ll kill it. Aim for a comfortable bathwater temperature, typically between 105-115°F (40-46°C). If you don’t have a thermometer, test a drop on your wrist—it should feel warm, not hot. Always let your yeast bloom fully; a bubbly, frothy surface is your green light to proceed. If it doesn’t bloom, don’t waste your other ingredients, start fresh with new yeast and correctly tempered water.
Kneading for Perfection: Kneading is where the magic of gluten development happens, giving your bread its structure and chew. Whether by hand or stand mixer, aim for a dough that is smooth, elastic, and no longer sticky. The “windowpane test” is your best friend here: pinch off a small piece of dough and gently stretch it. If you can stretch it thin enough to see light through it without it tearing, your gluten is perfectly developed. Under-kneading will result in dense, crumbly bread, while over-kneading can make it tough. Practice makes perfect!
Creating the Ideal Rising Environment: Yeast loves warmth and hates drafts. For the first rise (bulk fermentation), find a cozy spot. A turned-off oven with just the light on creates a perfect, consistent warmth. Alternatively, you can place the covered bowl in a warm laundry room, near a sunny window (but away from direct, scorching sun), or even in a microwave that’s been briefly run for 30 seconds to warm it up (then turned off!). The goal is to let the dough double in size, which indicates sufficient fermentation. Don’t rush it; patience is a virtue in bread making.
The Importance of Cooling: This is a step many eager bakers skip, but it’s vital. Slicing hot bread traps steam, leading to a gummy, dense texture. Cooling completely on a wire rack allows the internal starches to set and the moisture to redistribute evenly, resulting in that perfect, soft, and airy crumb you’re after. Resist the urge to cut into it for at least an hour, or until it’s cool to the touch.
Achieving that Golden Crust: For a beautifully golden-brown crust, ensure your oven is preheated properly. If your oven tends to bake unevenly, rotate the pans halfway through baking. For a softer, shinier crust, you can brush the baked loaves with a little melted butter immediately after taking them out of the oven. If you desire a slightly crispier crust, skip the butter and let it cool naturally.
Optional Topping – Rolled Oats: As seen in the inspiring image, rolled oats add a lovely visual appeal and a subtle textural contrast. To get them to stick effectively, lightly mist the tops of your shaped loaves with water just before the second rise, then sprinkle liberally with oats. Alternatively, you can brush with a very thin egg wash (1 egg yolk whisked with 1 tablespoon water) for even better adhesion and a richer crust color.
Flavor Variations:
- Honey Wheat: Substitute 1/2 cup of the granulated sugar with honey and replace 2 cups of all-purpose flour with whole wheat flour. You might need a little extra water to maintain dough consistency, as whole wheat flour absorbs more liquid.
- Milk Bread: For an even richer, softer crumb, substitute 2 cups of the warm water with warm milk. Milk adds fat and protein, contributing to a more tender loaf.
- Herb & Garlic: For a savory twist, knead in 2 tablespoons of dried Italian herbs and 1 tablespoon of garlic powder (or 2 cloves minced fresh garlic) during the last few minutes of kneading. Perfect for serving with pasta or soups.
- Seed Topping: Instead of oats, sprinkle with sesame seeds, poppy seeds, or a mix of “everything bagel” seasoning before baking for a different flavor and texture.
Troubleshooting Common Issues:
- Dough Not Rising: Usually due to inactive yeast (water too hot/cold, old yeast) or a cold environment. Ensure yeast is fresh and water is the correct temperature, and find a warmer spot for rising.
- Dense Bread: Can be caused by not enough kneading (poor gluten development), too much flour (stiff dough), or insufficient rising time.
- Crumbly Bread: Often a sign of too much flour, leading to a dry dough.
- Holes in Bread: Large, irregular holes can indicate under-kneading, trapping large air pockets.
Storage and Reheating
Storing Freshly Baked Bread:
Once your Amish White Bread has completely cooled (this is crucial!), you can store it to maintain its freshness. For short-term storage (1-2 days), simply place the whole loaf or sliced bread in an airtight container or a large resealable plastic bag at room temperature. Avoid storing homemade bread in the refrigerator, as it tends to dry out and become stale more quickly at cooler temperatures. If you prefer a softer crust, you can wrap the loaf tightly in plastic wrap. For a slightly crisper crust, a paper bag inside a plastic bag works well, allowing some air circulation while still preventing excessive drying.
Freezing for Longer Storage:
This recipe makes two loaves, which is perfect for enjoying one now and saving one for later. Freezing is an excellent way to preserve the freshness of homemade bread for up to 2-3 months. To freeze, ensure the loaf is completely cool. You can freeze it whole or pre-slice it. If freezing whole, wrap the loaf tightly in plastic wrap, then an additional layer of aluminum foil to prevent freezer burn. If freezing slices, it’s helpful to place a piece of parchment paper between each slice before wrapping the stack tightly in plastic wrap and then foil. This allows you to remove just a few slices at a time as needed.
Thawing and Reheating:
To thaw a whole frozen loaf, simply remove it from the freezer and let it sit at room temperature for several hours, or overnight. For a warm, “fresh out of the oven” experience, you can reheat a thawed loaf (or even a partially thawed one) in a preheated oven at 350°F (175°C) for about 10-15 minutes, or until warmed through. If the crust seems a bit dry, you can lightly mist it with water before reheating. If you’ve frozen individual slices, you can pop them directly into a toaster, toaster oven, or even a microwave for a few seconds (though a toaster will yield a better texture) for a quick and delicious treat.
Frequently Asked Questions
What makes Amish White Bread different from regular white bread?
Amish White Bread is known for its incredibly soft, tender crumb and slightly sweet flavor, often attributed to a higher sugar content and sometimes the use of milk (though this recipe uses water for simplicity and accessibility). It’s typically made with basic, wholesome ingredients, reflecting the Amish tradition of simple, homemade foods. While all white bread shares similar base ingredients, the proportions and techniques used in Amish recipes often result in a distinctively softer and more palatable texture that’s perfect for sandwiches and toast.
Can I use whole wheat flour in this recipe?
Yes, you can certainly incorporate whole wheat flour, but it will change the texture and flavor of the bread. Whole wheat flour absorbs more liquid and has a higher protein content, which can result in a denser loaf. To maintain some of the desired softness, we recommend substituting no more than 2-3 cups of the all-purpose flour with whole wheat flour. You may also need to add a tablespoon or two of extra water or milk to keep the dough from being too stiff. Expect a slightly heartier loaf with a nuttier flavor.
My dough isn’t rising. What went wrong?
The most common reasons for dough not rising are inactive yeast or an improper rising environment. First, check your yeast: ensure it’s fresh and hasn’t expired. Second, verify the water temperature used to activate the yeast was between 105-115°F (40-46°C). Water that’s too hot will kill the yeast, and water that’s too cold won’t activate it. Lastly, make sure your dough is placed in a warm, draft-free spot for rising. Cold temperatures will significantly slow down or halt yeast activity. If your yeast didn’t foam after 5-10 minutes in the warm sugar water, it’s best to start over with fresh yeast.
How do I know when the bread is fully baked?
There are a few reliable indicators. Visually, the crust should be a beautiful, deep golden brown. When you gently tap the bottom of the loaf, it should sound hollow. For the most accurate measure, use an instant-read thermometer: the internal temperature of the bread should register between 190-200°F (88-93°C). If the crust is browning too quickly before the inside is cooked, you can loosely tent the loaves with aluminum foil for the remainder of the baking time.