Introduction
There are chocolate chip cookies, and then there are Brown Butter Chocolate Chip Cookies. This isn’t just a slight upgrade; it’s a culinary revelation that transforms a beloved classic into an extraordinary indulgence. Imagine that familiar comfort of a warm, gooey chocolate chip cookie, but infused with a deeply nutty, caramelized aroma that adds layers of sophisticated flavor you never knew you were missing. The simple act of browning butter unlocks a secret dimension of taste, turning humble butter into a golden elixir that elevates every single bite.
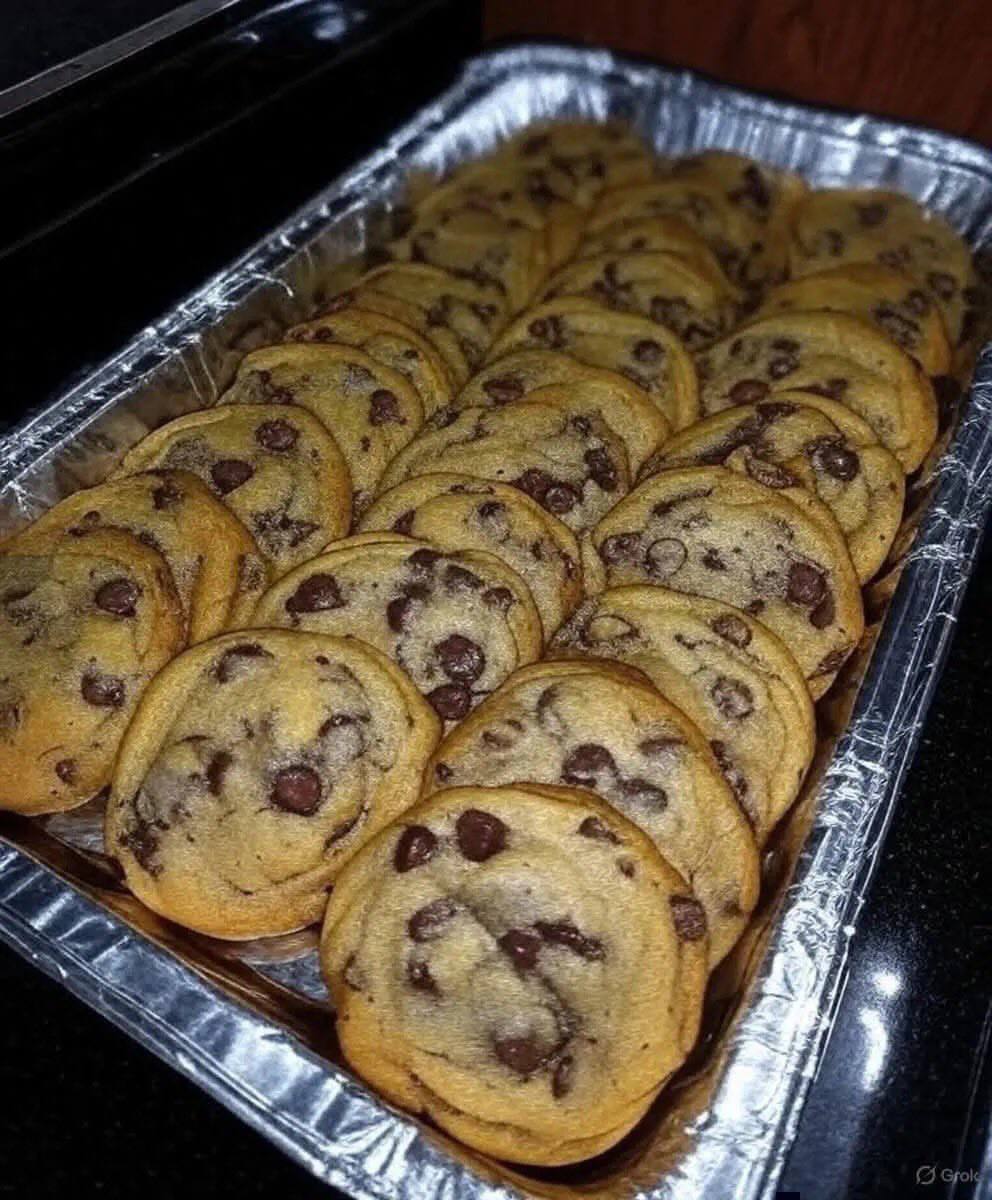
Just one look at a freshly baked batch of these cookies is enough to make your mouth water. With their beautifully golden-brown edges, hinting at a satisfying crispness, and centers that promise a soft, chewy interior, these cookies are a feast for the eyes as much as the palate. Nestled within, you’ll find pockets of perfectly melted chocolate, glistening and ready to ooze with every bite. The visual appeal is undeniable, and it’s all thanks to the magic of brown butter, which lends a rich, almost toffee-like complexity that pairs exquisitely with the sweet chocolate.
What truly sets these cookies apart is the harmonious balance of textures and flavors. The brown butter process introduces a depth that is both earthy and sweet, complementing the sweetness of the sugar and the richness of the chocolate. This isn’t just an easy cookie recipe; it’s a testament to how a small tweak in technique can yield dramatically superior results. Get ready to discover your new favorite cookie, one that boasts irresistible chewy centers, perfectly crispy edges, and an unforgettable nutty flavor that will have everyone asking for your secret.
Nutritional Information
Per serving (approximate values):
- Calories: 220
- Protein: 3g
- Carbohydrates: 28g
- Fat: 12g
- Fiber: 1g
- Sodium: 150mg
Ingredients
- 1 cup (226g) unsalted butter
- 1 cup (200g) packed light brown sugar
- ½ cup (100g) granulated sugar
- 2 large eggs, at room temperature
- 2 teaspoons pure vanilla extract
- 2 ¼ cups (270g) all-purpose flour
- 1 teaspoon baking soda
- ½ teaspoon salt
- 1 ½ cups (255g) mini chocolate chips or finely chopped semi-sweet chocolate
Instructions
- Begin by browning the butter. In a light-colored saucepan, melt the unsalted butter over medium heat. Continue to cook, stirring occasionally, until the butter begins to foam. Tiny brown bits will start to form at the bottom of the pan, and the butter will take on a nutty aroma. This usually takes about 5-8 minutes. Once the butter is a rich amber color with fragrant brown flecks, immediately remove it from the heat and pour it into a heatproof bowl to prevent further cooking. Allow the brown butter to cool for about 10-15 minutes, until it’s still warm but no longer sizzling hot.
- In a large mixing bowl, combine the cooled brown butter with the packed light brown sugar and granulated sugar. Beat with an electric mixer on medium speed until the mixture is light and creamy, about 2-3 minutes.
- Add the eggs one at a time, beating well after each addition until fully incorporated. Stir in the pure vanilla extract.
- In a separate medium bowl, whisk together the all-purpose flour, baking soda, and salt.
- Gradually add the dry ingredients to the wet ingredients, mixing on low speed until just combined. Be careful not to overmix the dough, as this can lead to tough cookies. Stop mixing as soon as no streaks of flour remain.
- Fold in the mini chocolate chips or finely chopped semi-sweet chocolate until evenly distributed throughout the dough.
- Cover the bowl with plastic wrap and refrigerate the cookie dough for at least 30 minutes, or up to 24 hours. Chilling the dough is crucial for developing flavor and preventing the cookies from spreading too much during baking.
- When ready to bake, preheat your oven to 375°F (190°C). Line baking sheets with parchment paper or silicone baking mats.
- Scoop rounded tablespoons of cookie dough onto the prepared baking sheets, leaving about 2 inches between each cookie. For uniform cookies, use a cookie scoop.
- Bake for 9-12 minutes, or until the edges are golden brown and set, but the centers still look slightly soft and underbaked. This will ensure chewy centers and crispy edges. If baking multiple trays, rotate them halfway through baking for even browning.
- Remove the baking sheets from the oven and let the cookies cool on the sheets for 5-10 minutes before transferring them to a wire rack to cool completely. This allows them to set up and prevents them from breaking.
- Serve warm or at room temperature and enjoy your perfect brown butter chocolate chip cookies!
Cooking Tips and Variations
Achieving cookie perfection is an art, and with these brown butter chocolate chip cookies, a few key tips can elevate your baking game significantly. First and foremost, don’t overmix the dough. Once the dry ingredients are added, mix only until just combined. Overmixing develops the gluten in the flour, leading to tough, cake-like cookies rather than the desired chewy texture. Another crucial tip is to ensure your eggs are at room temperature. Room temperature eggs emulsify better with the butter and sugar, creating a smoother, more uniform dough and contributing to a superior texture in the final cookie. For the best flavor, use good quality chocolate. Whether you prefer semi-sweet, dark, or milk chocolate, investing in a high-quality brand will make a noticeable difference in the taste and melt of your chocolate chips. If you enjoy a touch of saltiness to balance the sweetness, consider sprinkling a tiny pinch of flaky sea salt on top of the cookies immediately after they come out of the oven. This simple addition enhances all the flavors beautifully.
The chilling of the dough is not optional; it’s a vital step. Chilling for at least 30 minutes, and ideally for several hours or even overnight, allows the flavors to meld and deepen, particularly the nutty notes from the brown butter. More importantly, it solidifies the butter, which prevents the cookies from spreading too much in the oven, resulting in thicker, chewier cookies. Another excellent technique is to use parchment paper or silicone baking mats on your baking sheets. These prevent sticking, promote even baking, and make for easy cleanup. When it comes to baking, don’t overbake your cookies. Remove them from the oven when the edges are golden brown and set, but the centers still look slightly soft and underbaked. They will continue to cook and set as they cool on the hot baking sheet, ensuring those coveted chewy centers.
This classic recipe also serves as a fantastic base for a variety of customizations. For chocolate lovers, experiment with different types of chocolate: a mix of dark chocolate chunks and milk chocolate chips can create a complex flavor profile. White chocolate chips can add a creamy sweetness, while finely chopped chocolate bars offer a more luxurious melt. To add another layer of texture and flavor, incorporate a ½ cup of chopped toasted nuts like pecans, walnuts, or macadamia nuts into the dough. A dash of cinnamon or a pinch of espresso powder can also enhance the chocolate flavor. For a more adventurous twist, try adding a tablespoon of orange zest or a ¼ teaspoon of almond extract. While this recipe is designed for traditional cookies, brief mentions for gluten-free adaptations often involve substituting the all-purpose flour with a 1:1 gluten-free baking flour blend that contains xanthan gum. For dairy-free versions, a high-quality plant-based butter substitute can be used for browning, though the flavor profile may vary slightly.
Storage and Reheating
To keep your brown butter chocolate chip cookies fresh and delicious, proper storage is key. Once completely cooled, store the cookies in an airtight container at room temperature. They will remain fresh and chewy for up to 3-4 days. If you prefer a softer cookie, you can place a half slice of bread or a tortilla in the container with the cookies; the bread will absorb moisture, helping to keep the cookies soft. Avoid storing them in the refrigerator, as this can dry them out and make them hard.
For longer-term storage, these cookies freeze beautifully. Once fully cooled, place them in a single layer on a baking sheet and freeze for about an hour until solid. Then, transfer the frozen cookies to a freezer-safe airtight container or a heavy-duty freezer bag. They can be stored in the freezer for up to 3 months. When you’re ready to enjoy them, simply let them thaw at room temperature for a few hours, or you can reheat them directly from frozen.
Reheating these cookies brings back that irresistible fresh-baked aroma and gooey chocolate. To reheat, place individual cookies on a microwave-safe plate and microwave on high for 10-15 seconds, or until the chocolate is melted and the cookie is warm and soft. For a crispier edge, you can reheat them in a preheated oven or toaster oven at 300°F (150°C) for 5-7 minutes, or until warmed through. This method is particularly good for frozen cookies, which may need a few extra minutes. Always be careful not to overheat, as this can dry out the cookies.
Frequently Asked Questions
Why did my cookies spread too much?
Cookies spreading too much is a common issue, often due to a few factors. The most frequent culprit is insufficient chilling of the dough. Chilling solidifies the butter, preventing it from melting too quickly in the oven. Warm dough, or dough with too much softened butter, will spread more. Other reasons can include using too little flour, using too much leavening agent, or baking on an overly greased or warm baking sheet. Ensure your butter isn’t too soft when making the dough, and always chill the dough for at least 30 minutes, preferably longer.
Can I make the dough ahead of time?
Absolutely! Making the dough ahead of time is highly recommended for brown butter chocolate chip cookies. Chilling the dough not only prevents spreading but also allows the flavors, especially the nutty notes from the brown butter, to deepen and meld beautifully. You can store the raw cookie dough in an airtight container in the refrigerator for up to 3-4 days. For longer storage, portion the dough into balls, freeze them on a baking sheet until solid, then transfer to a freezer-safe bag. Frozen dough balls can be stored for up to 3 months and baked directly from frozen, adding an extra 2-4 minutes to the baking time.
What’s the best way to get chewy centers and crisp edges?
Achieving the perfect balance of chewy centers and crisp edges depends on a few techniques. First, don’t overbake! Remove the cookies from the oven when their edges are golden brown and set, but the centers still appear slightly soft and underbaked. They will continue to cook and firm up as they cool on the hot baking sheet. Second, chilling the dough helps create thicker cookies that retain moisture in the center. Third, the ratio of brown sugar to white sugar in this recipe is designed to promote chewiness (brown sugar) and crispness (white sugar). Finally, using parchment paper or silicone mats ensures even heat distribution, contributing to that desirable texture.
My butter burned when I tried to brown it. What went wrong?
Browning butter requires careful attention, as it can go from perfectly nutty to burnt very quickly. The most common reasons for burning are cooking it over too high heat, not stirring frequently enough, or not transferring it out of the hot pan immediately once it reaches the desired color. Use a light-colored saucepan so you can easily see the color change of the butter and the browning bits. Cook over medium heat, stir continuously or frequently, and once you see the golden-amber color and smell the nutty aroma, pour it into a separate, cool bowl right away to stop the cooking process. If it does burn, unfortunately, there’s no saving it; you’ll need to start over.