Introduction
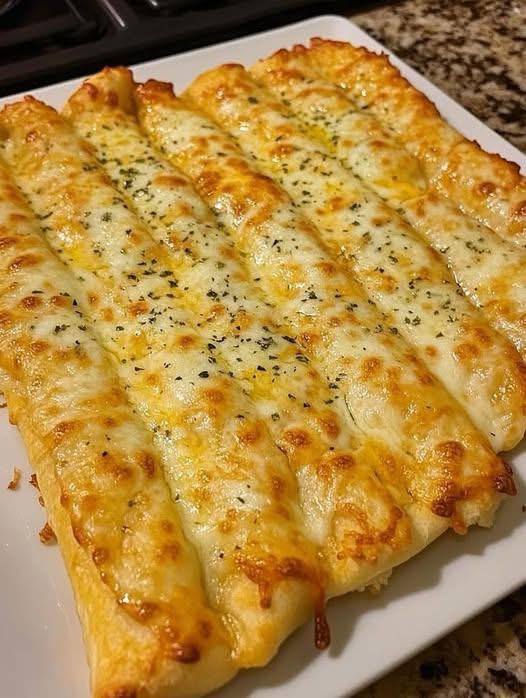
Prepare to embark on a culinary journey to the heart of comfort food with our ultimate Cheesy Garlic Breadsticks! Imagine: a warm, golden-brown crust, generously slathered with aromatic garlic butter, and blanketed under a glorious, bubbling layer of melted cheese. This isn’t just an appetizer; it’s an experience, a symphony of textures and flavors that will have everyone reaching for more. Whether you’re hosting a game night, planning a casual dinner, or simply craving that irresistible cheesy goodness, these breadsticks are guaranteed to steal the show and disappear faster than you can say “delicious!”
What makes these Cheesy Garlic Breadsticks truly special? It’s the perfect harmony of simple, high-quality ingredients transformed into something extraordinary. We start with a tender, airy dough that bakes up beautifully, providing the ideal canvas for our rich garlic butter. Then comes the star of the show: a generous topping of melty cheese, browned to perfection, creating those coveted crispy edges and gooey centers. Each bite delivers a burst of savory garlic, salty cheese, and satisfying bread, making it an absolute crowd-pleaser that pairs wonderfully with almost any meal or stands proudly on its own.
This recipe is designed to be approachable for home cooks of all skill levels, offering options for both convenience and from-scratch enthusiasts. We’ll guide you through each step, ensuring you achieve breadsticks that are not only delicious but also visually stunning, just like those you’d find at your favorite pizzeria. Get ready to fill your kitchen with the intoxicating aroma of garlic and cheese, and prepare for rave reviews!
Nutritional Information
Per serving (approximate values, based on 10 breadsticks per recipe):
- Calories: 280 calories
- Protein: 12g
- Carbohydrates: 30g
- Fat: 12g
- Fiber: 2g
- Sodium: 480mg
Ingredients
- 1 pound (about 450g) store-bought pizza dough (fresh or thawed frozen)
- 4 tablespoons (1/2 stick) unsalted butter, melted
- 4-5 cloves garlic, minced (about 1.5-2 tablespoons)
- 1/2 teaspoon dried oregano
- 1/4 teaspoon dried parsley
- 1/4 teaspoon garlic powder
- Pinch of red pepper flakes (optional, for a subtle kick)
- 1 1/2 cups shredded mozzarella cheese
- 1/2 cup shredded provolone cheese (or additional mozzarella)
- 2 tablespoons grated Parmesan cheese
- 1/4 teaspoon salt
- Fresh parsley, chopped, for garnish (optional)
Instructions
- Preheat your oven to 400°F (200°C). If using a baking stone, place it in the oven during preheating. Lightly grease a large baking sheet or line it with parchment paper.
- If using cold dough, allow it to come to room temperature for at least 30 minutes. This makes it easier to work with.
- On a lightly floured surface, gently stretch or roll the pizza dough into a rectangle, approximately 10×14 inches. You want it to be about 1/4 to 1/2 inch thick.
- Carefully transfer the dough to your prepared baking sheet.
- In a small microwave-safe bowl, melt the unsalted butter. Add the minced garlic, dried oregano, dried parsley, garlic powder, and red pepper flakes (if using) to the melted butter. Stir well to combine. Let this mixture sit for a few minutes to allow the flavors to meld.
- Brush about two-thirds of the garlic butter mixture evenly over the surface of the dough, making sure to go almost to the edges.
- In a medium bowl, combine the shredded mozzarella, provolone, and grated Parmesan cheeses. Sprinkle this cheese mixture evenly over the garlic-buttered dough, ensuring good coverage.
- Using a sharp knife or a pizza cutter, score the dough into breadstick shapes. You can make them about 1 inch wide and 5-7 inches long. Do not cut all the way through the dough; just score enough so they are easy to break apart after baking.
- Sprinkle the salt evenly over the cheese.
- Bake for 12-18 minutes, or until the crust is golden brown, the cheese is melted and bubbly, and has some beautiful golden-brown spots. Keep a close eye on them during the last few minutes to prevent over-browning.
- Once out of the oven, brush the remaining garlic butter mixture over the hot breadsticks. This adds an extra layer of flavor and moisture.
- If desired, sprinkle with fresh chopped parsley for a pop of color and freshness.
- Let the breadsticks cool for a minute or two on the baking sheet before transferring them to a cutting board. Cut along the scored lines completely, or simply break them apart.
- Serve immediately with your favorite dipping sauce, such as warm marinara sauce.
Cooking Tips and Variations
Achieving truly perfect cheesy garlic breadsticks involves a few key techniques and offers plenty of room for creative variations. Let’s dive into making these even better!
Dough Choice is Key: While store-bought pizza dough is fantastic for convenience, don’t hesitate to use your favorite homemade pizza dough recipe if you have one. For store-bought, look for fresh dough in the refrigerated section of your grocery store for the best texture. If using frozen dough, ensure it’s fully thawed and brought to room temperature before rolling.
Garlic Intensity: The more fresh garlic you use, the more potent and delicious the flavor will be. If you prefer a milder garlic taste, reduce the amount of minced fresh garlic and rely more on garlic powder. For an even richer garlic flavor, you can lightly sauté the minced garlic in a tablespoon of butter before adding it to the rest of the melted butter mixture. This mellows the raw garlic bite and brings out its sweetness.
The Perfect Cheese Blend: Mozzarella is essential for that classic stretch and melt, but don’t be afraid to experiment with other cheeses. Provolone adds a nice tang and slightly firmer texture when melted. A sprinkle of sharp cheddar can add a deeper, more savory note, while a touch of Monterey Jack will make them extra gooey. For a pungent kick, a small amount of crumbled feta or goat cheese can be surprisingly delicious. Always use freshly shredded cheese if possible, as pre-shredded varieties often contain anti-caking agents that can affect melt and texture.
Preventing Soggy Breadsticks: The key to a non-soggy bottom is proper baking. Ensure your oven is fully preheated. Baking on a preheated baking stone or a heavy-duty baking sheet helps conduct heat efficiently to the bottom of the dough, ensuring it cooks through and crisps up. Don’t overload the breadsticks with too much garlic butter or cheese; a generous but even layer is best. Also, make sure your dough isn’t too thick, as this can lead to an undercooked, doughy interior.
Golden Brown Perfection: For that beautiful golden-brown crust and bubbly, slightly charred cheese, make sure your oven is at the correct temperature. If your cheese isn’t browning enough, you can turn on the broiler for the last 1-2 minutes, but watch it very carefully as cheese can go from perfect to burnt in seconds.
Herb Power: Dried oregano and parsley are classics, but feel free to experiment with other dried herbs like basil or a pre-made Italian seasoning blend. For a fresh burst of flavor and vibrant color, sprinkle fresh chopped parsley or basil over the breadsticks immediately after they come out of the oven. The residual heat will wilt them slightly and release their aromas.
Spicy Kick: A pinch of red pepper flakes in the garlic butter mixture adds a wonderful, subtle heat that complements the cheese and garlic beautifully. If you like more spice, you can increase the amount or even add a dash of cayenne pepper.
Dipping Sauce Extravaganza: While marinara sauce is the quintessential pairing, consider other options. A creamy ranch dressing offers a cool contrast, while a homemade garlic aioli elevates the garlic flavor. Even a simple olive oil dip with balsamic vinegar and herbs can be delightful. Don’t be afraid to get creative with your dipping choices!
Make-Ahead Magic: You can prepare the garlic butter mixture in advance and store it in the refrigerator for up to 3 days. Simply warm it gently before brushing. If using homemade dough, you can prepare the dough ahead of time and store it in the fridge or freezer according to your recipe’s instructions. You can even assemble the breadsticks (without baking) and refrigerate them for an hour or two, then bake just before serving. This is perfect for party prep!
Cheesy Pull: For the ultimate cheese pull, serve the breadsticks piping hot, right out of the oven. The longer they sit, the more the cheese will set, though they’ll still be delicious.
These tips and variations ensure that every batch of your Cheesy Garlic Breadsticks is a resounding success, tailored perfectly to your taste and ready to impress!
Storage and Reheating
Cheesy garlic breadsticks are best enjoyed fresh out of the oven, when the cheese is gooey and the crust is crisp. However, if you happen to have leftovers (a rare occurrence!), they can be stored and reheated.
Storage: Allow the breadsticks to cool completely to room temperature. Store them in an airtight container or a resealable plastic bag. They will keep well in the refrigerator for up to 2-3 days. Storing them while still warm can lead to condensation, making them soggy.
Reheating:
- Oven/Toaster Oven (Recommended): This method is best for restoring crispness. Preheat your oven or toaster oven to 350°F (175°C). Place the breadsticks directly on a baking sheet or toaster oven tray. Reheat for 5-10 minutes, or until the cheese is melted and bubbly again and the breadsticks are warmed through and slightly crispy.
- Air Fryer: Preheat your air fryer to 325°F (160°C). Place the breadsticks in a single layer in the air fryer basket (do not overcrowd). Cook for 3-5 minutes, checking frequently, until warmed through and crispy.
- Microwave (Least Recommended): While quick, the microwave will make the breadsticks soft and chewy, losing their desirable crisp texture. If using, microwave for 15-30 seconds, just until warmed through. This method is best avoided if you want to retain any crispness.
Regardless of the reheating method, keep an eye on them to prevent over-drying or burning. A quick brush with a tiny bit of melted butter before reheating can help restore some moisture and flavor.
Frequently Asked Questions
Can I use pre-made garlic bread for this recipe?
While you could technically add more cheese to pre-made garlic bread, this recipe focuses on starting with a plain dough base to build a more authentic, fresh-baked breadstick experience. The texture and flavor will be significantly different if you use pre-made garlic bread, which often has a denser crumb and pre-applied garlic spread that might not meld as well with extra cheese.
My breadsticks are getting soggy. What am I doing wrong?
Soggy breadsticks are usually a result of too much moisture. Ensure your dough isn’t too thick, as this can lead to an undercooked interior. Also, make sure your oven is fully preheated to the correct temperature, and consider baking on a preheated baking stone or a heavier baking sheet to promote better heat transfer to the bottom. Don’t brush too much garlic butter on the dough before baking; a generous but even layer is sufficient. Lastly, avoid storing them in an airtight container while they are still warm, as condensation will make them soggy.
What’s the best way to get that perfect golden-brown cheese?
Several factors contribute to beautifully browned cheese. Firstly, ensure your oven temperature is accurate. Secondly, using a blend of cheeses, like mozzarella with a bit of provolone or Parmesan, can help achieve better browning and flavor. Parmesan, in particular, browns nicely. Finally, if your cheese isn’t browning to your liking during the last few minutes of baking, you can briefly switch on the broiler for 1-2 minutes. However, watch it very closely, as cheese can burn quickly under the broiler.
Can I prepare the dough and toppings ahead of time?
Yes, you can! The garlic butter mixture can be prepared up to 3 days in advance and stored in the refrigerator; just gently warm it before use. If you’re using homemade dough, you can prepare it according to your recipe’s instructions and refrigerate it. For convenience, you can even roll out the dough, brush it with garlic butter, top it with cheese, score it, and then refrigerate it on the baking sheet for an hour or two before baking. This is a great time-saver for entertaining.