Introduction
There are some desserts that just whisper “home.” They evoke memories of grandma’s kitchen, sun-drenched afternoons, and the simple joy of sharing something sweet. Old Time Oven Peach Cobbler is undoubtedly one of those dishes. It’s a classic for a reason, a comforting embrace in edible form, promising warmth and satisfaction with every spoonful. Imagine a golden-brown, tender crust giving way to a bubbling, sweet, and juicy peach filling – that’s the magic we’re talking about today. Our recipe celebrates the authentic, no-fuss approach to this beloved dessert, bringing you a taste of nostalgia that feels both familiar and utterly delightful.
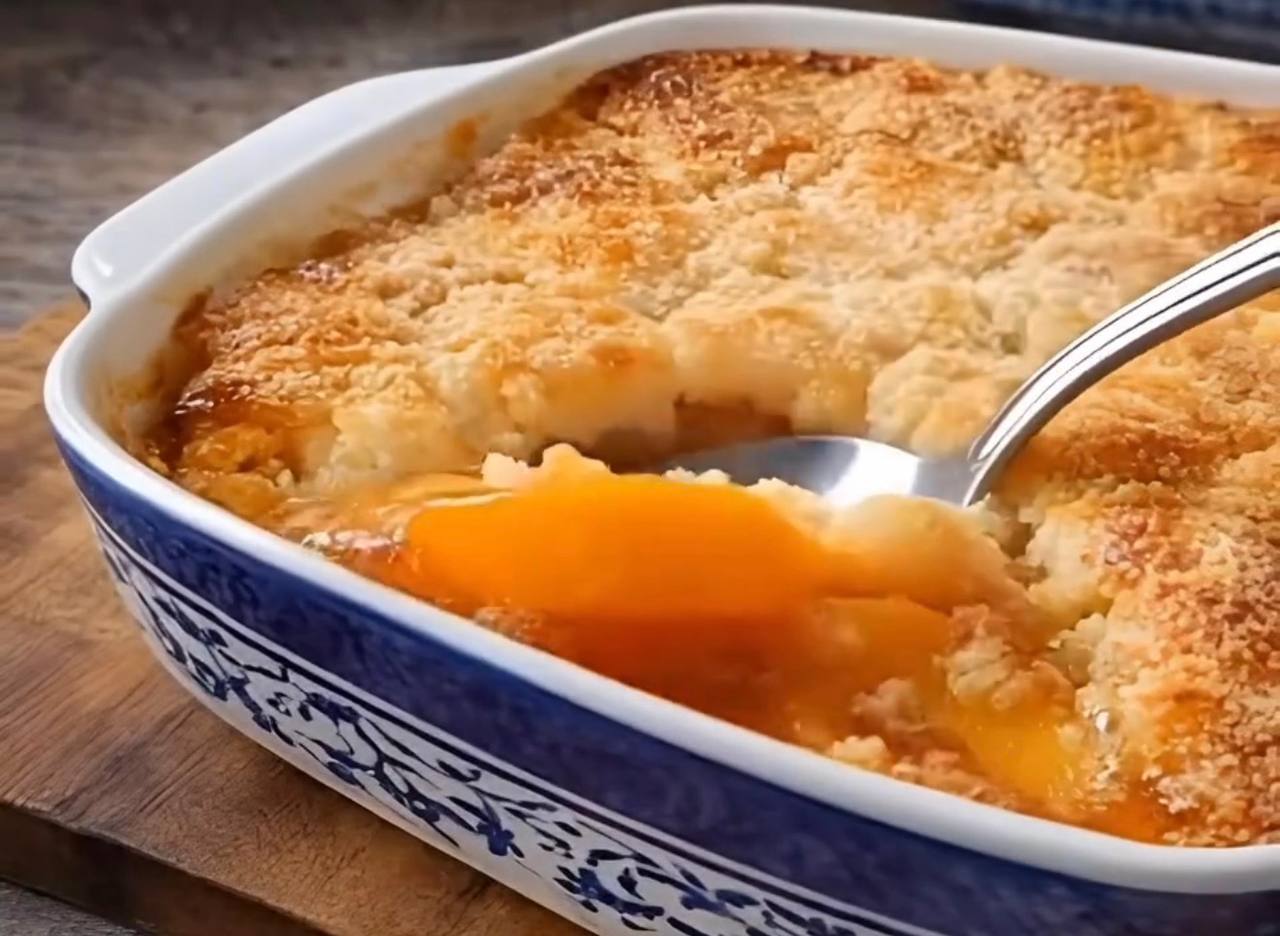
What makes this Old Time Oven Peach Cobbler truly special isn’t just its delicious flavor, but its heartwarming simplicity. It’s a dessert that doesn’t need fancy decorations or complicated techniques to impress. Instead, it relies on the natural sweetness of ripe peaches, a perfectly balanced, biscuit-like topping, and the gentle heat of your oven to transform humble ingredients into something extraordinary. The image itself speaks volumes: that rich, syrupy peach filling peeking out from beneath a beautifully browned, slightly irregular crust, just begging to be scooped up with a spoon, perhaps alongside a melting dollop of vanilla ice cream.
This isn’t just a recipe; it’s an invitation to create memories. Whether you’re gathering fresh peaches from a local orchard, or simply yearning for a taste of traditional comfort, this Old Time Oven Peach Cobbler promises to deliver. It’s a celebration of seasonal bounty, a testament to timeless flavors, and a perfect example of how the simplest desserts can often be the most satisfying. Get ready to fill your kitchen with the irresistible aroma of baking peaches and butter, and prepare to fall in love with a true classic.
Nutritional Information
Per serving (approximate values):
- Calories: 420
- Protein: 5g
- Carbohydrates: 65g
- Fat: 17g
- Fiber: 4g
- Sodium: 280mg
Ingredients
For the Peach Filling:
- 6-8 ripe fresh peaches (about 2.5-3 lbs), peeled, pitted, and sliced into 1/2-inch wedges (or 2 cans, 15 oz each, sliced peaches in light syrup, drained)
- 1/2 cup granulated sugar (adjust to taste based on peach sweetness)
- 1/4 cup light brown sugar, packed
- 1 tablespoon fresh lemon juice
- 1 teaspoon ground cinnamon
- 1/4 teaspoon ground nutmeg
- 2 tablespoons cornstarch (if using fresh peaches) or 1 tablespoon (if using canned)
- 1/4 teaspoon salt
- 2 tablespoons unsalted butter, cut into small pieces
For the Cobbler Topping:
- 1 1/2 cups all-purpose flour
- 1/2 cup granulated sugar
- 1 tablespoon baking powder
- 1/2 teaspoon salt
- 1/2 cup (1 stick) cold unsalted butter, cut into small cubes
- 1/2 cup milk (whole or 2%)
- 1 teaspoon vanilla extract
- 1 tablespoon turbinado sugar (for sprinkling, optional)
Instructions
- Preheat your oven to 375°F (190°C). Lightly grease a 9×13 inch baking dish or an 8×8 inch square baking dish if you prefer a thicker cobbler.
- Prepare the Peach Filling: If using fresh peaches, gently peel them by blanching them in boiling water for 30-60 seconds, then immediately transferring to an ice bath. The skins should slip off easily. Pit and slice the peaches into 1/2-inch wedges.
- In a large bowl, combine the sliced peaches with granulated sugar, brown sugar, lemon juice, cinnamon, nutmeg, cornstarch, and salt. Toss gently to coat the peaches evenly. If using canned peaches, ensure they are well-drained before mixing with the other filling ingredients.
- Pour the peach mixture into the prepared baking dish. Dot the top of the peaches with the small pieces of butter.
- Prepare the Cobbler Topping: In a separate medium bowl, whisk together the flour, granulated sugar, baking powder, and salt.
- Add the cold, cubed butter to the dry ingredients. Using a pastry blender, your fingertips, or two knives, cut the butter into the flour mixture until it resembles coarse crumbs with some pea-sized pieces of butter remaining. The key is to keep the butter cold for a tender, flaky topping.
- In a small bowl or measuring cup, whisk together the milk and vanilla extract.
- Pour the wet ingredients into the dry ingredients. Stir just until combined and a soft dough forms. Be careful not to overmix, as this can lead to a tough topping. A few lumps are perfectly fine.
- Assemble and Bake: Drop spoonfuls of the cobbler topping over the peach filling. You can either drop them in even mounds to cover the surface or create a more rustic, uneven look. Ensure most of the peaches are covered.
- If desired, sprinkle the top of the cobbler topping with turbinado sugar for a lovely crunchy finish and extra sparkle.
- Bake for 35-45 minutes, or until the topping is golden brown, the peach filling is bubbly around the edges, and a toothpick inserted into a piece of the topping comes out clean.
- Remove the cobbler from the oven and let it rest for at least 15-20 minutes before serving. This allows the filling to set and prevents it from being too runny.
Cooking Tips and Variations
For the most authentic “old time” flavor, always opt for fresh, ripe peaches when they are in season. Their natural sweetness and aroma are unmatched. If using fresh peaches, remember that their sweetness can vary greatly. Taste a peach before mixing your filling and adjust the sugar quantity accordingly. If your peaches are very sweet, you might reduce the sugar by a tablespoon or two. Conversely, if they’re a bit tart, add an extra tablespoon or two.
To achieve a perfectly tender and flaky cobbler topping, the key is to work with cold butter and avoid overmixing the dough. Cold butter creates pockets of steam in the oven, leading to a lighter, flakier texture. Overmixing develops the gluten in the flour, which can result in a tough, chewy topping. Mix just until the ingredients are combined. For an extra rich and slightly tangy topping, you can substitute buttermilk for regular milk. This addition often enhances the flavor and tenderness of the biscuit-like crust.
Don’t be afraid to experiment with spices! While cinnamon and nutmeg are classics, a pinch of ground ginger or cardamom can add a wonderful depth of flavor to the peach filling. For a different twist, you could even add a tablespoon of bourbon or vanilla extract to the peach filling for an extra layer of warmth. If you’re feeling adventurous, consider adding a handful of fresh berries like blueberries or raspberries to the peach filling for a mixed fruit cobbler that’s equally delicious.
If you notice the topping browning too quickly during baking, you can loosely tent the baking dish with aluminum foil. This will prevent the topping from burning while allowing the peaches underneath to continue bubbling and thickening. The cobbler is done when the topping is golden brown and a toothpick inserted into a piece of the topping comes out clean. The filling should also be visibly bubbling around the edges, indicating it has thickened properly.
Storage and Reheating
To store any leftover Old Time Oven Peach Cobbler, allow it to cool completely to room temperature. Once cooled, cover the baking dish tightly with plastic wrap or aluminum foil. It can be stored at room temperature for up to 1 day, especially if your kitchen is cool. For longer storage, transfer the covered cobbler to the refrigerator, where it will keep well for 3-4 days. The topping may soften slightly over time, but the flavors will still be delightful.
When you’re ready to enjoy your leftover cobbler, reheating it is simple. For individual servings, you can microwave a portion for 30-60 seconds, or until warmed through. Be careful not to overheat, as this can make the topping rubbery. For a crispier topping, or to reheat a larger portion of the cobbler, place it in an oven preheated to 300°F (150°C) for 10-15 minutes, or until warmed through and the topping has re-crisped slightly. You can also loosely cover it with foil during reheating to prevent further browning if desired. Always serve reheated cobbler with a fresh scoop of vanilla ice cream or a dollop of whipped cream for the best experience.
Frequently Asked Questions
What’s the difference between a cobbler, a crisp, and a crumble?
While all are fruit-based desserts with a baked topping, the main difference lies in the topping. A cobbler typically features a biscuit-like or scone-like topping that is dropped over the fruit, giving it a “cobbled” appearance. A crisp has a topping made of oats, flour, sugar, and butter, which bakes to a crumbly, crispy texture. A crumble is very similar to a crisp but generally doesn’t include oats in its topping, resulting in a slightly softer, streusel-like crumb.
Can I use frozen peaches for this recipe?
Yes, you can absolutely use frozen peaches! Thaw them completely before mixing them with the other filling ingredients. You might find that thawed frozen peaches release more liquid, so consider adding an extra half-tablespoon of cornstarch to the filling to ensure it thickens properly. Also, drain any excess liquid that accumulates during thawing before mixing with sugar and spices.
How do I know when the cobbler is fully cooked?
The cobbler is fully cooked when the topping is a beautiful golden brown and appears firm, not doughy. You should also see the fruit filling bubbling vigorously around the edges of the baking dish, indicating that it has thickened and is hot throughout. If you’re unsure about the topping, a toothpick inserted into one of the topping pieces should come out clean, without any wet batter clinging to it.
Can I make this cobbler ahead of time?
You can prepare components of the cobbler ahead of time. The peach filling mixture can be made up to a day in advance and stored in the refrigerator. The dry ingredients for the topping can also be mixed and stored at room temperature. However, it’s best to assemble and bake the cobbler just before serving for the freshest taste and best texture, especially for the topping. If you must bake it ahead, allow it to cool completely, then cover and store as described in the storage section, and reheat before serving.