Introduction
There are very few culinary experiences as universally beloved and deeply satisfying as biting into a piece of perfectly cooked Southern Fried Chicken. It’s more than just a meal; it’s a symphony of textures and flavors – the unmistakable crunch of a golden, craggy crust giving way to incredibly juicy, tender meat, all seasoned with a comforting blend of spices. This isn’t your average weeknight dinner; it’s a dish steeped in tradition, a culinary hug from the American South that has charmed palates for generations. The magic truly lies in the meticulous preparation of the chicken and, most importantly, the masterful creation of its iconic, crispy coating.
What sets truly exceptional Southern Fried Chicken apart is its unforgettable batter. This recipe isn’t just about frying chicken; it’s about crafting that ultimate, shatteringly crisp exterior that locks in moisture and infuses every bite with incredible flavor. We’ll dive deep into the secrets of a double-dredge technique, the power of buttermilk, and the perfect blend of spices that transform simple ingredients into a culinary masterpiece. Get ready to embark on a delicious journey that culminates in the most satisfying, golden-brown fried chicken you’ve ever tasted.
From selecting the freshest chicken to achieving that ideal oil temperature, every step in this guide is designed to empower you to create Southern Fried Chicken that rivals your favorite restaurant. We’ll cover everything from the essential ingredients and their roles to the precise frying techniques that guarantee a consistently crispy, flavorful result. Prepare to impress your family and friends with a dish that embodies comfort, tradition, and undeniable deliciousness.
Nutritional Information
Per serving (approximate values for 1 thigh or 2 drumsticks):
- Calories: 450
- Protein: 35g
- Carbohydrates: 25g
- Fat: 25g
- Fiber: 1g
- Sodium: 850mg
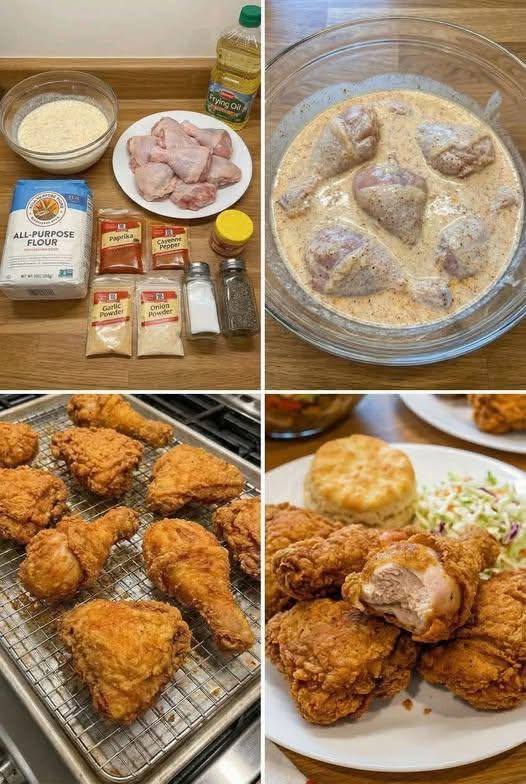
Ingredients
- 8 pieces bone-in, skin-on chicken (a mix of drumsticks and thighs works well)
- 4 cups all-purpose flour, divided
- 2 tablespoons smoked paprika
- 1 tablespoon cayenne pepper (adjust to your spice preference)
- 2 tablespoons garlic powder
- 2 tablespoons onion powder
- 1 tablespoon dried oregano
- 1 tablespoon dried thyme
- 2 teaspoons black pepper
- 2 tablespoons kosher salt, plus more for seasoning
- 4 cups buttermilk
- 1 large egg
- 1 tablespoon hot sauce (optional, for extra flavor and kick)
- 6-8 cups neutral frying oil (canola, vegetable, peanut, or shortening)
Instructions
- Prepare the Chicken: Pat the chicken pieces thoroughly dry with paper towels. This is a crucial step for achieving a crispy skin. Season each piece generously with a pinch of kosher salt and black pepper.
- Create the Wet Batter Mixture: In a large bowl, whisk together the buttermilk, egg, and hot sauce (if using) until well combined.
- Create the Dry Batter Mixture: In another large, shallow dish or bowl (wide enough to dredge chicken pieces comfortably), combine 3 cups of the all-purpose flour, smoked paprika, cayenne pepper, garlic powder, onion powder, dried oregano, dried thyme, and 2 tablespoons of kosher salt. Whisk everything together until the spices are evenly distributed throughout the flour.
- First Dredge (Wet): Submerge each piece of seasoned chicken into the buttermilk mixture, ensuring it’s completely coated. Let any excess drip off.
- Second Dredge (Dry): Transfer the wet chicken piece directly into the seasoned flour mixture. Press the flour firmly onto all surfaces of the chicken, ensuring a thick, even coating. Shake off any excess flour. Place the coated chicken on a wire rack set over a baking sheet. Repeat this process for all chicken pieces.
- Rest the Chicken: Allow the dredged chicken to rest on the wire rack for at least 30 minutes at room temperature, or up to 2 hours in the refrigerator. This allows the coating to adhere better, preventing it from falling off during frying, and results in a crispier crust.
- Prepare for Frying: While the chicken rests, pour the frying oil into a large, heavy-bottomed pot or Dutch oven, ensuring the oil is at least 3-4 inches deep. Attach a deep-fry thermometer to the side of the pot. Heat the oil over medium-high heat until it reaches a consistent temperature of 325-350°F (160-175°C). Maintaining this temperature is critical.
- Fry the Chicken (in batches): Carefully lower 2-3 pieces of chicken into the hot oil using tongs. Do not overcrowd the pot, as this will drop the oil temperature too much and result in greasy, soggy chicken.
- Cook Time: Fry the chicken for approximately 6-8 minutes per side, turning occasionally, until it’s deep golden brown and the internal temperature reaches 165°F (74°C) when tested with an instant-read thermometer inserted into the thickest part of the meat (avoiding the bone). Darker meat pieces like thighs and drumsticks will take longer than breasts.
- Drain and Rest: Once cooked, carefully remove the chicken from the oil and place it on a clean wire rack set over a fresh baking sheet. This allows excess oil to drain off and helps maintain the crispiness. Lightly sprinkle with a little extra kosher salt immediately after removing from the oil.
- Repeat and Serve: Continue frying the remaining chicken in batches, ensuring the oil returns to the desired temperature between each batch. Serve the Southern Fried Chicken hot and fresh with your favorite sides.
Cooking Tips and Variations
Brining for Ultimate Juiciness: For an extra layer of moisture and flavor, especially for chicken breasts, consider a pre-brine. Submerge chicken in a solution of 1/4 cup salt to 4 cups water for 30 minutes to an hour before drying and proceeding with the recipe. Rinse well and pat dry before moving to the buttermilk soak.
Maintain Oil Temperature: This is arguably the most important factor for perfect fried chicken. Use a reliable deep-fry thermometer and adjust your heat as needed. If the oil is too hot, the exterior will burn before the inside cooks; too cool, and the chicken will absorb too much oil and be greasy. Aim for 325-350°F (160-175°C).
Don’t Overcrowd the Pot: Frying in small batches is essential. Overcrowding significantly drops the oil temperature, leading to uneven cooking and a less crispy crust. Give each piece space to cook evenly.
The Power of the Rest: Allowing the dredged chicken to rest for 30 minutes before frying helps the flour mixture adhere better to the chicken, creating a more robust and craggy crust that won’t fall off in the oil.
Buttermilk Substitute: No buttermilk? No problem! You can easily make your own by adding 1 tablespoon of white vinegar or lemon juice to a measuring cup, then filling the rest of the way to 1 cup with regular milk. Stir and let it sit for 5-10 minutes until it slightly curdles. Multiply as needed for the recipe.
Spice it Up (or Down): The cayenne pepper level is completely customizable. If you prefer a milder flavor, reduce it to 1 teaspoon or omit it entirely. For more heat, add another teaspoon or two, or even a pinch of dried chili flakes to the dry dredge.
Add a Touch of Sweetness: Some traditional Southern fried chicken recipes include a tablespoon or two of granulated sugar in the dry flour mixture. This helps with browning and can add a subtle sweet-savory note. Experiment to see if you like it!
Herbal Variations: While the core spices are classic, don’t hesitate to play with dried herbs. A touch of dried sage or rosemary in the flour mixture can add a lovely aromatic complexity.
Cornstarch for Extra Crisp: For an even crispier, lighter coating, replace 1/4 cup of the all-purpose flour in the dry mixture with cornstarch. This can contribute to a more delicate crunch.
Serving Suggestions: Classic pairings include creamy coleslaw, fluffy biscuits, creamy mashed potatoes with gravy, mac and cheese, or braised collard greens. Don’t forget a side of hot sauce for dipping!
Storage and Reheating
Storage: Allow any leftover fried chicken to cool completely to room temperature. Store it in an airtight container in the refrigerator for up to 3-4 days. For longer storage, you can freeze individual pieces of fried chicken once cooled. Wrap each piece tightly in plastic wrap, then place them in a freezer-safe bag or container. It will keep for up to 2-3 months.
Reheating (for best crispness):
- Oven Method: This is the preferred method for restoring crispiness. Preheat your oven to 375°F (190°C). Place the cold chicken pieces on a wire rack set over a baking sheet. Heat for 15-25 minutes, or until thoroughly heated through and the skin is crispy again. For frozen chicken, you may need 30-45 minutes.
- Air Fryer Method: Preheat your air fryer to 350°F (175°C). Place chicken in a single layer in the air fryer basket, ensuring not to overcrowd. Cook for 8-12 minutes, flipping halfway, until heated through and crispy.
- Microwave (least recommended for crispness): While quick, the microwave will make the chicken soft and lose its crispiness. If you must use it, heat in short 30-second intervals until warmed through.
Frequently Asked Questions
Why do I need to double-dredge the chicken?
Double-dredging, which involves coating the chicken first in the wet buttermilk mixture, then in the seasoned flour, then often back to the wet and then dry again (though this recipe focuses on a single wet-dry dredge after the initial buttermilk soak), is key to building that thick, craggy, and super crispy crust. The buttermilk acts as an adhesive, allowing more of the seasoned flour to stick, creating more surface area for crispiness. It also helps lock in moisture, ensuring a juicy interior.
Can I use boneless, skinless chicken breasts for this recipe?
Yes, you can, but you’ll need to adjust the cooking time significantly. Boneless, skinless breasts cook much faster and can dry out easily. Consider cutting them into smaller, more uniform pieces (like tenders) to ensure even cooking. Keep a close eye on the internal temperature, aiming for 165°F (74°C).
What is the best oil to use for frying chicken?
The best oils for frying chicken are those with a high smoke point and neutral flavor. Excellent choices include canola oil, vegetable oil, peanut oil, or even shortening. These oils can withstand the high temperatures required for deep frying without burning or imparting off-flavors to your delicious chicken.
My fried chicken isn’t crispy, what went wrong?
Several factors can lead to non-crispy fried chicken. The most common culprits are: 1) Oil temperature too low: The chicken absorbs oil instead of crisping. 2) Overcrowding the pot: This drastically drops the oil temperature. 3) Not patting the chicken dry enough: Excess moisture prevents crisping. 4) Not resting the dredged chicken: The coating needs time to adhere. Ensure you follow these steps carefully for the best results.