Introduction
Prepare yourselves, chocolate lovers, for an experience so profoundly rich and utterly irresistible, it might just be your sweetest demise. We’re talking about the “Death by Chocolate Bundt Cake,” a dessert that doesn’t just promise chocolate; it delivers an avalanche of deep, intense cocoa flavor in every single moist, tender bite. This isn’t your average chocolate cake; it’s a celebration of all things decadent, a dark-hued masterpiece crowned with a glossy, flowing glaze and a shower of chocolate chips that beckons you to indulge. From its elegant fluted form to its intoxicating aroma, this Bundt cake is designed to be the ultimate showstopper, perfect for any occasion where only the most extravagant chocolate treat will do.
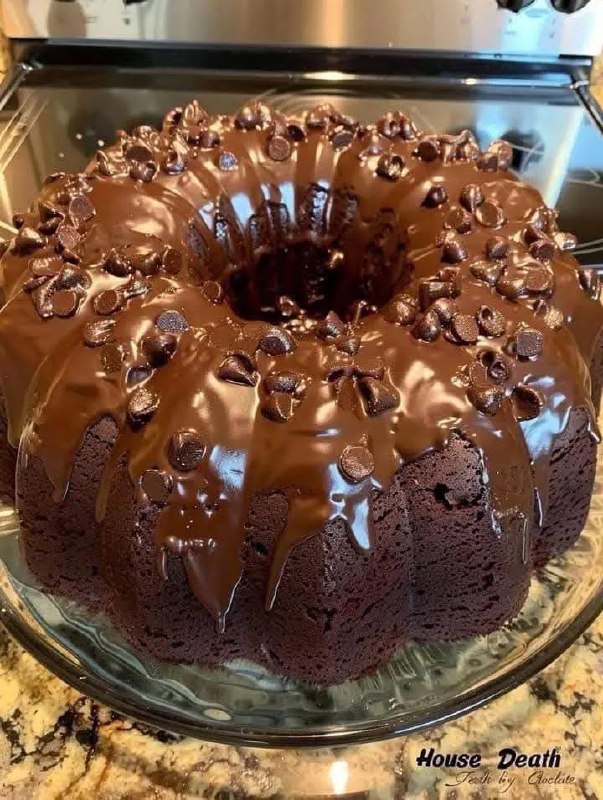
What makes this particular Bundt cake a “death by chocolate” experience? It’s all about layering those rich chocolate elements. The cake itself boasts a deep, dark chocolate crumb, promising a tender texture that melts in your mouth. But we don’t stop there. A luxurious, homemade chocolate glaze cascades down its distinctive ridges, creating a visual feast that’s as appealing as its taste. And as if that weren’t enough, a generous sprinkle of mini chocolate chips adds an extra textural dimension and another burst of chocolatey goodness. The Bundt pan, with its beautiful, intricate designs, elevates this simple cake into an elegant dessert, making it not just delicious but also stunningly beautiful on any table.
This recipe is more than just a set of instructions; it’s your guide to crafting a truly unforgettable chocolate dessert. Whether you’re a seasoned baker or a curious beginner, the steps are straightforward, leading you to a cake that’s guaranteed to impress. Expect a cake that’s incredibly moist, deeply flavorful, and crowned with a glaze that’s both rich and perfectly balanced. So, gather your ingredients, preheat your oven, and prepare to embark on a journey to chocolate nirvana. This Death by Chocolate Bundt Cake isn’t just a dessert; it’s an indulgence, a moment of pure, unadulterated chocolate bliss.
Nutritional Information
Per serving (approximate values):
- Calories: 650 kcal
- Protein: 8g
- Carbohydrates: 85g
- Fat: 35g
- Fiber: 4g
- Sodium: 400mg
Ingredients
- 2 ½ cups all-purpose flour
- 1 ½ cups granulated sugar
- ¾ cup unsweetened cocoa powder (Dutch-processed for darker color and richer flavor)
- 2 teaspoons baking soda
- 1 teaspoon baking powder
- 1 teaspoon salt
- 1 cup buttermilk, room temperature
- ½ cup vegetable oil (or canola oil)
- 2 large eggs, room temperature
- 1 teaspoon vanilla extract
- 1 cup strong hot coffee (or hot water)
- For the Chocolate Glaze:
- 1 cup semi-sweet chocolate chips
- ½ cup heavy cream
- 2 tablespoons unsalted butter
- 1 teaspoon vanilla extract
- 2 tablespoons powdered sugar (optional, for extra sweetness/thickness)
- For Garnish:
- ½ cup mini chocolate chips (or regular chocolate chips), for sprinkling
Instructions
- Preheat your oven to 350°F (175°C). Thoroughly grease and flour a 10-12 cup Bundt pan. For chocolate cakes, you can also use cocoa powder instead of flour to prevent white residue on the cake. Ensure every crevice is coated.
- In a large mixing bowl, whisk together the all-purpose flour, granulated sugar, unsweetened cocoa powder, baking soda, baking powder, and salt. Make sure there are no lumps and the dry ingredients are well combined.
- In a separate medium bowl, whisk together the buttermilk, vegetable oil, eggs, and vanilla extract until smooth.
- Pour the wet ingredients into the dry ingredients and mix on low speed with an electric mixer, or by hand with a spatula, until just combined. Do not overmix.
- Carefully pour the hot coffee (or hot water) into the batter and mix until the batter is smooth and thin. The batter will be quite liquidy, which is normal for this type of cake and contributes to its moistness.
- Pour the batter evenly into the prepared Bundt pan. Gently tap the pan on the counter a few times to release any air bubbles.
- Bake for 45-55 minutes, or until a wooden skewer or toothpick inserted into the center of the cake comes out with only a few moist crumbs attached (not wet batter).
- Remove the cake from the oven and let it cool in the pan on a wire rack for 10-15 minutes. This allows the cake to firm up slightly before inversion.
- After 10-15 minutes, carefully invert the Bundt cake onto the wire rack. If it doesn’t release easily, gently tap the pan or run a thin, flexible knife around the edges (if not already done by the pan design). Allow the cake to cool completely on the wire rack before glazing, which can take 1-2 hours.
- While the cake cools, prepare the Chocolate Glaze: In a small saucepan over low heat, combine the semi-sweet chocolate chips, heavy cream, and unsalted butter. Stir continuously until the chocolate chips are melted and the mixture is smooth and glossy. Be careful not to scorch the chocolate.
- Remove the glaze from the heat and stir in the vanilla extract. If you prefer a sweeter or thicker glaze, whisk in the powdered sugar until smooth. Let the glaze cool for about 10-15 minutes, stirring occasionally, until it’s slightly thickened but still pourable.
- Once the Bundt cake is completely cool, place the wire rack with the cake over a baking sheet or parchment paper to catch any drips.
- Generously pour the slightly warm chocolate glaze over the cooled cake, allowing it to cascade down the sides and into the fluted crevices. You can use a spoon to guide the glaze if needed.
- Immediately after glazing, sprinkle the mini chocolate chips evenly over the top and sides of the glazed cake while the glaze is still wet, so they adhere.
- Allow the glaze to set for at least 30 minutes to an hour at room temperature before slicing and serving. This will ensure the glaze is firm enough not to smudge excessively upon cutting.
Cooking Tips and Variations
Bundt Pan Preparation is Key: For a perfect release, thoroughly grease your Bundt pan with shortening or baking spray (one that contains flour). Then, dust it with flour or, for this chocolate cake, cocoa powder. Make sure to get into all the nooks and crannies. An improperly prepped pan is the leading cause of Bundt cake sticking.
Quality Ingredients Matter: Since chocolate is the star here, use good quality unsweetened cocoa powder (Dutch-processed will give a darker color and mellower flavor) and semi-sweet chocolate chips for the glaze. This will significantly impact the final taste. Don’t skimp on the vanilla extract either, as it enhances the chocolate flavor.
Don’t Overmix the Batter: Overmixing develops gluten, which can lead to a tough, dry cake. Mix just until the dry ingredients are incorporated into the wet. The hot coffee addition will thin the batter, but a few lumps are fine.
The Magic of Hot Coffee: The hot coffee in the batter doesn’t make the cake taste like coffee; it intensifies the chocolate flavor, making it richer and deeper. If you don’t have coffee, hot water can be used, but the coffee adds an extra layer of complexity.
Cooling Properly: Allow the cake to cool in the pan for the recommended 10-15 minutes. This allows the cake to pull away from the sides slightly and become more stable. Inverting too soon can cause it to break, and cooling too long in the pan can cause it to stick. Always cool completely on a wire rack before glazing.
Glaze Consistency: The perfect glaze should be pourable but thick enough to coat the cake and cling to its sides. If your glaze seems too thick, add a tiny bit more heavy cream, a teaspoon at a time, until desired consistency is reached. If it’s too thin, let it cool a bit longer or whisk in a little more powdered sugar.
Flavor Boosters: For an even deeper chocolate flavor, add 1-2 teaspoons of espresso powder (not instant coffee) to the dry ingredients. For an adult twist, a tablespoon or two of chocolate liqueur, Kahlúa, or dark rum can be added to the glaze.
Alternative Toppings: While the chocolate chips are classic, consider serving slices with a dollop of freshly whipped cream, a scoop of vanilla bean ice cream, or a scattering of fresh raspberries or strawberries for a touch of tartness to balance the richness.
Dusting Instead of Glazing: For a simpler presentation, omit the glaze and instead dust the cooled cake generously with powdered sugar or cocoa powder.
Chocolate Types for Glaze: Experiment with different types of chocolate for the glaze. Dark chocolate will yield a more intense, less sweet glaze, while milk chocolate will create a sweeter, creamier one. Adjust powdered sugar accordingly.
Bundt Pan Design: Different Bundt pans have varying levels of intricacy. For highly detailed pans, ensure extra diligent greasing and flouring to capture all the beautiful details.
Storage and Reheating
Room Temperature Storage: This Death by Chocolate Bundt Cake, especially when glazed, is best stored at room temperature for up to 3-4 days. Place it under a cake dome or in an airtight container to prevent it from drying out. The glaze will firm up at room temperature, making it easier to handle and slice.
Refrigeration: While not strictly necessary for freshness, if your kitchen is very warm or humid, or if you plan to keep the cake longer, you can refrigerate it. Wrap the cake tightly in plastic wrap or place it in an airtight container. Refrigeration can extend its shelf life to about a week. However, be aware that refrigeration can sometimes alter the texture of cakes, making them slightly denser or drier. Allow refrigerated cake to come to room temperature for about 30 minutes to an hour before serving for the best flavor and texture.
Freezing: This Bundt cake freezes beautifully, either whole or in individual slices. For a whole cake, ensure it is completely cooled and the glaze is fully set. Wrap it tightly in several layers of plastic wrap, then an additional layer of aluminum foil. For individual slices, wrap each slice individually in plastic wrap, then place them in a freezer-safe bag or container. Frozen cake can last for up to 2-3 months.
Reheating: For frozen cake, thaw it overnight in the refrigerator, then bring it to room temperature before serving. If you want a slightly warm slice, you can gently warm individual portions in the microwave for 15-30 seconds, or in a preheated oven at 250°F (120°C) for about 5-10 minutes. Be careful not to overheat, as this can dry out the cake. Warming often enhances the moistness and brings out the chocolate aroma, making it even more indulgent.
Frequently Asked Questions
What kind of cocoa powder should I use for the best “death by chocolate” flavor?
For the deepest, darkest color and a rich, mellow chocolate flavor, Dutch-processed cocoa powder is highly recommended. It has been treated to reduce its acidity, resulting in a smoother, less bitter taste. Natural cocoa powder can also be used, but the cake might be slightly lighter in color and have a more pronounced, slightly acidic chocolate flavor.
My Bundt cake often sticks to the pan. What are your best tips to prevent this?
Thorough pan preparation is crucial. Use a high-quality non-stick Bundt pan. Grease every inch of the pan with shortening or a baking spray that contains flour (like Baker’s Joy or Pam Baking). After greasing, dust the pan with flour or, for chocolate cakes, with cocoa powder, tapping out any excess. Ensure every crevice is coated. Also, do not skip the cooling time in the pan (10-15 minutes) before inverting; this allows the cake to firm up and pull away from the sides.
Can I make this cake ahead of time?
Yes, absolutely! This Death by Chocolate Bundt Cake is an excellent make-ahead dessert. You can bake the cake a day or two in advance. Store the cooled, unglazed cake wrapped tightly at room temperature. Prepare the glaze and glaze the cake on the day of serving for the freshest appearance. The glazed cake itself will stay fresh and delicious at room temperature for 3-4 days under a cake dome or in an airtight container.
What if I don’t have buttermilk? Can I still make this cake?
Yes, you can easily make a buttermilk substitute at home! For 1 cup of buttermilk, simply pour 1 tablespoon of white vinegar or lemon juice into a liquid measuring cup, then fill the rest of the cup with regular milk (dairy or non-dairy) until it reaches the 1-cup line. Stir gently and let it sit for 5-10 minutes until it slightly curdles. This homemade buttermilk substitute will work perfectly in the recipe, providing the necessary acidity and moisture.