Introduction
Imagine the irresistible aroma of freshly baked bread wafting through your home, a golden-brown crust promising a tender, fluffy interior. Now, imagine achieving that culinary dream without ever having to turn on your oven. Sound like magic? It’s not! Welcome to the world of No-Oven Stovetop Bread, a game-changer for anyone who loves homemade goodness but lacks an oven, is dealing with a power outage, lives in a small kitchen, or is simply looking for a new adventure in bread making. This recipe isn’t just a clever trick; it’s a revelation, delivering a delicious, satisfying loaf that rivals its oven-baked counterparts.
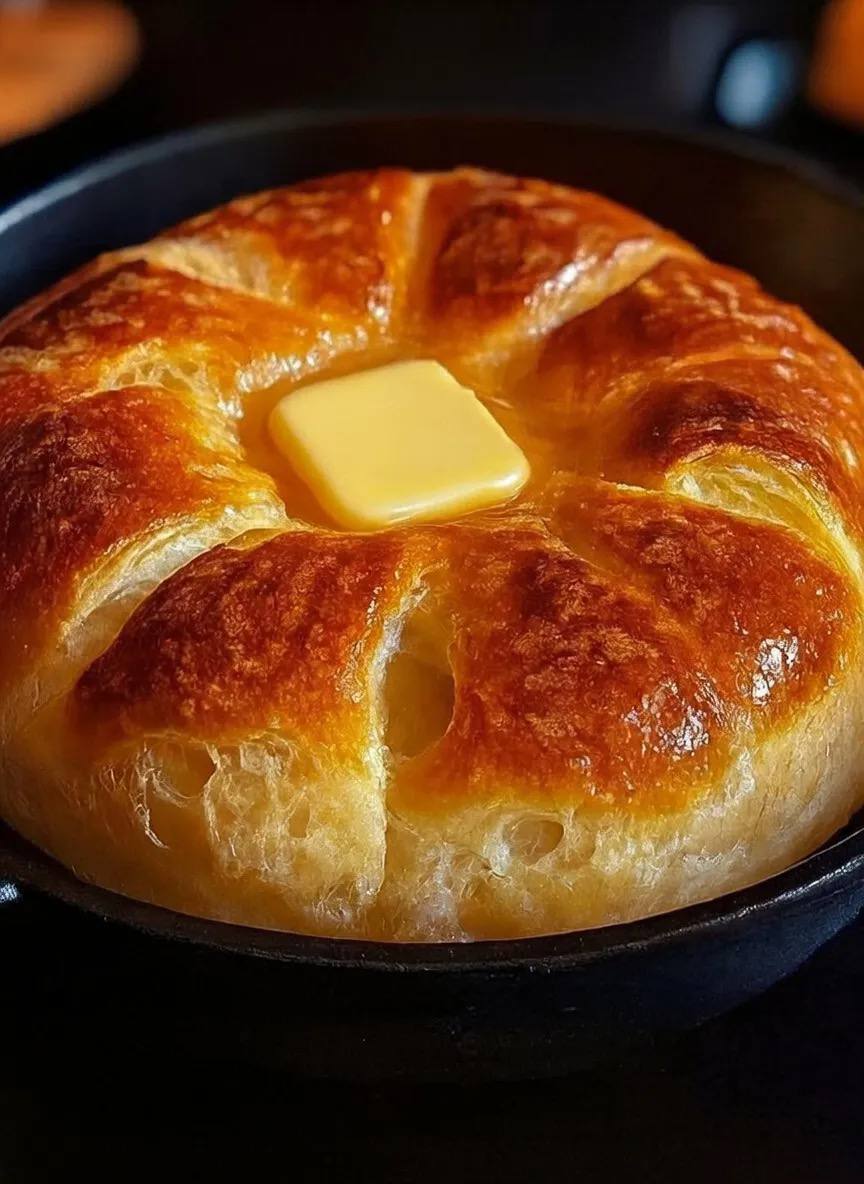
This isn’t just any bread; it’s a testament to ingenuity and simplicity. We’re talking about a perfectly round loaf, cooked entirely in a skillet on your stovetop, developing a gorgeous golden crust and an impossibly soft, airy crumb. The distinctive scoring on top not only adds to its rustic charm but also allows for easy tearing into delightful segments, perfect for sharing (or not!). With a generous pat of butter melting into its warm embrace, each bite is a symphony of rich flavor and comforting texture. Get ready to impress yourself and everyone lucky enough to try a slice of this incredibly approachable and rewarding stovetop creation.
The beauty of this stovetop method lies in its accessibility and the surprisingly rich flavor profile it achieves. The direct heat from the skillet creates a beautifully caramelized bottom crust, while the trapped steam from a tight-fitting lid ensures the inside cooks through to a tender perfection. It’s a method that promises a satisfying homemade bread experience with minimal fuss, making it ideal for busy weeknights, lazy weekends, or even your next camping trip. Prepare to transform your kitchen into a bakery, one stovetop loaf at a time!
Nutritional Information
Per serving (approximate values):
- Calories: 250 kcal
- Protein: 8g
- Carbohydrates: 45g
- Fat: 4g
- Fiber: 2g
- Sodium: 300mg
Ingredients
- 2 ¼ teaspoons active dry yeast (one standard packet)
- 1 cup warm water (105-115°F / 40-46°C)
- 1 teaspoon granulated sugar
- 3 cups all-purpose flour, plus more for dusting
- 1 teaspoon salt
- 2 tablespoons olive oil, plus more for greasing
- 2 tablespoons unsalted butter, melted (for brushing and serving)
Instructions
- In a large bowl, combine the warm water and granulated sugar. Sprinkle the active dry yeast over the top. Let it sit for 5-10 minutes, or until the yeast is foamy and activated. This indicates the yeast is alive and ready to work its magic.
- Add the salt and 2 tablespoons of olive oil to the yeast mixture. Stir gently to combine.
- Gradually add the all-purpose flour, one cup at a time, mixing with a wooden spoon or spatula until a shaggy dough forms.
- Once the dough is too stiff to stir, turn it out onto a lightly floured surface. Knead the dough for 5-7 minutes, or until it becomes smooth and elastic. If the dough is too sticky, add a tiny bit more flour, but be careful not to add too much, as this can make the bread dry.
- Lightly grease the inside of the large bowl with a little olive oil. Place the kneaded dough into the bowl, turning it once to coat the entire surface with oil. This prevents it from sticking.
- Cover the bowl with plastic wrap or a clean kitchen towel and let it rise in a warm place for 1 to 1.5 hours, or until the dough has doubled in size. This is the first proofing.
- Once the dough has doubled, gently punch it down to release the air. Transfer the dough back to a lightly floured surface.
- Shape the dough into a smooth, round ball. Try to create tension on the surface of the dough by tucking the edges underneath.
- Using a sharp knife or a bread lame, score the top of the dough with a cross, hash marks, or any desired pattern. These cuts help the bread expand evenly during cooking and add a beautiful aesthetic.
- Lightly grease a heavy-bottomed skillet (a 10-inch cast iron skillet works perfectly) with a little olive oil or butter.
- Carefully place the shaped and scored dough into the greased skillet.
- Cover the skillet with a tight-fitting lid and let the dough rise for a second time, for about 30-45 minutes, or until noticeably puffy. This second proofing in the skillet is crucial for achieving a light and airy texture.
- After the second rise, place the covered skillet over very low heat on your stovetop. It is essential to use very low heat to prevent the bottom from burning before the inside cooks through.
- Cook for 25-30 minutes on one side with the lid on. Resist the urge to peek frequently, as this releases steam. The steam is vital for cooking the bread evenly.
- After 25-30 minutes, carefully lift the lid and check the bottom of the bread. It should be a deep golden brown. If not, continue cooking for a few more minutes, checking frequently.
- Once the bottom is beautifully browned, carefully flip the bread over using a large spatula. This can be a bit tricky, so be gentle. Alternatively, if your skillet is oven-safe, you can place it under a broiler for a few minutes to brown the top, but for a true stovetop method, flipping is necessary.
- Cover the skillet again and cook on the second side for another 15-20 minutes, or until the bread is cooked through and the second side is also golden brown.
- To check for doneness, you can insert an instant-read thermometer into the center of the loaf; it should read between 200-210°F (93-99°C). Another way is to tap the bottom of the bread; it should sound hollow.
- Once cooked, remove the bread from the skillet and place it on a wire rack to cool slightly.
- While still warm, brush the top of the bread with melted butter.
- Allow the bread to cool for at least 15-20 minutes before slicing or tearing into pieces. This allows the internal structure to set.
- Serve warm with an extra pat of butter, if desired, and enjoy your incredible No-Oven Stovetop Bread!
Cooking Tips and Variations
- Heat Management is Key: The most crucial aspect of stovetop bread is maintaining very low heat. Too high, and the bottom will burn before the interior is cooked. A heavy-bottomed pan like cast iron helps distribute heat more evenly and prevents scorching.
- The Power of the Lid: A tight-fitting lid acts like a mini oven, trapping steam and heat to cook the bread all the way through. Avoid lifting it too often during the initial cooking phase.
- Doneness Check: Besides the internal temperature (200-210°F / 93-99°C), a good indicator is a hollow sound when you tap the bottom of the loaf. The crust should also be a deep golden brown on both sides.
- Skillet Choice Matters: Cast iron is highly recommended for its excellent heat retention and even cooking. A heavy-duty non-stick skillet can also work, but monitor the heat even more closely as it may heat up faster.
- Proofing Environment: For a faster rise, place the covered bowl in a slightly warm (but not hot) spot, like a turned-off oven with the light on, or near a sunny window.
- Scoring for Success: The scores on top aren’t just for looks. They allow the bread to expand without tearing unevenly, resulting in a better shape and texture. Use a very sharp knife or a dedicated bread lame for clean cuts.
- Flavor Variations:
- Herby Delight: Add 1-2 tablespoons of finely chopped fresh herbs like rosemary, thyme, or oregano to the dough during the kneading stage.
- Cheesy Goodness: Mix in ½ cup of shredded cheddar, Parmesan, or your favorite cheese during the final stages of kneading.
- Garlic Lover’s Dream: Incorporate 1-2 cloves of minced garlic or 1 teaspoon of garlic powder into the dry ingredients.
- Sweet Touch: For a slightly sweeter bread, increase the sugar to 2 tablespoons and consider adding a pinch of cinnamon.
- Enriching the Dough: For an even richer, softer crumb, substitute half of the water with warm milk or add 1-2 tablespoons of softened butter to the dough during kneading.
- No-Knead Option (Slightly Different Texture): If you prefer a truly hands-off approach, you can adapt this to a no-knead method by simply mixing the ingredients until just combined, letting it rise for 12-18 hours in the fridge (or 8-12 hours at room temp), then shaping and proceeding with the stovetop cooking. The texture will be a bit chewier.
- Crust Customization: For an even crispier crust, you can remove the lid for the last 5-10 minutes of cooking on each side, but watch carefully to prevent burning.
Storage and Reheating
- Storage: Stovetop bread, like most homemade breads, is best enjoyed the day it’s made. To store leftovers, allow the bread to cool completely. Wrap it tightly in plastic wrap or aluminum foil, or place it in an airtight container at room temperature for up to 2-3 days. For longer storage, you can freeze individual slices or the whole loaf, tightly wrapped, for up to 1 month. Thaw at room temperature before reheating.
- Reheating:
- Stovetop: For best results, reheat slices or the whole loaf in a dry skillet over medium-low heat for a few minutes per side until warmed through and slightly crisp.
- Oven/Toaster Oven: If you have an oven available, wrap the loaf in foil and bake at 350°F (175°C) for 10-15 minutes, or until warm. Slices can be toasted in a toaster or toaster oven.
- Microwave (use sparingly): While convenient, microwaving can make bread chewy. If using, microwave slices for only 10-15 seconds at a time until just warm.
Frequently Asked Questions
Can I make this stovetop bread without yeast?
This particular recipe relies on active dry yeast for its soft, fluffy, and airy texture, which is characteristic of traditional bread. While you could make a “quick bread” on the stovetop using baking powder or baking soda, the result would have a denser, cake-like consistency rather than the classic chewy crumb of yeast bread. For this recipe’s intended outcome, yeast is essential.
What if I don’t have a cast iron skillet?
While a cast iron skillet is highly recommended for its superior heat retention and even distribution, you can still make this bread in another heavy-bottomed, oven-safe skillet with a tight-fitting lid. Look for a pan that is sturdy and conducts heat well. You may need to monitor the heat even more closely and adjust cooking times slightly, as other materials might heat up faster or have hot spots.
How do I know if my yeast is still good?
The “foamy” test in the first step is crucial. If your yeast, sugar, and warm water mixture doesn’t bubble and become foamy after 5-10 minutes, your yeast may be old or inactive. It’s best to discard it and start with fresh yeast to ensure proper rising and a successful loaf. Using water that is too hot or too cold can also kill or inhibit yeast activity, so ensure it’s within the 105-115°F (40-46°C) range.
Can I add seeds or grains to this bread?
Absolutely! Adding seeds or grains can enhance both the flavor and nutritional value. You can mix in 2-3 tablespoons of sunflower seeds, pumpkin seeds, sesame seeds, or even rolled oats during the kneading stage. For a chewier texture, you might want to soak harder grains like flax seeds or steel-cut oats in a small amount of warm water for about 15-20 minutes before adding them to the dough.