Introduction
Prepare yourself for a dessert experience that transcends the ordinary – welcome to the world of the Million Dollar Cream Cheese Cake. This isn’t just any cheesecake; it’s a masterpiece of culinary indulgence, a symphony of rich flavors, and a texture so unbelievably smooth it practically melts on your tongue. Imagine a golden, tender cake-like crust cradling a luscious, creamy filling that boasts the perfect balance of sweet and tangy, all crowned with an irresistible, glistening caramel swirl. It’s the kind of dessert that stops conversations, elicits gasps of delight, and leaves an unforgettable impression long after the last bite. This cream cheese cake has earned its “million dollar” moniker not just for its exquisite taste and luxurious presentation, but for the sheer joy it brings to anyone fortunate enough to experience it. It’s the ultimate comfort dessert, elevated to an art form, making every occasion feel a little more special, a little more extravagant.
What sets our Million Dollar Cream Cheese Cake apart is a meticulous attention to detail and a few key techniques that guarantee unparalleled perfection. We start with the highest quality cream cheese, butter, and eggs, ensuring every component contributes to a rich, decadent foundation. The magic truly happens in the careful preparation of the batter, where ingredients are brought to room temperature and gently incorporated to achieve that signature silky-smooth consistency without a single lump or air bubble. Then comes the crucial water bath, a secret weapon for any serious baker, which ensures the cake bakes evenly, developing a pristine, crack-free surface and a custardy interior that is simply beyond compare. Finally, a homemade caramel topping, artfully swirled, adds not just visual appeal but an additional layer of complex sweetness that elevates this dessert from delightful to absolutely divine. This isn’t a dessert you rush; it’s one you savor, from the moment you begin mixing to the last decadent forkful.
Whether you’re looking to impress guests at a dinner party, celebrate a special occasion, or simply treat yourself to something truly extraordinary, this Million Dollar Cream Cheese Cake is your answer. It’s surprisingly approachable for such an impressive dessert, with clear, step-by-step instructions that will guide even novice bakers to success. The reward is a show-stopping dessert that looks like it came from a high-end patisserie, yet carries the warmth and love of a homemade creation. Get ready to transform simple ingredients into a dessert that tastes like a million bucks, creating memories and moments of pure indulgence that you and your loved ones will cherish.
Nutritional Information
Per serving (approximate values):
- Calories: 680
- Protein: 10g
- Carbohydrates: 65g
- Fat: 45g
- Fiber: 1g
- Sodium: 350mg
Ingredients
- For the Cake Base:
- 1 ½ cups all-purpose flour
- ½ cup granulated sugar
- 1 teaspoon baking powder
- ¼ teaspoon salt
- ½ cup (1 stick) unsalted butter, softened
- 2 large eggs
- ½ cup whole milk
- 1 teaspoon vanilla extract
- For the Cream Cheese Filling:
- 4 (8-ounce) packages full-fat cream cheese, softened
- 1 ½ cups granulated sugar
- 4 large eggs, room temperature
- 1 large egg yolk, room temperature
- 1 tablespoon all-purpose flour
- 1 teaspoon vanilla extract
- 1 tablespoon fresh lemon juice
- ½ teaspoon lemon zest
- ¼ teaspoon salt
- ½ cup sour cream, room temperature
- For the Million Dollar Caramel Swirl:
- ½ cup granulated sugar
- 2 tablespoons water
- 3 tablespoons unsalted butter
- ¼ cup heavy cream, warmed
- ½ teaspoon vanilla extract
- Pinch of sea salt
Instructions
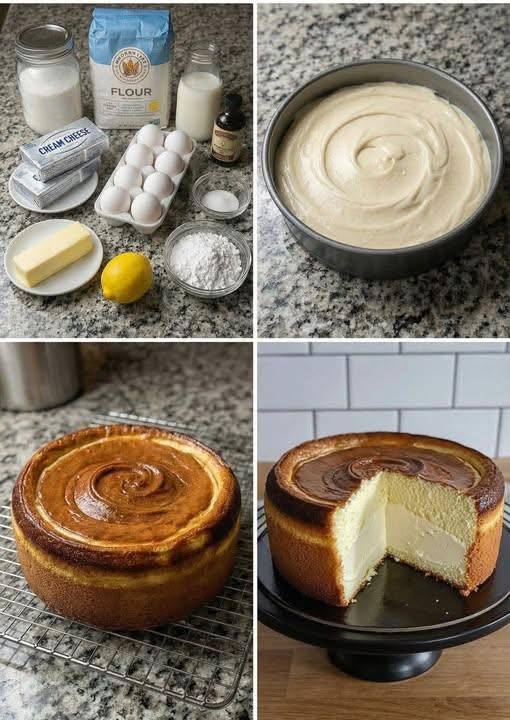
- Prepare for Baking: Preheat your oven to 325°F (160°C). Grease and flour a 9-inch springform pan. Line the bottom with parchment paper and grease the parchment. Wrap the outside of the springform pan tightly with several layers of heavy-duty aluminum foil to prevent water from seeping in during the water bath.
- Make the Cake Base: In a medium bowl, whisk together the flour, ½ cup granulated sugar, baking powder, and ¼ teaspoon salt.
- In a separate large bowl, using an electric mixer, beat the softened ½ cup butter until creamy. Add the 2 large eggs one at a time, beating well after each addition. Stir in the ½ cup milk and 1 teaspoon vanilla extract.
- Gradually add the dry ingredients to the wet ingredients, mixing on low speed until just combined. Do not overmix.
- Pour the cake batter into the prepared springform pan and spread evenly. Bake for 15-20 minutes, or until lightly golden and a toothpick inserted into the center comes out clean. Remove from oven and let cool slightly on a wire rack while you prepare the filling. Do not remove from the pan.
- Prepare the Water Bath: While the cake base cools, place a large roasting pan or baking dish (large enough to hold the springform pan) into the oven. Fill it halfway with hot water. This will be your water bath.
- Make the Cream Cheese Filling: In a very large bowl, using an electric mixer on medium-low speed, beat the softened cream cheese until completely smooth and creamy, about 3-4 minutes. Scrape down the sides of the bowl often.
- Gradually add the 1 ½ cups granulated sugar to the cream cheese, beating until just combined and smooth. Do not incorporate too much air.
- Add the 4 large eggs and 1 egg yolk one at a time, beating on low speed until just incorporated after each addition. Be careful not to overbeat, as this can introduce too much air and cause cracks.
- Stir in the 1 tablespoon all-purpose flour, 1 teaspoon vanilla extract, 1 tablespoon fresh lemon juice, ½ teaspoon lemon zest, and ¼ teaspoon salt until just combined.
- Gently fold in the ½ cup sour cream until the mixture is uniform and smooth.
- Assemble and Bake the Cheesecake: Pour the cream cheese filling evenly over the partially baked cake base in the springform pan.
- Carefully transfer the springform pan into the hot water bath in the oven.
- Bake for 1 hour to 1 hour 15 minutes, or until the edges are set and a 2-3 inch circle in the center still jiggles slightly when gently shaken.
- Turn off the oven, prop the oven door open slightly with a wooden spoon, and let the cheesecake cool in the oven for 1 hour. This slow cooling helps prevent cracks.
- Remove the cheesecake from the oven and the water bath. Carefully unwrap the foil. Let it cool completely on a wire rack at room temperature for at least 2-3 hours.
- Once completely cooled, cover the cheesecake loosely with plastic wrap and refrigerate for at least 6-8 hours, or preferably overnight, to allow it to set fully.
- Prepare the Million Dollar Caramel Swirl: In a medium saucepan, combine ½ cup granulated sugar and 2 tablespoons water. Cook over medium heat without stirring until the sugar dissolves and the syrup begins to boil.
- Continue to cook, swirling the pan occasionally, until the syrup turns a rich amber caramel color. Do not burn.
- Remove from heat and immediately add the 3 tablespoons butter, stirring until melted.
- Carefully and slowly pour in the warmed ¼ cup heavy cream (it will bubble up), stirring constantly until smooth.
- Stir in ½ teaspoon vanilla extract and a pinch of sea salt. Let the caramel cool for about 15-20 minutes, stirring occasionally, until it thickens slightly but is still pourable.
- Finish and Serve: Once the cheesecake is thoroughly chilled, carefully remove the sides of the springform pan.
- Pour the slightly cooled caramel swirl over the top of the cheesecake, spreading it evenly and creating decorative swirls with the back of a spoon if desired.
- Return the cheesecake to the refrigerator for another 30 minutes to allow the caramel to set slightly.
- To serve, use a sharp, thin knife dipped in hot water and wiped clean between each slice for clean cuts. Enjoy your Million Dollar Cream Cheese Cake!
Cooking Tips and Variations
Achieving the perfect Million Dollar Cream Cheese Cake relies on a few key techniques and considerations. First and foremost, ensure all your dairy ingredients – cream cheese, butter, eggs, and sour cream – are at true room temperature. This is absolutely critical for a smooth, lump-free batter. Cold ingredients won’t emulsify properly, leading to a lumpy texture and potential cracks in the final product. Plan ahead and take them out of the refrigerator at least 2-3 hours before you begin baking. When mixing the cream cheese, beat it until it’s incredibly smooth before adding sugar and eggs. The goal is to create a homogenous mixture, but once you start adding eggs, use the lowest speed on your mixer and mix only until just combined. Overmixing after the eggs are added incorporates too much air, which expands during baking and then collapses, causing dreaded cracks in your cheesecake. The water bath, or bain-marie, is non-negotiable for this recipe. It provides a moist, even heat that prevents the cheesecake from drying out, baking too quickly, and cracking. Make sure your springform pan is wrapped very securely with multiple layers of heavy-duty foil to prevent any water from seeping in, which would result in a soggy crust. Don’t rush the cooling process; the slow cool-down in the oven with the door ajar, followed by room temperature cooling, and then a full overnight chill in the refrigerator, is essential for the cheesecake to set properly and achieve its dense, creamy, and sliceable texture. Patience truly is a virtue when making cheesecake.
For variations, the possibilities are endless. To enhance the crust, consider adding a teaspoon of cinnamon or a pinch of nutmeg to the cake base batter for a subtle warmth. For a different texture, you could substitute the cake base with a classic graham cracker crust: simply combine 1 ¾ cups graham cracker crumbs with ¼ cup granulated sugar and ½ cup melted unsalted butter, press firmly into the bottom of the pan, and bake for 10 minutes before adding the filling. The cream cheese filling itself is a canvas for creativity. For a citrusy twist, increase the lemon zest to 1 tablespoon and add 1 teaspoon of orange zest. You could also experiment with other extracts; try almond extract instead of vanilla, or add a touch of coconut extract for a tropical flair. For a fruitier cheesecake, swirl in about ½ cup of fruit puree (like raspberry or passion fruit) into the filling before baking, or spoon a homemade fruit compote over individual slices when serving. Chocolate lovers might enjoy swirling ½ cup of melted dark chocolate into the filling or sprinkling mini chocolate chips over the cheesecake before baking. The Million Dollar Caramel Swirl can also be adapted; for a slightly different flavor, try a bourbon caramel by adding a tablespoon of good quality bourbon at the end of the caramel cooking process, or a coffee caramel with a teaspoon of instant espresso powder dissolved in the heavy cream. You could also opt for a different topping entirely, such as a rich chocolate ganache, a vibrant berry compote, or simply a dusting of cocoa powder and fresh berries for a lighter touch. Always remember to allow your cheesecake to chill thoroughly after any additions to ensure it sets beautifully.
Storage and Reheating
Proper storage is crucial for maintaining the exquisite taste and texture of your Million Dollar Cream Cheese Cake. Once the cheesecake has been fully chilled and the caramel topping has set, it should be stored in an airtight container in the refrigerator. If you don’t have a container large enough, you can cover the entire springform pan (or the cheesecake on a serving plate) tightly with plastic wrap, ensuring no air can get to the cut edges or the top. This prevents the cheesecake from absorbing odors from other foods in the refrigerator and keeps it from drying out. Stored correctly, your Million Dollar Cream Cheese Cake will remain fresh and delicious for up to 5-7 days in the refrigerator. For the best flavor and texture, it’s often recommended to let chilled cheesecake sit at room temperature for about 15-20 minutes before serving. This allows the flavors to open up and the filling to become slightly softer and more luxurious, enhancing the overall experience.
For longer storage, this cream cheese cake freezes exceptionally well. If freezing an entire cake, ensure it is completely chilled and the caramel topping is fully set. You can either freeze it in the springform pan (without the sides, just the base) or transfer it to a sturdy cardboard cake circle. Wrap the entire cheesecake tightly in several layers of plastic wrap, then an additional layer of heavy-duty aluminum foil. This double-wrapping prevents freezer burn and protects the cake from absorbing freezer odors. For individual slices, place them on a baking sheet lined with parchment paper and freeze until solid (about 2-3 hours). Once frozen, wrap each slice individually in plastic wrap, then foil, and place them in an airtight freezer-safe container or freezer bag. Frozen cheesecake can be stored for up to 2-3 months. To thaw, transfer the entire frozen cake (still wrapped) or individual slices to the refrigerator and allow them to thaw slowly overnight or for at least 6-8 hours. Do not attempt to thaw cheesecake at room temperature quickly, as this can compromise its texture. Cheesecake is not typically reheated; it is a dessert best served chilled or at cool room temperature. Reheating would alter its delicate, creamy consistency and is not recommended.
Frequently Asked Questions
Why did my cheesecake crack on top?
Cheesecake cracks are a common issue, usually caused by sudden temperature changes or overbaking. The most frequent culprits are baking too long or at too high a temperature, which causes the outer edges to set and shrink before the center, pulling it apart. Overmixing the batter, especially after adding eggs, can also incorporate too much air, leading to expansion and then collapse during cooling. To prevent cracks, use a water bath, don’t overbake (the center should still jiggle slightly), cool slowly in the oven with the door ajar, and avoid overmixing.
Can I make this cheesecake ahead of time?
Absolutely, and it’s highly recommended! Cheesecake benefits greatly from a long chilling period, typically 6-8 hours or, ideally, overnight. This allows the flavors to meld and the filling to firm up to its perfect dense, creamy texture. You can prepare the entire cheesecake, including the caramel swirl, a day or two in advance. Store it covered in the refrigerator until ready to serve. This makes it an excellent dessert for entertaining, as it reduces stress on the day of your event.
What if I don’t have a springform pan?
While a springform pan is ideal for cheesecake due to its easy-release sides, you can use a regular 9-inch round cake pan if necessary. Line the pan with two long strips of parchment paper that cross each other, extending over the sides of the pan. This creates “slings” that you can use to lift the cooled cheesecake out of the pan. You’ll still need to grease and flour the entire pan and parchment, and wrap the outside with foil for the water bath. Be extra gentle when lifting the cheesecake to avoid damaging it.
My caramel swirl became too hard or too runny. What went wrong?
Caramel can be tricky! If your caramel became too hard, it was likely cooked for too long or at too high a heat, causing it to over-crystallize. If it’s too runny, it wasn’t cooked long enough to reach the proper concentration and color, or perhaps too much cream was added. The key is to watch the sugar carefully as it cooks, remove it from the heat as soon as it reaches a rich amber color, and ensure your heavy cream is warmed before adding to prevent seizing. If it hardens too much after cooling, gently reheat it over low heat with a teaspoon or two of water or cream to loosen it. If it’s too runny, you can try gently heating it again to reduce it further, but be careful not to burn it.