Introduction
Imagine a dessert that’s rich, creamy, and bursting with fresh fruit flavor, yet requires absolutely no baking. Sounds like a dream, right? Welcome to the wonderful world of No-Bake Blueberry Cheesecake! This isn’t just any dessert; it’s an effortless masterpiece designed for those moments when you crave something impressive without the fuss of turning on the oven. Perfect for warm summer evenings, festive holiday gatherings, or simply a delightful weekend treat, this cheesecake delivers pure indulgence with minimal effort.
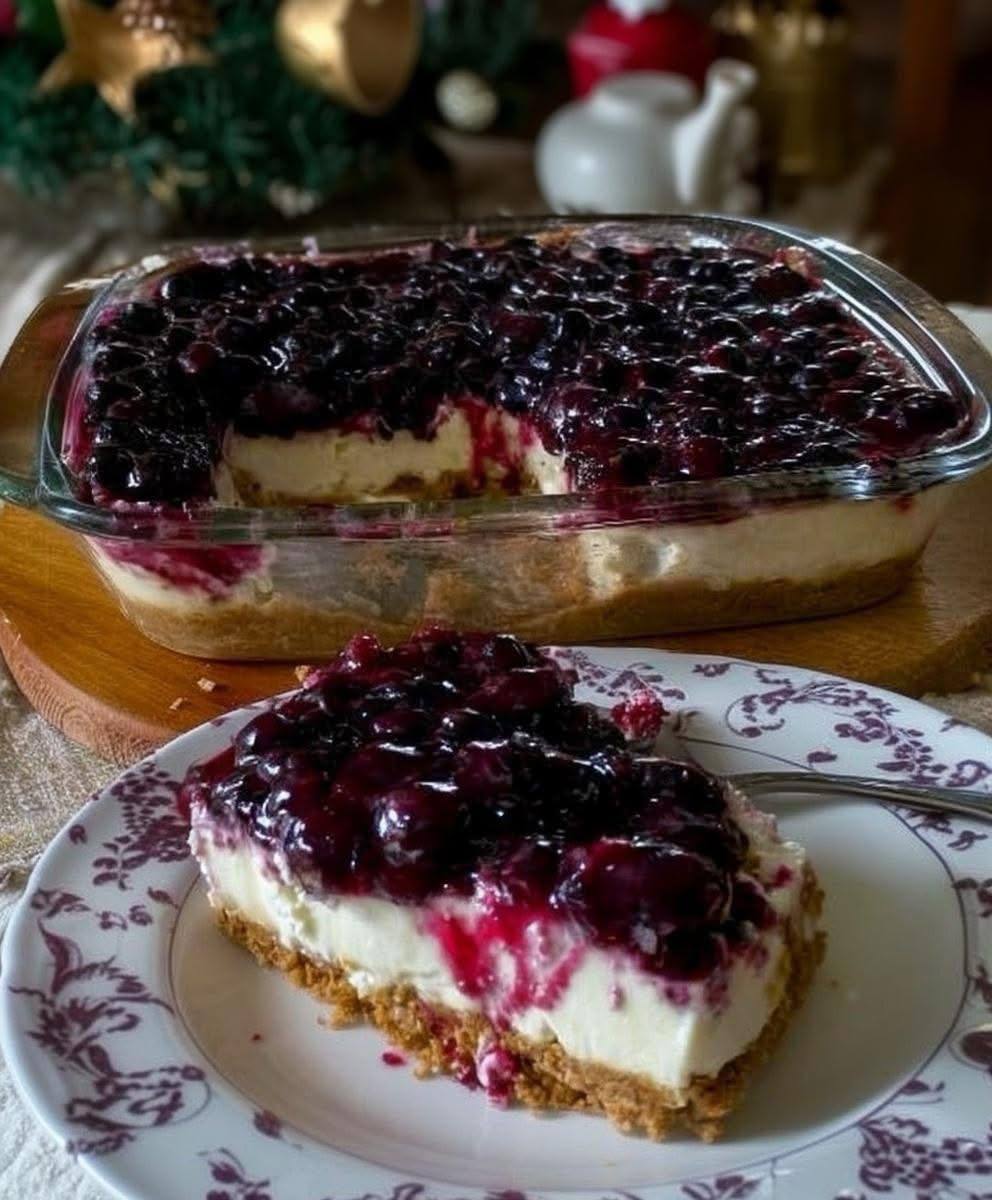
What makes this particular recipe so special? It begins with a perfectly crisp, buttery graham cracker crust that forms the ideal foundation. Layered atop is a cloud-like, luscious cream cheese filling so smooth it practically melts in your mouth. But the true star, as you can see from its vibrant hue, is the generous, glistening blueberry topping. It’s a sweet-tart explosion of berry goodness that provides a beautiful contrast to the creamy white filling, making each bite an unforgettable experience. The best part? No oven means less stress and more time to enjoy the simple pleasures of life.
This No-Bake Blueberry Cheesecake isn’t just easy to make; it’s also incredibly versatile and a fantastic make-ahead option, allowing you to prepare it hours, or even a day, in advance. Its elegant presentation and irresistible flavor make it a crowd-pleaser for any occasion, from casual family dinners to sophisticated celebrations. Get ready to impress your taste buds and your guests with this stunning, no-fuss dessert that proves deliciousness doesn’t always require an oven.
Nutritional Information
Per serving (approximate values):
- Calories: 420
- Protein: 7g
- Carbohydrates: 48g
- Fat: 25g
- Fiber: 2g
- Sodium: 280mg
Ingredients
- For the Graham Cracker Crust:
- 1 ½ cups (about 10-12 full sheets) graham cracker crumbs
- ¼ cup granulated sugar
- ½ cup (1 stick) unsalted butter, melted
- For the Creamy Cheesecake Filling:
- 2 (8-ounce) packages cream cheese, softened
- 1 cup powdered sugar
- 1 teaspoon vanilla extract
- ¼ cup fresh lemon juice
- 1 ½ cups heavy whipping cream, cold
- For the Luscious Blueberry Topping:
- 2 cups fresh or frozen blueberries (do not thaw if frozen)
- ½ cup granulated sugar
- 1 tablespoon fresh lemon juice
- 1 tablespoon cornstarch
- ¼ cup cold water
Instructions
- Prepare the Graham Cracker Crust:
- In a medium bowl, combine the graham cracker crumbs and ¼ cup granulated sugar.
- Pour in the melted butter and stir until the crumbs are evenly moistened and resemble wet sand.
- Press the mixture firmly and evenly into the bottom of an 8×8-inch or 9×9-inch square baking dish, or a 9-inch round springform pan. Use the bottom of a glass to help create a compact, even crust.
- Place the crust in the refrigerator to chill while you prepare the filling, for at least 15 minutes.
- Make the Creamy Cheesecake Filling:
- In a large bowl, using an electric mixer, beat the softened cream cheese until smooth and creamy, about 2-3 minutes. Make sure there are no lumps.
- Add the powdered sugar, vanilla extract, and ¼ cup fresh lemon juice to the cream cheese. Beat on medium speed until well combined and smooth, scraping down the sides of the bowl as needed.
- In a separate, chilled large bowl, pour the cold heavy whipping cream. Beat with an electric mixer on high speed until stiff peaks form. Be careful not to overbeat, or it will turn grainy.
- Gently fold the whipped cream into the cream cheese mixture using a spatula, until just combined and no streaks of whipped cream remain. Do not overmix, as this will deflate the filling.
- Spread the cheesecake filling evenly over the chilled graham cracker crust.
- Cover the dish loosely with plastic wrap and refrigerate for at least 4 hours, or preferably overnight, to allow the cheesecake to set completely.
- Craft the Luscious Blueberry Topping:
- In a medium saucepan, combine the blueberries, ½ cup granulated sugar, and 1 tablespoon fresh lemon juice.
- In a small bowl, whisk together the cornstarch and ¼ cup cold water until smooth.
- Heat the blueberry mixture over medium heat, stirring occasionally. Once it begins to simmer, add the cornstarch slurry, stirring constantly.
- Continue to cook and stir for 2-3 minutes, until the mixture thickens to a jam-like consistency. Some blueberries will burst, while others may remain whole.
- Remove the saucepan from the heat and allow the blueberry topping to cool completely to room temperature before using. It will thicken further as it cools.
- Assemble and Serve:
- Once the cheesecake filling is fully set and the blueberry topping is completely cool, carefully spoon the blueberry topping over the chilled cheesecake, spreading it evenly to cover the entire surface.
- Refrigerate the cheesecake for another 30 minutes to an hour to allow the topping to set slightly.
- To serve, use a sharp knife dipped in hot water and wiped clean between each slice for neat portions. Garnish with fresh mint leaves or lemon zest if desired.
Cooking Tips and Variations
For the best results with your No-Bake Blueberry Cheesecake, always start with room temperature cream cheese. This is crucial for achieving a smooth, lump-free filling. If your cream cheese is too cold, it will be difficult to beat smoothly, leading to a grainy texture. Simply leave it out on the counter for about 30-60 minutes before you begin. Another vital tip is to chill your mixing bowl and whisk attachment before whipping the heavy cream; this helps the cream whip up faster and hold its stiff peaks better. When folding the whipped cream into the cream cheese mixture, be gentle and use a light hand to maintain the airy texture. Overmixing can deflate the cream, resulting in a denser filling. And remember, thorough chilling is key! A minimum of 4 hours, but ideally overnight, will ensure your cheesecake sets perfectly and slices cleanly.
This recipe is also wonderfully adaptable. For the crust, feel free to experiment with other crushed cookies like shortbread, Oreos (for a chocolate contrast), or vanilla wafers. You can also add a pinch of cinnamon or nutmeg to the graham cracker crust for a warmer spice note. If blueberries aren’t your only love, swap them out for other berry toppings! Raspberries, strawberries, or a mixed berry compote would be equally delicious. Just follow the same method for thickening the fruit with cornstarch. For a touch of citrusy brightness in the filling, you could add a teaspoon of lemon zest along with the lemon juice. To make it a bit lighter, you can use reduced-fat cream cheese, but be aware it might affect the final texture slightly. For individual servings, prepare this cheesecake in mini springform pans or even small dessert glasses, layering the crust, filling, and topping for a beautiful presentation. You can also swirl a little of the blueberry topping into the cream cheese filling before setting for a marbled effect.
Storage and Reheating
Storing your No-Bake Blueberry Cheesecake properly is essential to maintain its freshness and delicious flavor. Once prepared, cover the cheesecake loosely with plastic wrap or aluminum foil. If you’ve made it in a dish with a lid, even better! Store it in the refrigerator for up to 3-4 days. The topping, especially if made with fresh fruit, is best enjoyed within the first 2-3 days, as it can start to get a bit watery over time. For longer storage, you can freeze the cheesecake! Once fully set and topped, you can freeze individual slices or the entire cheesecake (without the topping) for up to 1 month. To freeze the whole cheesecake, place it in the freezer uncovered for about an hour until firm. Then, wrap it tightly in plastic wrap, followed by a layer of aluminum foil, and place it in an airtight container or freezer bag. If freezing without the topping, you can add a fresh batch of topping after thawing.
This is a dessert that does not require reheating, as it is meant to be served chilled. If you’ve frozen your cheesecake, simply transfer it from the freezer to the refrigerator to thaw overnight, or for at least 6-8 hours. If thawing individual slices, they may only need 2-3 hours in the refrigerator. Once thawed, if you froze it without the topping, prepare a fresh batch of blueberry topping and spread it over the cheesecake before serving. Always ensure the cheesecake is thoroughly chilled before serving for the best texture and flavor. Avoid leaving it at room temperature for extended periods, especially on a warm day, as the cream cheese filling can soften quickly.
Frequently Asked Questions
Can I use frozen blueberries for the topping?
Absolutely! Frozen blueberries work perfectly for the topping. You do not need to thaw them beforehand; simply add them directly to the saucepan with the sugar and lemon juice. They might release a bit more liquid as they cook, so you might need to simmer the topping for an extra minute or two to achieve the desired thickness after adding the cornstarch slurry.
Why is my cheesecake filling not setting?
There are a few common reasons why a no-bake cheesecake filling might not set. The most frequent culprit is insufficient chilling time; it truly needs at least 4 hours, and ideally overnight, to become firm. Another reason could be overmixing the whipped cream, which can cause it to lose its airiness and thus its setting power, or not whipping it to stiff peaks in the first place. Ensure your heavy cream is very cold before whipping. Also, make sure your cream cheese is full-fat, as low-fat versions may not set as firmly.
Can I make this cheesecake ahead of time?
Yes, this no-bake cheesecake is an excellent make-ahead dessert! You can prepare the entire cheesecake, including the topping, up to 2 days in advance. In fact, making it a day ahead often allows the flavors to meld beautifully and ensures the filling is perfectly set. Just make sure to keep it tightly covered in the refrigerator until ready to serve.
How do I get clean slices?
For beautifully clean slices, the key is a properly chilled cheesecake and a sharp knife. Before each cut, dip a long, thin-bladed knife into a tall glass of hot water, then wipe it completely dry with a clean towel. Make a slice, then repeat the hot water and wipe process before the next slice. This prevents the filling and topping from sticking to the knife and creates neat, defined edges.