Introduction
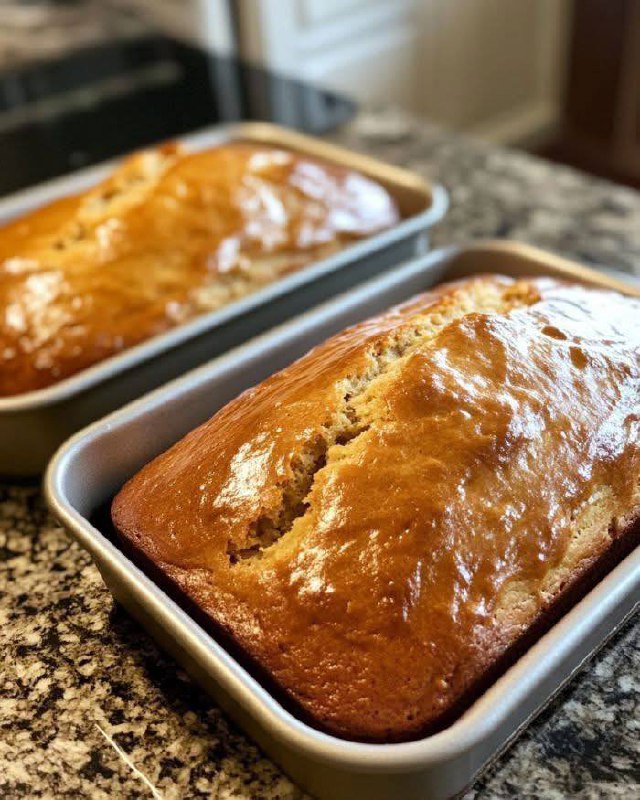
There’s a special kind of magic that fills the kitchen when a quick bread is baking. The air becomes thick with the promise of warmth, sweetness, and comfort. Our Applesauce Honey Bread is precisely that kind of magic in a loaf pan, offering a delightful blend of familiar flavors and an unbelievably moist texture that will have everyone asking for the recipe. This isn’t just any bread; it’s a hug in every slice, perfect for cozy mornings, afternoon pick-me-ups, or a sweet ending to any meal.
What makes this Applesauce Honey Bread truly shine is the ingenious combination of two humble yet powerful ingredients: applesauce and honey. The applesauce doesn’t just add a subtle fruity note; it’s the secret to an incredibly moist crumb, allowing us to reduce the amount of added fats without sacrificing tenderness. Then there’s the honey, which lends a natural, nuanced sweetness far more complex than granulated sugar alone, along with a beautiful golden hue and a faint, irresistible aroma that hints at its presence. Together, they create a loaf that’s tender, flavorful, and deeply satisfying, proving that simple ingredients can yield extraordinary results.
Whether you’re new to baking or a seasoned pro, this Applesauce Honey Bread is an approachable and rewarding recipe to add to your repertoire. It’s a quick bread, meaning no yeast, no kneading, and no long proofing times – just a simple mix, bake, and enjoy. The golden-brown crust, often kissed with a delightful crack across the top, gives way to a soft, aromatic interior that’s perfect on its own, toasted with a pat of butter, or alongside a cup of tea or coffee. It’s a versatile treat that adapts effortlessly to any occasion, making it a staple in our kitchen and soon, we hope, in yours too.
Nutritional Information
Per serving (approximate values):
- Calories: 280
- Protein: 5g
- Carbohydrates: 45g
- Fat: 10g
- Fiber: 2g
- Sodium: 250mg
Ingredients
- 2 cups all-purpose flour
- 1 teaspoon baking soda
- 1/2 teaspoon baking powder
- 1/2 teaspoon salt
- 1 teaspoon ground cinnamon
- 1/4 teaspoon ground nutmeg
- 1 1/2 cups unsweetened applesauce
- 1/2 cup honey
- 2 large eggs, at room temperature
- 1/4 cup vegetable oil or melted unsalted butter
- 1 teaspoon vanilla extract
- 1/2 cup chopped walnuts or pecans (optional)
- 1/2 cup raisins or dried cranberries (optional)
Instructions
- Preheat your oven to 350°F (175°C). Grease and flour two 8×4-inch loaf pans, or one 9×5-inch loaf pan and one 8×4-inch loaf pan, or line with parchment paper, leaving an overhang on the long sides for easy removal.
- In a large bowl, whisk together the dry ingredients: flour, baking soda, baking powder, salt, cinnamon, and nutmeg. Make sure there are no lumps and the spices are evenly distributed.
- In a separate medium bowl, whisk together the wet ingredients: unsweetened applesauce, honey, eggs, vegetable oil (or melted butter), and vanilla extract. Whisk until well combined and smooth.
- Pour the wet ingredients into the dry ingredients. Stir gently with a spatula or wooden spoon until just combined. Be careful not to overmix; a few lumps are perfectly fine. Overmixing can lead to a tough, dry bread. If using, gently fold in the optional chopped nuts, raisins, or dried cranberries now.
- Divide the batter evenly between the prepared loaf pans. Smooth the tops with the back of a spoon or spatula.
- Bake for 45-60 minutes, or until a wooden skewer or toothpick inserted into the center of the loaf comes out clean. Baking time will vary depending on your oven and the size of your loaf pans. If the tops start to brown too quickly, you can loosely tent them with aluminum foil.
- Once baked, remove the pans from the oven and let the bread cool in the pans for about 10-15 minutes. This allows the bread to set and prevents it from crumbling when you remove it.
- After cooling in the pans, carefully invert the bread onto a wire rack to cool completely. Allowing it to cool completely before slicing will ensure a cleaner cut and better texture.
Cooking Tips and Variations
Achieving the perfect Applesauce Honey Bread is easier than you think with a few key tips. First and foremost, resist the urge to overmix the batter. Once the wet and dry ingredients are just combined and no streaks of dry flour remain, stop stirring. Overmixing develops the gluten in the flour too much, leading to a tough and chewy bread instead of a tender, moist one. Another crucial tip is to measure your flour correctly. Spoon your flour into the measuring cup and then level it off with a straight edge rather than scooping directly from the bag, as this can compact the flour and result in too much flour in your recipe, leading to a dry loaf.
Your choice of applesauce matters! Opt for unsweetened applesauce to have better control over the overall sweetness of the bread. If you use sweetened applesauce, you might want to slightly reduce the amount of honey to prevent it from becoming overly sweet. The type of honey you use can also subtly influence the flavor profile. A light, floral honey will offer a delicate sweetness, while a darker, more robust honey like buckwheat or clover can add a deeper, more complex note. Feel free to experiment with different honey varieties to find your favorite.
For variations, the possibilities are endless! Incorporate 1/2 cup of chocolate chips (milk, dark, or white) for a sweeter treat. A simple glaze can elevate the presentation and flavor; whisk together 1 cup powdered sugar with 2-3 tablespoons of milk or orange juice and drizzle over the cooled bread. For an extra autumnal touch, you can add 1/2 cup of finely grated fresh apple along with the wet ingredients. You can also experiment with different spices; a pinch of allspice or ginger can complement the cinnamon and nutmeg beautifully. Don’t be afraid to make this recipe your own!
Storage and Reheating
To keep your Applesauce Honey Bread fresh and delicious, proper storage is key. Once the bread has completely cooled, wrap it tightly in plastic wrap or aluminum foil. You can also place it in an airtight container or a resealable plastic bag. Stored at room temperature, it will stay fresh for 3-4 days. For longer storage, this bread freezes beautifully. Wrap individual slices or whole loaves tightly in plastic wrap, then an additional layer of aluminum foil, and place in a freezer-safe bag. It can be frozen for up to 3 months.
When you’re ready to enjoy a frozen slice or loaf, simply thaw it at room temperature. For a quick warm-up, individual slices can be gently reheated in a toaster or microwave for 15-30 seconds until warm. If reheating a whole loaf from frozen, you can unwrap it and bake it in a preheated oven at 300°F (150°C) for about 15-20 minutes, or until warmed through. This will also help to revive some of that wonderful freshly baked aroma and texture. Serving the bread slightly warm enhances its moistness and brings out its rich, comforting flavors even more.
Frequently Asked Questions
Why did my Applesauce Honey Bread turn out dry?
A dry quick bread is usually the result of one of two things: overmixing the batter or overbaking the bread. Overmixing develops the gluten in the flour too much, making the bread tough and dry. Always mix just until the ingredients are combined. Overbaking can also draw out too much moisture, so be sure to check for doneness with a toothpick inserted into the center of the loaf; it should come out clean or with a few moist crumbs, but no wet batter.
Can I use sweetened applesauce instead of unsweetened?
Yes, you can use sweetened applesauce, but you may want to adjust the amount of honey to prevent the bread from becoming overly sweet. If using sweetened applesauce, reduce the honey by 1/4 cup and taste the batter (before adding eggs if you’re concerned) to determine if additional sweetness is needed. The goal is a balanced flavor, not just maximum sweetness.
Can I make this recipe into muffins?
Absolutely! This Applesauce Honey Bread batter works wonderfully for muffins. Simply preheat your oven to 375°F (190°C), line a muffin tin with paper liners or grease it well, and fill each cup about two-thirds full. Bake for 18-22 minutes, or until a toothpick inserted into the center of a muffin comes out clean. The yield will be approximately 18-24 muffins, depending on the size of your muffin tin.