Introduction
Craving a delicious, guilt-free snack that comes together in minutes? Look no further than these incredible No-Bake Peanut Butter Oat Energy Balls! These little powerhouses are the ultimate solution for satisfying your sweet tooth while fueling your body with wholesome ingredients. Forget turning on the oven; with just a few pantry staples and a quick mix, you’ll have a batch of these chewy, satisfying bites ready to boost your energy, curb those afternoon cravings, or even serve as a quick breakfast on the go. They’re naturally sweet, packed with fiber and protein, and so incredibly easy to make, you’ll wonder how you ever lived without them.
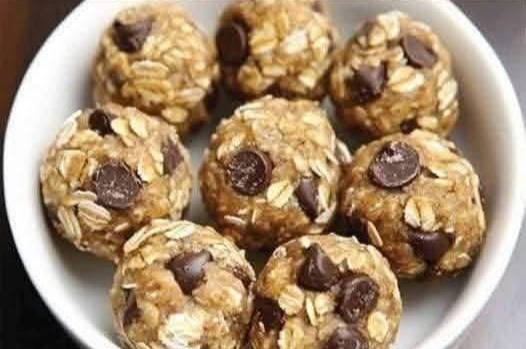
What makes these energy balls so special? It’s their irresistible combination of creamy peanut butter, hearty oats, and decadent chocolate chips, all bound together in a perfectly portable package. They’re a fantastic option for busy individuals, active families, and anyone looking for a healthier alternative to store-bought snacks. Plus, they’re incredibly versatile! You can customize them with your favorite add-ins, making each batch uniquely yours. From their delightful texture to their satisfying flavor, these no-bake wonders are about to become a staple in your healthy snacking routine.
Beyond their delicious taste, these energy balls offer a wealth of benefits. They’re naturally gluten-free (if using certified GF oats), easily made vegan, and a fantastic way to sneak in some extra fiber and plant-based protein. The “no-bake” aspect means less time in the kitchen and more time enjoying your day, while their make-ahead nature makes meal prepping a breeze. Whether you need a quick pre-workout bite, a kid-friendly after-school snack, or simply a wholesome treat to get you through the afternoon slump, these No-Bake Peanut Butter Oat Energy Balls are the perfect, fuss-free solution.
Nutritional Information
Per serving (approximate values, based on 20 balls per recipe):
- Calories: 150-180
- Protein: 5-7g
- Carbohydrates: 15-20g
- Fat: 8-12g
- Fiber: 2-3g
- Sodium: 80-120mg
Ingredients
- 1 ½ cups rolled oats (old-fashioned oats), gluten-free certified if preferred
- ½ cup natural creamy peanut butter (unsweetened, unsalted)
- ⅓ cup honey or maple syrup (for a vegan option)
- ¼ cup mini chocolate chips (vegan chocolate chips for a vegan option)
- 1 teaspoon vanilla extract
- ¼ teaspoon salt
- Optional: 2 tablespoons ground flaxseed or chia seeds for added nutrition
Instructions
- In a large mixing bowl, combine the rolled oats, salt, and any optional add-ins like ground flaxseed or chia seeds. Stir them together until well combined.
- Add the natural creamy peanut butter, honey (or maple syrup), and vanilla extract to the bowl with the dry ingredients.
- Using a sturdy spoon or a rubber spatula, mix all the ingredients thoroughly. Continue mixing until everything is fully incorporated and the mixture forms a cohesive, sticky dough. You may need to use your hands to really get it all combined, ensuring no dry oat bits remain at the bottom of the bowl.
- Once the mixture is well combined, fold in the mini chocolate chips. Distribute them evenly throughout the dough.
- Prepare a baking sheet or a plate by lining it with parchment paper or wax paper.
- Using a small cookie scoop (about 1.5 tablespoons) or your hands, scoop out portions of the mixture. Roll each portion between your palms to form smooth, uniform balls, about 1 to 1.5 inches in diameter.
- Place the formed energy balls onto the prepared baking sheet or plate.
- Once all the mixture has been rolled into balls, transfer the baking sheet to the refrigerator. Chill the energy balls for at least 30 minutes. This chilling time is crucial as it allows them to firm up, hold their shape better, and become less sticky, making them perfect for snacking.
- After chilling, your No-Bake Peanut Butter Oat Energy Balls are ready to enjoy!
Cooking Tips and Variations
Achieving the perfect consistency for your energy balls is key. If your mixture seems too dry and crumbly, add a tiny bit more peanut butter or sweetener, about a teaspoon at a time, until it comes together. Conversely, if it’s too sticky and hard to roll, add a tablespoon or two of extra oats or oat flour. The type of peanut butter you use can significantly impact the texture; natural, runnier peanut butter often works best. When rolling the balls, lightly moistening your hands with a little water or oil can prevent the mixture from sticking. This simple trick makes the process much smoother and less messy.
The beauty of these energy balls lies in their adaptability. You can easily customize them to suit your taste and dietary preferences. For an extra boost of healthy fats and omega-3s, consider adding a tablespoon of chia seeds, hemp seeds, or finely ground flaxseed meal to the mixture. If you’re a fan of coconut, shredded unsweetened coconut flakes can be mixed in or rolled on the outside for a tropical twist. For a different flavor profile, swap out the peanut butter for almond butter, cashew butter, or even sunflower seed butter for a nut-free option. Dried fruits like finely chopped raisins, cranberries, or apricots can also add a delightful chewiness and natural sweetness. Don’t be afraid to experiment with spices like cinnamon, nutmeg, or a pinch of pumpkin pie spice for a warm, comforting flavor. You can also vary the chocolate chips; white chocolate chips, dark chocolate chunks, or even cacao nibs are excellent alternatives. For a protein punch, a scoop of your favorite vanilla or chocolate protein powder can be incorporated, just be mindful that you might need to add a touch more liquid to maintain the desired consistency.
Storage and Reheating
These No-Bake Peanut Butter Oat Energy Balls are fantastic for meal prepping and can be stored easily to enjoy throughout the week. Once chilled and firm, transfer the energy balls to an airtight container. They will keep beautifully in the refrigerator for up to 1-2 weeks. It’s best to place a piece of parchment paper between layers if you’re stacking them to prevent them from sticking together. For longer storage, these energy balls also freeze exceptionally well. Place them in a single layer on a baking sheet and freeze until solid, about 1-2 hours. Once frozen, transfer them to a freezer-safe bag or container, again using parchment paper between layers if necessary. They can be stored in the freezer for up to 2-3 months. When you’re ready to enjoy a frozen energy ball, simply take it out of the freezer and let it thaw at room temperature for 10-15 minutes, or pop it in the fridge overnight. There’s no need to “reheat” them as they are designed to be enjoyed cold or at room temperature. Their chewy texture is best preserved when kept cool.
Frequently Asked Questions
Can I make these energy balls vegan?
Absolutely! To make these No-Bake Peanut Butter Oat Energy Balls vegan-friendly, simply ensure you use maple syrup instead of honey as your sweetener. Additionally, make sure to choose vegan chocolate chips, which are readily available in most grocery stores. All other ingredients, such as oats and natural peanut butter, are typically vegan.
What kind of oats should I use for this recipe?
For the best texture, we recommend using old-fashioned rolled oats. They provide a chewier texture and hold their shape well. Quick oats can also be used, but they might result in a slightly softer, less textured ball. Steel-cut oats are not suitable for this no-bake recipe as they require cooking to soften.
My mixture is too sticky/too dry, what should I do?
If your mixture is too sticky and difficult to roll, try adding a tablespoon or two of extra oats or a little oat flour to absorb some of the moisture. If it’s too dry and crumbly, add a teaspoon at a time of extra peanut butter or honey/maple syrup until the mixture comes together and is easy to form into balls. The consistency can vary slightly depending on the brand of peanut butter and the humidity, so don’t be afraid to adjust!
How long do these energy balls last?
When stored in an airtight container in the refrigerator, these No-Bake Peanut Butter Oat Energy Balls will stay fresh and delicious for 1 to 2 weeks. They can also be frozen for up to 2-3 months. Just be sure to let them thaw for a bit before enjoying them if you’re eating them straight from the freezer.