Homemade Sweetened Condensed Milk
There’s a certain magic ingredient that whispers through countless beloved desserts, from creamy fudges and luscious pies to decadent ice creams and rich coffee drinks. That ingredient, of course, is sweetened condensed milk. Its thick, velvety texture and intensely sweet flavor are the backbone of so many indulgent treats. But what if we told you that this pantry staple, often bought in a can, is incredibly simple and immensely satisfying to make right in your own kitchen? That’s right, homemade sweetened condensed milk is not just a possibility; it’s a game-changer.
Making your own sweetened condensed milk offers a delightful array of benefits. For starters, you gain complete control over the ingredients, ensuring no unwanted additives or preservatives find their way into your concoction. You can choose the quality of your milk and sugar, resulting in a fresher, purer taste that truly elevates your desserts. It’s also surprisingly cost-effective, especially when you consider how much a can of the store-bought variety can add up over time. Beyond the practical advantages, there’s an undeniable satisfaction that comes from creating such a versatile and delicious component from scratch. The process itself is wonderfully simple and rewarding, transforming humble milk and sugar into a rich, creamy, and perfectly sweet liquid gold.
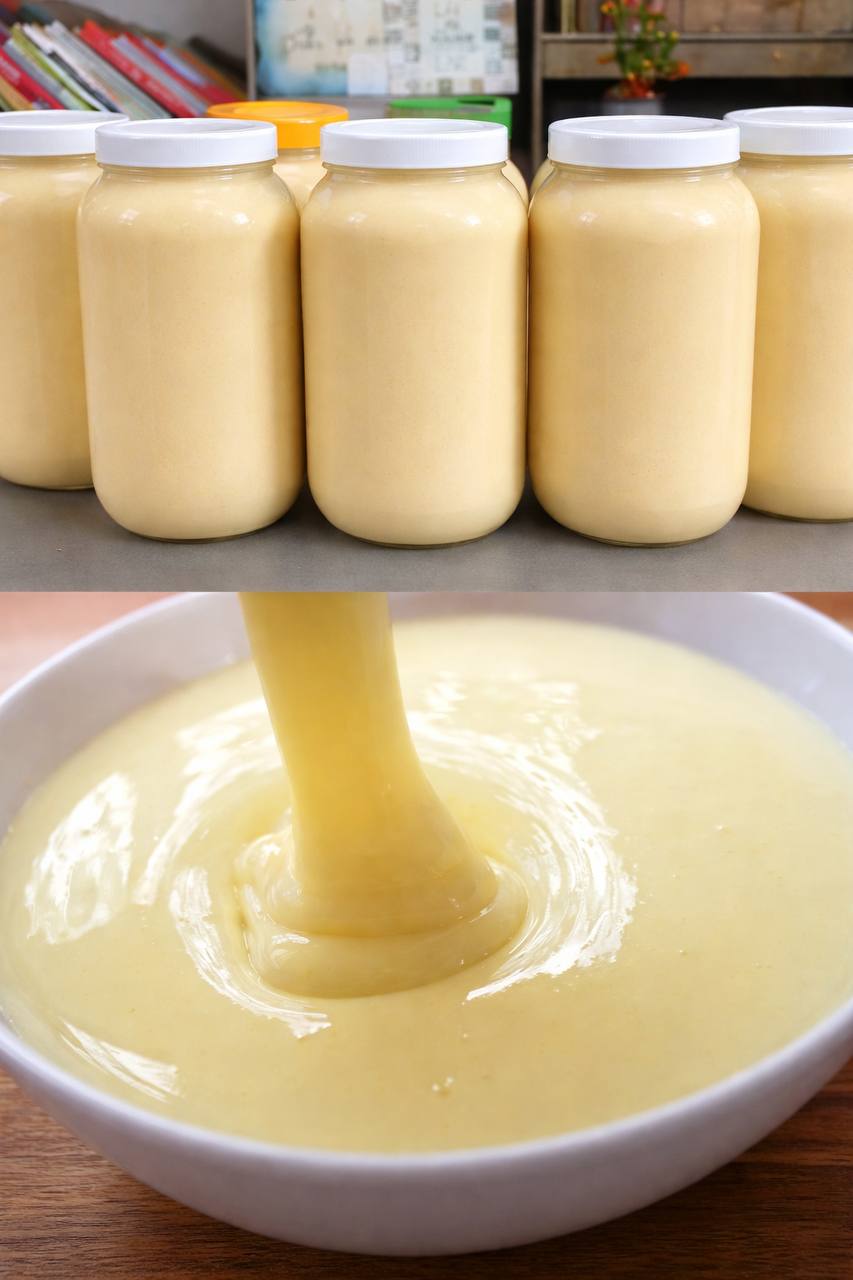
Get ready to unlock a new level of dessert mastery. Our homemade sweetened condensed milk is everything you could wish for: thick, luscious, with that characteristic pale yellow hue, and a smooth, uniform consistency that pours beautifully. It’s incredibly versatile, ready to be whisked into your favorite recipes or simply enjoyed by the spoonful. This recipe will guide you through the straightforward steps, equipping you with the knowledge to craft batch after batch of this essential sweet secret. Prepare to impress your taste buds and your guests with the superior quality and flavor of homemade!
Nutritional Information
Per serving (approximate values, based on 2 tablespoons):
- Calories: 130
- Protein: 3g
- Carbohydrates: 22g
- Fat: 4g
- Fiber: 0g
- Sodium: 45mg
Ingredients
- 4 cups (960ml) whole milk (full-fat milk is essential for richness)
- 1 cup (200g) granulated sugar
- 1 teaspoon vanilla extract (optional, added after cooking)
Instructions
- Prepare Your Equipment: Begin by ensuring all your equipment is clean and ready. If you plan to store your homemade sweetened condensed milk for more than a few days, it’s highly recommended to sanitize your storage jars. Wash glass jars and lids thoroughly with hot, soapy water, then rinse well. You can then sterilize them by boiling them in water for 10 minutes, or by running them through a hot cycle in your dishwasher. Allow them to air dry completely or place them upside down on a clean towel.
- Combine Ingredients: Pour the 4 cups of whole milk into a large, heavy-bottomed saucepan. A heavy-bottomed pot is crucial as it helps distribute heat more evenly and significantly reduces the risk of scorching the milk, which can happen easily with thinner pots. Add the 1 cup of granulated sugar to the milk.
- Begin Heating: Place the saucepan over medium heat. Whisk the milk and sugar constantly until the sugar has completely dissolved. This usually takes about 3-5 minutes. Continue whisking occasionally as the milk begins to heat up, preventing the sugar from settling at the bottom and burning.
- Bring to a Simmer: Once the sugar is dissolved and the milk is hot, reduce the heat to medium-low. Bring the mixture to a gentle simmer. You should see small bubbles forming around the edges of the pot, but avoid a rolling boil as this can cause the milk to boil over or scorch too quickly.
- Reduce the Milk: This is the most crucial step. Maintain a consistent, gentle simmer. Stir the milk frequently, especially scraping the bottom and sides of the pot, to prevent scorching and to ensure even reduction. As the water evaporates, the milk will begin to thicken and turn a pale yellow color. This reduction process can take anywhere from 45 minutes to 1 hour and 30 minutes, depending on your stovetop, pot, and initial heat.
- Monitor Consistency: The goal is to reduce the volume of the milk by approximately half, or until it reaches a thick, pourable consistency similar to commercial sweetened condensed milk. A good way to check is to dip a spoon into the mixture; if it coats the back of the spoon and you can draw a clean line through it with your finger, it’s getting close. Remember, it will thicken considerably more as it cools. If you have a candy thermometer, you can aim for a temperature between 220°F and 225°F (104°C to 107°C), but visual cues are often sufficient.
- Remove from Heat and Add Vanilla: Once the desired consistency is achieved, remove the saucepan from the heat immediately. If using, stir in the 1 teaspoon of vanilla extract now. The vanilla adds a lovely aromatic depth but should not be added during the cooking process as its flavor can dissipate with prolonged heat.
- Cool Completely: Carefully pour the hot sweetened condensed milk into your prepared clean jars. Leave about half an inch of headspace at the top of each jar. Allow the sweetened condensed milk to cool completely to room temperature before sealing the jars with their lids. This cooling process is vital for it to thicken to its final, luscious consistency. You can speed up the cooling by placing the jars in an ice bath, stirring occasionally, but ensure no water gets into the milk.
- Store: Once fully cooled and thickened, seal the jars tightly. Your homemade sweetened condensed milk is now ready to use or store.
Cooking Tips and Variations
Achieving the perfect homemade sweetened condensed milk requires a bit of patience and attention, but these tips will ensure your success every time:
- Use a Heavy-Bottomed Pot: This cannot be stressed enough. A thick-bottomed pot distributes heat evenly, drastically reducing the chances of your milk scorching on the bottom, which can ruin the flavor.
- Constant, Gentle Stirring: Especially as the milk begins to thicken, frequent stirring is key. Scrape the bottom and sides of the pot to prevent milk solids from sticking and burning. This also ensures an even reduction and a smooth, lump-free product.
- Maintain a Gentle Simmer: Avoid a rolling boil. A gentle simmer allows for controlled evaporation and prevents the milk from boiling over, curdling, or developing a “cooked” flavor. Low to medium-low heat is your friend here.
- Don’t Over-Reduce: It’s tempting to keep cooking until it looks super thick, but remember that sweetened condensed milk thickens significantly as it cools. If you cook it down too much, it can become almost solid in the fridge. Err on the side of slightly thinner if you’re unsure; it will firm up.
- Preventing Lumps: Lumps usually occur from milk solids sticking and burning to the bottom or sides of the pot. Consistent stirring and maintaining a gentle simmer are the best preventative measures. If you do end up with a few small lumps, you can strain the finished product through a fine-mesh sieve before cooling.
- Adjusting Sweetness: The recipe provides a standard sweetness level. If you prefer it less sweet, you can reduce the sugar by 1/4 cup. Be aware that sugar also contributes to the preservation and texture, so don’t reduce it too drastically.
- Flavor Variations: While vanilla is a classic addition, feel free to experiment! You can add a pinch of salt to balance the sweetness, a few cardamom pods during reduction for an Indian-inspired flavor, or even a tablespoon of cocoa powder at the end for a chocolate version. Just ensure any powdered additions are thoroughly whisked in.
- Cleanliness is Key: When jarring, ensure your jars and lids are meticulously clean and, ideally, sterilized. This is especially important if you plan to store the condensed milk for more than a week.
Storage and Reheating
Proper storage is crucial for extending the shelf life of your homemade sweetened condensed milk and maintaining its quality.
Storage:
- Refrigeration: Once your homemade sweetened condensed milk has cooled completely, transfer it to airtight, sterilized glass jars. Store it in the refrigerator. It will keep well for up to 2-3 weeks. Always use a clean spoon when scooping it out to prevent contamination.
- Freezing: For longer storage, sweetened condensed milk freezes beautifully. Pour it into freezer-safe containers or even ice cube trays (for smaller, pre-portioned amounts). It can be frozen for up to 3 months. Thaw frozen condensed milk in the refrigerator overnight or on the counter for a few hours. Stir well before using, as some separation might occur after thawing, but this is perfectly normal.
Reheating:
Sweetened condensed milk is typically used at room temperature or chilled, depending on the recipe. However, if you find it has become too thick in the refrigerator or you need it slightly warmer for a specific application (like dissolving into hot coffee), you can gently warm it.
- Microwave: Spoon the desired amount into a microwave-safe bowl. Heat in 10-15 second intervals on low power, stirring in between, until it reaches your desired consistency. Be careful not to overheat, as it can scorch easily.
- Stovetop: Transfer the desired amount to a small saucepan. Heat over very low heat, stirring constantly, until it’s warmed through and slightly more fluid. Again, avoid high heat to prevent scorching.
Frequently Asked Questions
Why did my sweetened condensed milk turn out lumpy or grainy?
Lumpiness or graininess often occurs for a few reasons. The most common is insufficient stirring, allowing milk solids and sugar to stick to the bottom and sides of the pot and burn, forming lumps. Another reason could be cooking at too high a heat, which can cause the milk to “break” or scorch. Ensure you’re using a heavy-bottomed pot, stirring frequently, and maintaining a gentle simmer. If you find small lumps, you can strain the finished product through a fine-mesh sieve before it cools completely.
Can I use skim milk or low-fat milk for this recipe?
While technically possible, it is not recommended for achieving the rich, creamy texture and flavor characteristic of traditional sweetened condensed milk. Whole milk (full-fat) is essential because the fat content contributes significantly to the body, mouthfeel, and overall richness of the final product. Skim or low-fat milk will result in a thinner, less luxurious condensed milk that may not perform as well in recipes.
How can I tell when my sweetened condensed milk is done cooking?
The key indicators are volume reduction and consistency. The milk should reduce by about half its original volume. Visually, it should become noticeably thicker, coating the back of a spoon, and you should be able to draw a clean line through it with your finger. Remember, it will continue to thicken significantly as it cools, so it’s better to undercook slightly than overcook. If you have a candy thermometer, a temperature between 220°F and 225°F (104°C to 107°C) is a good target, but not strictly necessary.