Introduction
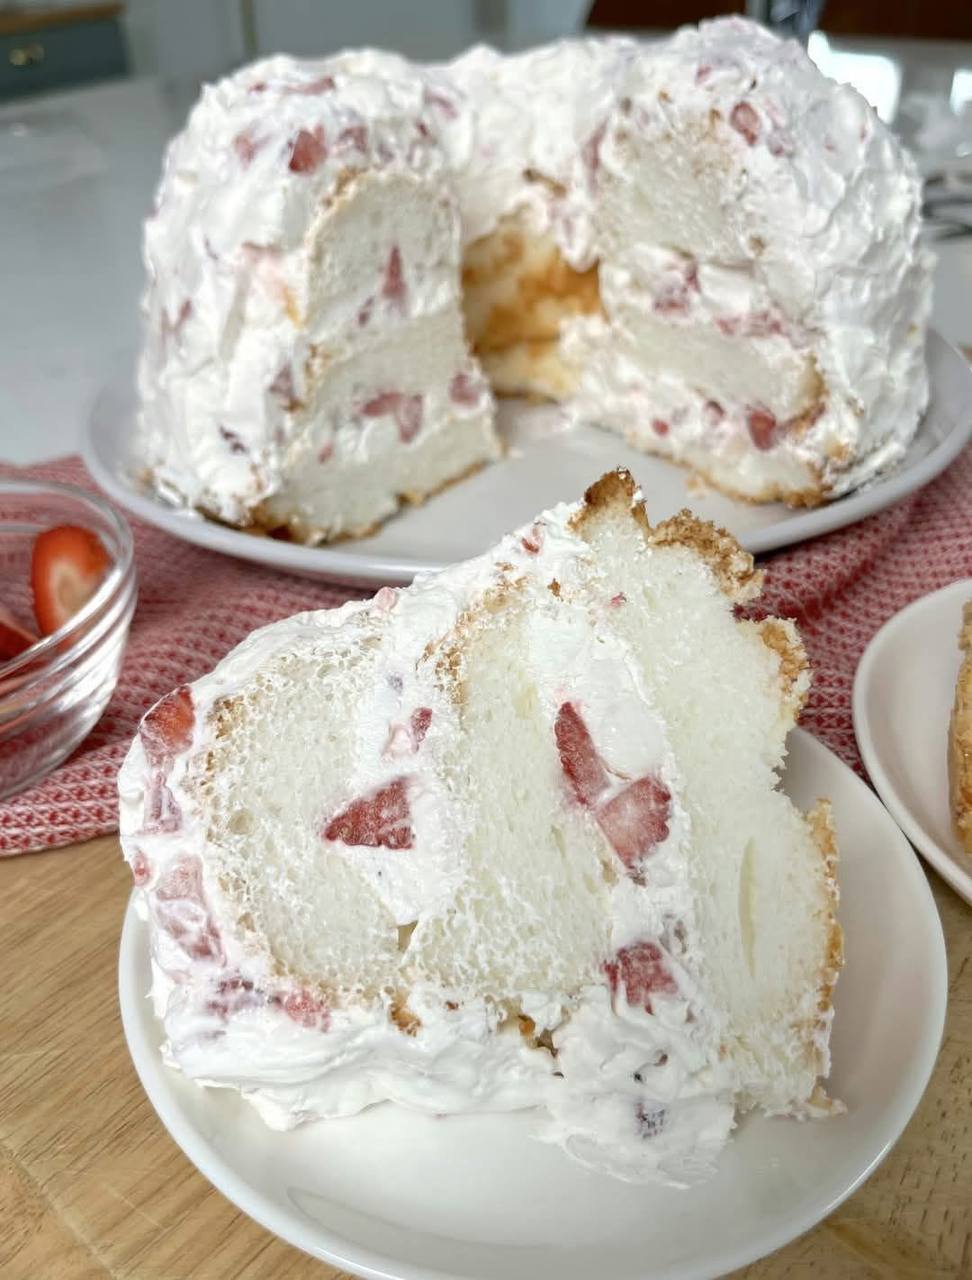
As the days stretch longer and the sun shines brighter, our cravings naturally turn to desserts that are light, refreshing, and, most importantly, require absolutely no oven. Enter the Strawberry Shortcake Icebox Cake – a true hero of warm-weather entertaining. This isn’t just a dessert; it’s a celebration of summer in every creamy, fruity bite. Imagine layers of tender angel food cake, luscious whipped cream, and vibrant fresh strawberries, all coming together in a chilled symphony that practically melts in your mouth. It’s the perfect antidote to a hot day, offering sweet relief without adding a single degree of heat to your kitchen.
What makes this Strawberry Shortcake Icebox Cake truly special is its incredible simplicity combined with an impressive presentation. Forget complicated baking steps or elaborate decorating; this treat practically assembles itself. The magic happens in your refrigerator, where the layers mingle and soften, transforming humble ingredients into a cohesive, flavorful masterpiece. It’s light, airy, and bursting with the classic taste of strawberry shortcake, but with a delightful no-bake twist that makes it accessible to even the most novice of dessert makers. Plus, its make-ahead nature means you can prepare it hours, or even a day, before your event, leaving you free to enjoy your guests and the beautiful weather.
This dessert truly embodies the spirit of easy summer living. It’s the kind of dish that evokes nostalgic memories of backyard barbecues and picnics, yet feels elegant enough for any gathering. Whether you’re hosting a crowd or simply treating yourself to a delightful indulgence, our Strawberry Shortcake Icebox Cake promises to be a showstopper. It’s proof that sometimes, the simplest desserts are the most memorable, delivering maximum flavor with minimal effort.
Nutritional Information
Per serving (approximate values):
- Calories: 320
- Protein: 5g
- Carbohydrates: 40g
- Fat: 16g
- Fiber: 2g
- Sodium: 220mg
Ingredients
- 1 (16-ounce) prepared angel food cake (store-bought or homemade), preferably day-old
- 2 pounds fresh strawberries, hulled and sliced or diced
- 1/4 cup granulated sugar (for strawberries, optional)
- 3 cups heavy whipping cream, very cold
- 1/2 cup powdered sugar
- 1 teaspoon pure vanilla extract
- 1/4 teaspoon cream of tartar (optional, for stabilizing whipped cream)
Instructions
- Prepare the Strawberries: Wash and hull the fresh strawberries. Slice about two-thirds of them into 1/4-inch thick pieces, and dice the remaining one-third into smaller chunks. If your strawberries aren’t very sweet, or if you prefer a juicier cake, you can gently toss the sliced and diced strawberries with 1/4 cup of granulated sugar in a medium bowl. Let them sit for 15-20 minutes to macerate and release their natural juices.
- Prepare the Angel Food Cake: If using a whole angel food cake, carefully slice it horizontally into three even layers using a serrated knife. Alternatively, you can cut the cake into 1-inch thick slices or 1-inch cubes. The goal is to have easily manageable pieces for layering.
- Prepare the Whipped Cream: In a large, very cold mixing bowl (chilling the bowl and whisk attachment in the freezer for 10-15 minutes helps tremendously), combine the cold heavy whipping cream, powdered sugar, and vanilla extract. If using, add the cream of tartar. Beat on medium-high speed with an electric mixer until stiff peaks form. Be careful not to overbeat, or the cream will become grainy.
- Assemble the Cake: For a beautiful ring shape, lightly grease a 10-cup bundt pan or tube pan with non-stick spray, or line a 9-inch springform pan with plastic wrap, leaving an overhang on the sides.
- First Cake Layer: Arrange a layer of angel food cake pieces at the bottom of the pan, pressing them gently to create a relatively even base. Don’t worry if there are small gaps; the cream will fill them. If using sliced cake, lay the first layer down.
- First Cream and Strawberry Layer: Spread about one-third of the whipped cream evenly over the cake layer. Then, scatter about one-third of the prepared strawberries (both sliced and diced) over the whipped cream.
- Repeat Layers: Add another layer of angel food cake, pressing gently. Follow with another third of the whipped cream and another third of the strawberries.
- Final Layers: Place the last layer of angel food cake on top. Finish with the remaining whipped cream, spreading it smoothly over the top. If you reserved any strawberries for garnish, you can arrange them now, or wait until just before serving.
- Chill Thoroughly: Cover the pan tightly with plastic wrap. Refrigerate for at least 4-6 hours, or preferably overnight. This crucial chilling time allows the cake to absorb moisture from the cream and strawberries, softening into a cohesive “cake” texture and allowing the flavors to meld beautifully.
- Unmold and Serve: If using a bundt or tube pan, carefully invert the cake onto a serving platter. If using a springform pan, simply remove the springform ring and peel away the plastic wrap. Garnish with additional fresh strawberries, a sprig of mint, or a light dusting of powdered sugar, if desired. Slice and serve immediately.
Cooking Tips and Variations
Cake Options: While angel food cake is traditional for its light and airy texture, you can absolutely use a store-bought sponge cake or even pound cake if you prefer a denser base. For ultimate convenience, pre-cut angel food cake slices or cubes are readily available in many grocery stores. If making homemade angel food cake, ensure it’s completely cooled, preferably day-old, as it’s easier to slice without crumbling.
Whipped Cream Secrets: For the most stable homemade whipped cream, always start with very cold heavy whipping cream. Chilling your mixing bowl and whisk attachment in the freezer for 10-15 minutes before you begin will make a significant difference. The cream of tartar addition is a fantastic trick to help stabilize the whipped cream, preventing it from weeping or deflating too quickly. However, if you’re short on time or want an even easier option, a good quality store-bought Cool Whip can be a convenient substitute and holds up exceptionally well. Just thaw it in the refrigerator before using.
Strawberry Prep: Macerating the strawberries (tossing them with a little sugar and letting them sit) is an excellent way to enhance their flavor and create a lovely, syrupy juice that infuses into the cake layers. If your strawberries are perfectly ripe and sweet, you might omit the extra sugar. For extra visual appeal and varied texture, consider reserving a few whole, perfect strawberries for garnishing the top of the cake before serving.
Assembly Tricks: When assembling in a bundt or tube pan, lining the pan with plastic wrap before layering can make unmolding much easier. Simply leave enough overhang to lift the cake out once it’s set. Pressing the cake pieces gently into the cream ensures good contact and helps the cake soften evenly. Don’t worry about perfection; the beauty of an icebox cake is its rustic charm. For clean slices, use a sharp, thin-bladed knife and wipe it clean between cuts.
Serving Suggestions: Beyond fresh strawberries, a few mint leaves can add a pop of color and freshness. A light dusting of powdered sugar over the top before serving adds an elegant touch. For a more decadent treat, a drizzle of homemade strawberry sauce or a sprinkle of white chocolate shavings would be delightful.
Variations: The beauty of an icebox cake lies in its adaptability. Don’t limit yourself to just strawberries! This recipe works wonderfully with other summer fruits like raspberries, blueberries, peaches, or a combination of mixed berries. You can also add a hint of citrus by grating some lemon or orange zest into the whipped cream for a bright, tangy note. For a chocolate twist, finely grate some dark chocolate into the whipped cream layers or add a layer of chocolate shavings.
Storage and Reheating
This Strawberry Shortcake Icebox Cake is best enjoyed chilled. Store any leftovers tightly covered with plastic wrap in the refrigerator. It will remain fresh and delicious for up to 3-4 days. The cake’s texture actually improves as it sits, allowing the flavors to meld further and the cake to soften beautifully. Due to the fresh fruit and dairy, this cake does not freeze well; freezing and thawing will alter the texture of both the whipped cream and the strawberries, making them watery and mushy.
Frequently Asked Questions
Can I make this cake ahead of time for a party?
Absolutely! This is one of the best features of an icebox cake. It requires a minimum of 4-6 hours of chilling, but it’s even better if made the night before. This allows all the flavors to fully meld and the cake to soften to the perfect consistency, making it an ideal make-ahead dessert for entertaining.
What if I don’t have a bundt pan or springform pan?
No problem! You can easily assemble this cake in a 9×13-inch baking dish. Simply layer the cake pieces, whipped cream, and strawberries as described, pressing down gently. The result will be a rectangular cake that’s just as delicious, though it won’t have the distinct ring shape. You can also use a deep, round serving bowl, lining it with plastic wrap first for easier inversion.
My whipped cream isn’t getting stiff. What am I doing wrong?
The most common reasons for whipped cream not stiffening are that the cream isn’t cold enough, or the bowl and whisk weren’t chilled. Ensure your heavy cream is straight from the refrigerator and that your equipment is very cold. Also, make sure you’re using heavy whipping cream (at least 36% milk fat), not just “whipping cream” or “light cream,” as the higher fat content is crucial for stability. Adding a touch of cream of tartar or a tablespoon of cornstarch can also help stabilize it.