Amish White Bread
There’s something truly magical about homemade bread, and when it comes to pure comfort and irresistible flavor, Amish White Bread stands in a league of its own. Imagine sinking your teeth into a roll so incredibly soft, so wonderfully fluffy, and just sweet enough to make your taste buds sing. That’s the promise of this classic recipe, a beloved staple in Amish communities known for its simple goodness and heartwarming appeal. It’s the kind of bread that instantly transports you back to grandma’s kitchen, filling your home with an aroma that’s utterly intoxicating and promising a delicious experience.
This recipe focuses on crafting perfect, individual rolls – ideal for sharing, for dinner parties, or simply for savoring warm from the oven with a generous pat of butter. Their signature tender crumb and delicate sweetness make them incredibly versatile, whether they’re accompanying a hearty stew, serving as the base for a mini-sandwich, or simply enjoyed on their own. Don’t be intimidated by working with yeast; I’m going to guide you through every step, ensuring that even if you’re a novice baker, you’ll achieve bakery-quality results that will impress everyone at your table. Get ready to discover the joy of baking these truly special rolls!
Amish White Bread rolls are more than just a side dish; they are a centerpiece of warmth and hospitality. Their slightly sweet profile comes from a touch more sugar than typical savory breads, while the use of milk and butter contributes to their incredibly soft texture and rich flavor. This isn’t a sourdough or a crusty artisan loaf; it’s pure, unadulterated comfort food designed to be pillowy and tender. Each bite is a testament to simple, quality ingredients coming together to create something extraordinary. Prepare yourself for the ultimate homemade bread experience – one that’s sure to become a cherished recipe in your kitchen.
Nutritional Information
Per serving (approximate values for one roll, assuming 16 rolls per batch):
- Calories: 180 kcal
- Protein: 5g
- Carbohydrates: 32g
- Fat: 4g
- Fiber: 1g
- Sodium: 250mg
Ingredients
- 1 cup warm water (105-115°F / 40-46°C)
- 2 ¼ teaspoons active dry yeast (one standard packet)
- ½ cup granulated sugar, divided (¼ cup for yeast, ¼ cup for dough)
- 1 ½ cups warm milk (105-115°F / 40-46°C)
- ½ cup unsalted butter, melted and slightly cooled, plus 2 tablespoons for brushing
- 1 teaspoon salt
- 6-7 cups all-purpose flour, divided, plus more for dusting
Instructions
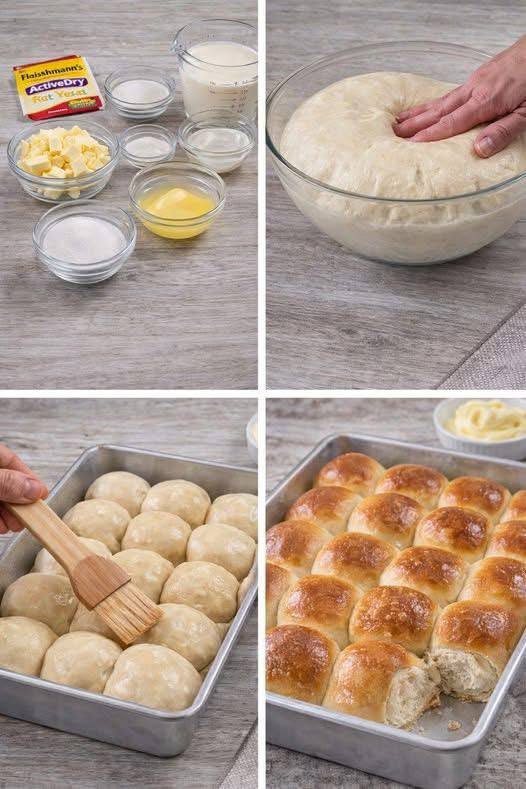
- Activate the Yeast: In a large mixing bowl (or the bowl of a stand mixer), combine the warm water and ¼ cup of the granulated sugar. Sprinkle the active dry yeast over the top. Let it sit for 5-10 minutes until the mixture becomes foamy and bubbly. This indicates your yeast is active and ready to work.
- Combine Wet Ingredients: To the activated yeast mixture, add the warm milk, ½ cup of melted butter, and the remaining ¼ cup of granulated sugar, along with the salt. Stir gently to combine.
- Add Flour Gradually: Begin adding the flour, one cup at a time, mixing well after each addition. Start with 3 cups and mix until incorporated. The dough will be very shaggy at this point.
- Knead the Dough: Continue adding flour, ½ cup at a time, until the dough comes together and starts to pull away from the sides of the bowl. You may not need all 7 cups; stop when the dough is still slightly sticky but manageable.
- If using a stand mixer: Attach the dough hook and knead on medium-low speed for 7-10 minutes, until the dough is smooth, elastic, and passes the windowpane test (you can stretch a small piece thin enough to see light through it without tearing).
- If kneading by hand: Turn the dough out onto a lightly floured surface. Knead for 10-15 minutes, pushing the dough away from you with the heels of your hands, folding it back, and rotating it, until it is smooth and elastic. Avoid adding too much extra flour, as this can make the rolls tough.
- First Rise (Bulk Fermentation): Lightly grease a large clean bowl with a little oil. Place the kneaded dough in the bowl, turning it once to coat the top. Cover the bowl tightly with plastic wrap or a clean kitchen towel. Place in a warm, draft-free spot (like a slightly warmed, turned-off oven or a sunny windowsill) for 1 to 1 ½ hours, or until the dough has doubled in size.
- Punch Down and Divide: Once the dough has doubled, gently punch it down to release the air. Turn the dough out onto a lightly floured surface. Divide the dough into 16-18 equal pieces (about 2.5-3 ounces each for standard rolls). A kitchen scale can help with accuracy.
- Shape the Rolls: Take each piece of dough and gently shape it into a smooth, round ball. You can do this by cupping your hand over the dough and rolling it against the counter in a circular motion, creating tension on the surface.
- Second Rise (Proofing): Arrange the shaped rolls in a lightly greased 9×13 inch baking pan, leaving a little space between each roll (they will expand). Cover the pan loosely with plastic wrap or a clean kitchen towel. Let the rolls rise in a warm place for another 30-45 minutes, or until they look visibly puffy and have nearly doubled in size again.
- Preheat Oven: While the rolls are on their second rise, preheat your oven to 375°F (190°C).
- Bake the Rolls: Uncover the rolls and place the pan in the preheated oven. Bake for 15-20 minutes, or until the tops are golden brown. If they are browning too quickly, you can loosely tent them with aluminum foil.
- Finishing Touch: As soon as the rolls come out of the oven, brush the tops generously with the remaining 2 tablespoons of melted butter. This creates an incredibly soft crust and a beautiful sheen.
- Cool and Serve: Let the rolls cool in the pan for a few minutes before transferring them to a wire rack to cool completely. Serve warm or at room temperature.
Cooking Tips and Variations
Achieving bakery-quality Amish White Bread rolls is all about understanding a few key principles and being patient with the process. Here are some tips to ensure your rolls turn out perfectly every time, along with some delicious variations to experiment with.
Tips for Amish White Bread Success
- Yeast Activation is Key: Always ensure your water temperature is between 105-115°F (40-46°C). Water that’s too cold won’t activate the yeast, and water that’s too hot will kill it. If your yeast doesn’t foam, discard it and start with a fresh packet.
- Don’t Over-Flour: This is perhaps the most crucial tip for soft bread. A common mistake is adding too much flour during kneading because the dough feels sticky. A slightly sticky dough is desirable and will result in a more tender, airy crumb. Resist the urge to add more flour than necessary; just enough so the dough is manageable.
- Warm, Draft-Free Rising Environment: Yeast loves warmth and hates drafts. For the first and second rises, find a cozy spot. A slightly warmed oven (turned off, with the door ajar), a sunny windowsill, or even placing the bowl in a larger bowl of warm water can work wonders.
- Knead Sufficiently: Proper kneading develops the gluten structure, which is what gives bread its elasticity and chewiness. Don’t cut this step short. The dough should be smooth, elastic, and pass the windowpane test when fully kneaded.
- Even Baking: If your oven has hot spots, rotate the baking pan halfway through the baking time to ensure all rolls brown evenly.
- Brush with Butter: Don’t skip the melted butter brush after baking! It’s not just for shine; it adds amazing flavor and contributes to that signature soft, tender crust.
- Use a Kitchen Scale: For truly consistent results, especially with flour, using a kitchen scale for precise measurements is highly recommended. Flour can vary in weight depending on how it’s scooped.
- Listen to Your Dough: Baking bread is as much an art as a science. Pay attention to how your dough feels and looks. If it needs a little more time to rise, give it that time. If it feels too dry, a tiny bit of water can help; too wet, a sprinkle of flour.
- Cool on a Wire Rack: Once out of the pan, transfer the rolls to a wire rack to cool. This allows air to circulate around them and prevents the bottoms from becoming soggy from trapped steam.
Variations
- Herb & Garlic Rolls: Before the second rise, mix 1-2 teaspoons of dried Italian herbs and ½ teaspoon of garlic powder into the dough. You can also brush with garlic butter instead of plain melted butter after baking.
- Cheese Rolls: Fold in ½ cup of shredded cheddar or mozzarella cheese during the last minute of kneading. You can also sprinkle a little extra cheese on top before baking for a cheesy crust.
- Sweet Cinnamon Rolls: After the first rise, roll the dough into a rectangle, spread with softened butter, sprinkle with cinnamon sugar, roll up, and slice into individual rolls before the second rise and baking.
- Whole Wheat Blend: For a slightly healthier twist, substitute 1-2 cups of the all-purpose flour with whole wheat flour. Note that this might result in a slightly denser roll and may require a bit more liquid.
- Honey Rolls: Replace ¼ cup of the granulated sugar with ¼ cup of honey for a subtle honey flavor and added moisture.
- Loaf Bread: Instead of shaping into individual rolls, you can shape the entire dough into one or two loaves and bake in standard loaf pans (adjusting baking time, likely 30-40 minutes at 350°F / 175°C).
Storage and Reheating
Amish White Bread rolls are best enjoyed fresh, ideally warm from the oven. However, if you find yourself with leftovers (a rare occurrence!), proper storage will help maintain their deliciousness.
- Room Temperature: Store cooled rolls in an airtight container or a large zip-top bag at room temperature for up to 2-3 days. Make sure they are completely cool before storing to prevent condensation, which can make them soggy.
- Freezing: For longer storage, Amish White Bread rolls freeze beautifully. Once completely cooled, place them in a single layer on a baking sheet and freeze until solid (about 1-2 hours). Then, transfer the frozen rolls to a freezer-safe bag or airtight container, removing as much air as possible. They can be stored in the freezer for up to 2-3 months.
- Reheating from Room Temperature: To reheat, you can warm them in a microwave for 15-30 seconds per roll (be careful not to over-microwave, or they can become tough). Alternatively, wrap them loosely in foil and warm in a preheated oven at 300°F (150°C) for 5-10 minutes until heated through.
- Reheating from Frozen: For frozen rolls, you can thaw them at room temperature for a few hours. For a quicker reheat, place the frozen rolls on a baking sheet, cover loosely with foil, and bake in a preheated oven at 300°F (150°C) for 15-20 minutes, or until soft and warmed through. Brushing with a little melted butter after reheating can also refresh their texture.
Frequently Asked Questions
What makes Amish White Bread so soft and fluffy?
The signature softness and fluffiness of Amish White Bread come from a few key factors. Firstly, the recipe typically uses milk instead of just water, and a generous amount of butter, both of which contribute to a tender crumb. Secondly, the slight sweetness from sugar helps keep the bread moist and also aids in browning. Finally, proper kneading develops the gluten just enough for structure without making the bread tough, and two distinct rising periods ensure a light, airy texture.
Can I make this dough ahead of time?
Yes, you can prepare the dough ahead of time. After the first rise, instead of punching it down and shaping, you can punch it down gently, cover the bowl tightly with plastic wrap, and refrigerate the dough for up to 24 hours. When you’re ready to bake, remove the dough from the refrigerator, let it sit at room temperature for about 30-60 minutes to take off the chill, then proceed with shaping, the second rise, and baking as instructed.
My rolls didn’t rise. What went wrong?
The most common reason for dough not rising is inactive yeast. This can happen if your water was too hot (killing the yeast) or too cold (not activating it), or if the yeast itself was old or expired. Always proof your yeast first to ensure it’s active. Other factors could be a cold environment for rising, or adding too much flour during kneading, which can make the dough too stiff to rise properly.
What’s the best way to ensure my rolls have a beautiful golden-brown crust?
Several things contribute to a beautiful golden crust. The sugar in the dough helps with browning. Baking at the correct temperature (375°F/190°C) is also crucial. Most importantly, brushing the rolls with melted butter immediately after they come out of the oven not only adds flavor but also creates that desirable soft, golden-brown sheen. Some bakers also like to brush with an egg wash (one egg beaten with a tablespoon of water) before baking for an even richer color, though it’s not strictly necessary for this recipe.