Instructions
- Prepare the Shortbread Crust: In a large bowl, whisk together the flour, granulated sugar, and salt. Add the cold, cubed butter. Using a pastry blender, your fingertips, or a food processor, cut the butter into the flour mixture until it resembles coarse crumbs with some pea-sized pieces of butter remaining.
- In a small bowl, whisk together the egg yolk, 2 tablespoons of ice water, and vanilla extract. Gradually add this mixture to the flour mixture, mixing until just combined. If the dough is too dry, add the remaining tablespoon of ice water, one teaspoon at a time, until the dough just comes together. Do not overmix.
- Form the dough into a disc, wrap tightly in plastic wrap, and refrigerate for at least 30 minutes, or up to 2 days.
- Preheat Oven and Prepare Tart Pan: Preheat your oven to 375°F (190°C). Lightly grease a 9-inch tart pan with a removable bottom.
- Roll Out the Crust: On a lightly floured surface, roll out the chilled dough into a 12-inch circle, about ⅛ inch thick. Carefully transfer the dough to the prepared tart pan, pressing it gently into the bottom and up the sides. Trim any excess dough from the edges. Prick the bottom of the crust all over with a fork.
- Blind Bake the Crust (Optional but Recommended): Line the crust with parchment paper and fill with pie weights or dried beans. Blind bake for 15 minutes. Remove the parchment paper and weights, then continue to bake for another 5-7 minutes, or until the crust is lightly golden. This helps prevent a soggy bottom. Remove from oven and let cool slightly.
- Prepare the Creamy Filling: In a medium bowl, whisk together the granulated sugar, flour, cinnamon, nutmeg, and cloves (if using). In a separate bowl, whisk together the egg, heavy cream, vanilla extract, and lemon juice. Add the wet ingredients to the dry ingredients and whisk until smooth and well combined.
- Prepare the Apples: In a large bowl, toss the thinly sliced apples with 2 tablespoons of granulated sugar and 1 tablespoon of lemon juice. This helps prevent browning and adds a touch of sweetness.
- Assemble the Tart: Pour the creamy filling into the blind-baked tart crust, spreading it evenly.
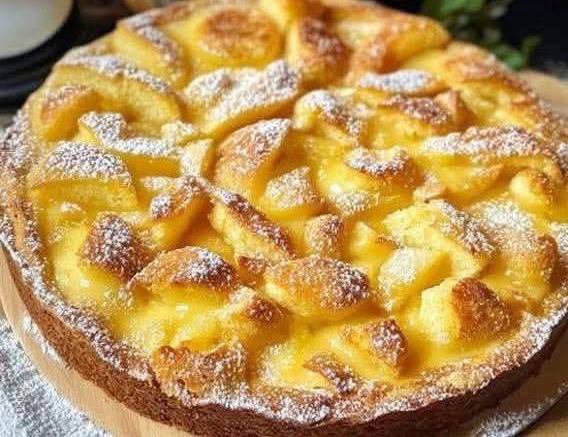
- Arrange the apple slices decoratively over the filling. You can create concentric circles, a fanned pattern, or any design you prefer. Try to overlap the slices slightly to create a beautiful visual effect and ensure even baking.
- Bake the Tart: Place the tart on a baking sheet (to catch any potential drips) and bake in the preheated oven for 45-55 minutes, or until the apples are tender, the filling is set, and the crust is golden brown. If the crust edges start to brown too quickly, you can loosely cover them with aluminum foil.
- Cool and Garnish: Once baked, remove the tart from the oven and let it cool completely on a wire rack before removing it from the tart pan. This is crucial for the filling to fully set and for the tart to hold its shape.
- Just before serving, dust generously with powdered sugar.
Cooking Tips and Variations
For the Perfect Shortbread Crust: The key to a tender, crumbly shortbread crust is using cold butter and not overworking the dough. Cold butter creates pockets of steam during baking, contributing to a flaky texture, while overmixing develops gluten, leading to a tough crust. If your kitchen is warm, you can even chill your flour before starting. Blind baking is highly recommended for this tart; it creates a barrier against the moisture from the filling and ensures a crisp bottom crust.
Choosing Your Apples: For the best results, use a mix of sweet and tart baking apples. Honeycrisp offers a lovely crunch and sweetness, Granny Smith provides a welcome tartness, and Fuji or Braeburn hold their shape beautifully. Avoid overly soft or mealy apple varieties, as they can turn to mush during baking. Slicing the apples uniformly thin is important for even cooking and an elegant presentation.
Preventing a Soggy Bottom: Beyond blind baking, ensure your creamy filling isn’t too liquidy. The flour in the filling helps to thicken it, but precise measurements are crucial. Also, allowing the tart to cool completely before slicing is essential; this gives the filling time to set fully, preventing it from weeping into the crust.
Flavor Variations:
- Spiced Apple Tart: Increase the cinnamon, nutmeg, and cloves in the filling, or add a pinch of allspice or cardamom for extra warmth.
- Caramel Apple Tart: Drizzle homemade or store-bought caramel sauce over the apple layer before baking, or warm some caramel sauce to drizzle over the finished tart before serving.
- Nutty Crust: Add ¼ cup of finely ground almonds or pecans to the shortbread crust mixture for a subtle nutty flavor and texture.
- Citrus Zest: Incorporate the zest of one lemon or orange into the shortbread crust or the creamy filling for a brighter flavor profile.
- Pear & Apple Tart: Substitute half of the apples with thinly sliced firm pears for a delightful flavor combination.
Decorative Touches: Don’t underestimate the impact of a beautiful apple arrangement. Take your time to layer the slices neatly. A final dusting of powdered sugar not only adds visual appeal but also a subtle sweetness that balances the tartness of the apples. You can also create a stencil with parchment paper to dust patterns onto the tart.
Storage and Reheating
Storage: This Apple Pie Tart is best enjoyed the day it’s made, especially for the crispness of the crust. However, leftovers can be stored. Cover the tart loosely with plastic wrap or aluminum foil and store it at room temperature for up to 1 day. For longer storage, refrigerate the tart for up to 3-4 days. Ensure it’s well covered to prevent it from drying out or absorbing refrigerator odors.
Reheating: If you prefer a warm slice, individual servings can be reheated in a microwave for 30-60 seconds, though this may soften the crust. For a crisper crust, reheat slices in a preheated oven or toaster oven at 300°F (150°C) for 10-15 minutes, or until warmed through. Be careful not to overcook, as this can dry out the filling. Whole tarts can be gently warmed in an oven at 300°F (150°C) for about 20-30 minutes.
Frequently Asked Questions
Can I use a store-bought pie crust for this recipe?
While you technically could, this recipe specifically calls for a shortbread-like crust which offers a distinct buttery and crumbly texture that complements the creamy filling and apples beautifully. A traditional store-bought pie crust might not yield the same desired result in terms of flavor and texture. Making the shortbread crust from scratch is quite simple and well worth the effort for this particular tart.
My apples turned brown after slicing, what can I do?
Apples naturally oxidize and turn brown when exposed to air. To prevent this, always toss your sliced apples immediately with lemon juice (as instructed in the recipe). The acidity in the lemon juice acts as an antioxidant. If you’re working in stages, you can even immerse the sliced apples in a bowl of water with a tablespoon of lemon juice until you’re ready to arrange them, then drain thoroughly before using.
How do I know when the tart is fully baked?
The tart is fully baked when the apples are tender when pierced with a knife, the creamy filling is set (it shouldn’t jiggle excessively in the center when gently shaken), and the crust is golden brown. If the crust edges are browning too quickly, loosely tent them with aluminum foil while the center continues to bake. Ovens can vary, so always trust your visual cues and a quick tenderness check of the apples.
Can I make this tart ahead of time for an event?
Yes, you can make this Apple Pie Tart a day in advance. After it has completely cooled, cover it loosely and store it at room temperature or in the refrigerator. Dust with powdered sugar just before serving for the freshest look. While best served fresh, it still tastes wonderful the next day, especially if gently warmed.