Introduction
Craving something sweet and creamy without the guilt? Look no further than this incredibly simple, 1-ingredient banana ice cream, often affectionately called “Nice Cream!” This magical dessert transforms humble frozen bananas into a delightful, soft-serve-like treat that tastes surprisingly indulgent. It’s the perfect solution for satisfying your sweet tooth any time of day, whether you’re looking for a healthy dessert, a quick snack, or even a refreshing breakfast addition.
Nice Cream has soared in popularity for good reason. Its core appeal lies in its utter simplicity – literally just one ingredient – combined with its fantastic texture and natural sweetness. Forget artificial flavors, added sugars, or dairy; this recipe delivers pure, unadulterated banana goodness in a scoopable, spoonable form. It’s a game-changer for anyone seeking a healthier alternative to traditional ice cream, proving that delicious doesn’t have to mean complicated or unhealthy.
What makes this 1-ingredient wonder so special? It’s not just its minimalist ingredient list; it’s the sheer versatility and the amazing transformation that happens when frozen bananas are blended. The natural sugars concentrate as the bananas ripen, and freezing them solidifies their structure. When blended, these frozen pieces break down into a smooth, airy, and creamy consistency that perfectly mimics soft-serve ice cream. It’s a culinary trick that will impress your taste buds and leave you wondering why you haven’t been making it all along!
Nutritional Information
Per serving (approximate values, based on 2 medium bananas):
- Calories: 210
- Protein: 2.6g
- Carbohydrates: 54g
- Fat: 0.8g
- Fiber: 6g
- Sodium: 2mg
Ingredients
- 4 ripe bananas (with brown spots are best)
Instructions
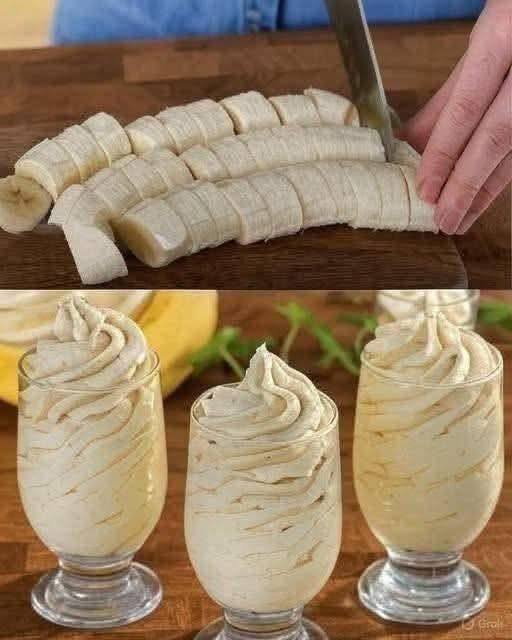
- Prepare the Bananas: Peel the ripe bananas. Slice each banana into approximately 1/2 to 1-inch thick rounds. The more uniform the slices, the easier they will freeze and blend.
- Freeze the Bananas: Arrange the banana slices in a single layer on a parchment paper-lined baking sheet or plate. This prevents them from clumping together as they freeze. Place the tray in the freezer for at least 2-4 hours, or preferably overnight, until the banana slices are completely solid.
- Blend to Perfection: Transfer the frozen banana slices to a powerful blender or food processor.
- Start Blending: Begin blending on a low speed, then gradually increase to a higher speed. At first, the bananas will look crumbly and chopped, resembling small frozen pebbles.
- Scrape and Continue: Stop the blender occasionally and use a spatula to scrape down the sides of the container, pushing the banana pieces towards the blades. This is crucial for achieving a smooth consistency. Be patient, as this stage can take a few minutes.
- Witness the Transformation: Continue blending and scraping. The mixture will progress from crumbly to a thick, paste-like consistency, then to a soft, creamy texture that resembles soft-serve ice cream. Keep blending until it’s completely smooth and no lumps remain.
- Serve Immediately: For the best soft-serve consistency, scoop the banana nice cream into bowls or cones and serve immediately. Enjoy your healthy, delicious treat!
Cooking Tips and Variations
Achieving the perfect 1-ingredient banana nice cream is all about the bananas and the blending technique. Firstly, the ripeness of your bananas is paramount. Don’t be afraid of bananas with plenty of brown spots; these are the sweetest and will yield the most flavorful nice cream, reducing any need for added sweeteners. Green or yellow bananas won’t offer the same natural sweetness or creamy texture. Freezing your banana slices in a single layer on parchment paper before transferring them to a freezer bag is a small but mighty tip. This prevents them from sticking together in a solid block, making them much easier for your blender or food processor to handle, and ensuring a smoother blend without overworking your appliance.
When it comes to blending, patience is your best friend. Resist the urge to add liquid too early. The mixture will go through several stages: from crumbly, to chunky, to a thick paste, and finally, to that glorious soft-serve consistency. Scrape down the sides of your blender or food processor frequently to ensure all the frozen pieces are incorporated. If your blender is truly struggling and you see it’s just spinning air, add only a tablespoon or two of plant-based milk or water at a time. Too much liquid will turn your nice cream into a smoothie, so use it sparingly. A powerful blender or food processor is highly recommended for the smoothest results, but a standard blender can work with a bit more patience and scraping.
While the beauty of this recipe is its single ingredient, it’s also incredibly versatile for flavor variations once you master the basic technique. For a chocolatey treat, add 1-2 tablespoons of unsweetened cocoa powder or cacao powder during blending. A spoonful of peanut butter or almond butter transforms it into a nutty delight. A dash of vanilla extract or a pinch of cinnamon can elevate the flavor profile without adding calories. For a fruity twist, blend in a handful of frozen berries (strawberries, blueberries, raspberries) or mango chunks along with the bananas. You can even sneak in some greens for a super healthy version by adding a handful of spinach – the banana will mask the flavor, and you’ll get a vibrant green nice cream!
Don’t forget the toppings! While delicious on its own, nice cream is a fantastic canvas for creative additions. A sprinkle of chopped nuts (almonds, walnuts, pecans), mini chocolate chips (dark chocolate for a healthier option), or a spoonful of granola can add delightful texture and flavor. Fresh fruit slices, coconut flakes, or a light drizzle of pure maple syrup or honey (if not strictly vegan) can also turn your simple nice cream into a gourmet experience. The possibilities are endless, allowing you to customize each serving to your exact cravings.
Storage and Reheating
For the absolute best soft-serve consistency, banana nice cream is designed to be enjoyed immediately after blending. This is when its texture is at its peak – smooth, airy, and perfectly creamy, just like freshly churned ice cream. However, if you prefer a firmer, more scoopable ice cream consistency, you can transfer the freshly blended nice cream into a freezer-safe container, smooth out the top, and freeze it for an additional 1-2 hours. This will allow it to firm up further without becoming rock solid.
If you have any leftovers or choose to make a larger batch to store for later, transfer the nice cream to an airtight, freezer-safe container. Press a piece of parchment paper or plastic wrap directly onto the surface of the nice cream before sealing the container. This helps to prevent ice crystals from forming and maintains a better texture. Stored this way, it will keep well in the freezer for up to 1-2 weeks. Beyond that, the texture might start to degrade, becoming icier.
When you’re ready to enjoy stored nice cream, it will likely be quite hard, similar to a block of frozen fruit. It won’t have the same soft-serve consistency directly from the freezer. To “reheat” or soften it, simply remove the container from the freezer and let it sit at room temperature for about 10-20 minutes, depending on the ambient temperature and the amount you’re thawing. You want it to soften just enough so you can easily scoop it. Alternatively, you can transfer the frozen nice cream back into your blender or food processor with a tiny splash (1-2 tablespoons) of plant-based milk or water and re-blend it for a minute or two until it reaches a soft-serve consistency again. This method works very well for restoring its creamy texture. Avoid microwaving, as this will lead to a watery, unappealing result.
Frequently Asked Questions
What kind of bananas are best for nice cream?
The best bananas for nice cream are very ripe ones, typically with plenty of brown spots on their peels. These bananas are naturally sweeter and have a softer texture, which contributes to a creamier and more flavorful nice cream. Under-ripe bananas (green or firm yellow) will result in a less sweet and potentially icier product.
Can I make nice cream without a high-speed blender?
Yes, you can make nice cream with a regular blender or a food processor, though it might require a bit more patience and scraping. A high-speed blender will typically yield the smoothest and creamiest result with less effort. If using a less powerful appliance, make sure your banana slices are well-frozen but not completely rock-hard (let them sit for 5 minutes if they just came out of a deep freeze), and be diligent about stopping and scraping down the sides to help the blades catch all the pieces.
Why did my nice cream turn out watery or too soft?
If your nice cream is too watery or soft, there are a few possible reasons. The most common is that the bananas weren’t frozen solid enough before blending. Ensure they are frozen for at least 4 hours, or ideally overnight. Another reason could be adding too much liquid during the blending process; only add a tiny splash if your blender is truly struggling. Over-blending for an extended period can also generate heat, which will melt the nice cream, so blend until just creamy.
How long do I need to freeze the bananas?
For optimal results, you should freeze the banana slices for a minimum of 2-4 hours. However, freezing them overnight (8+ hours) ensures they are thoroughly solid, which is crucial for achieving the perfect ice cream-like consistency. The firmer the freeze, the creamier your nice cream will be when blended correctly.