Introduction
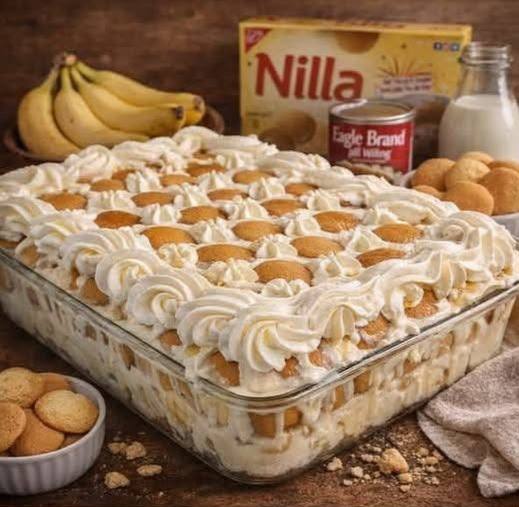
Step right up, comfort food connoisseurs! Today, we’re diving headfirst into a dessert that’s more than just a sweet treat; it’s a hug in a dish, a spoonful of pure nostalgia, and a guaranteed crowd-pleaser. Forget complicated baking projects and endless hours in the kitchen – we’re talking about the legendary Banana Pudding Cake. This isn’t your average cake, but rather a spectacular no-bake, layered masterpiece that captures all the beloved flavors and textures of classic banana pudding, elevated into a truly special presentation. Imagine tender vanilla wafers softening into cake-like layers, ripe bananas lending their natural sweetness, all nestled between clouds of creamy pudding and fluffy whipped cream. It’s rich, it’s dreamy, and it’s surprisingly easy to assemble.
What makes this “cake” so utterly irresistible? For starters, it’s a celebration of simplicity and incredible flavor. Each bite delivers a delightful medley of textures – the slight crunch of a fresh Nilla wafer, the soft yielding of a banana slice, and the silken smoothness of the creamy layers. It’s a dessert that speaks to the soul, evoking memories of family gatherings, potlucks, and lazy Sunday afternoons. Perfect for feeding a crowd, this Banana Pudding Cake is designed for sharing, its impressive stature in a large rectangular dish making it the centerpiece of any dessert table. Best of all, the magic happens in your refrigerator, allowing the flavors to meld and the layers to set into a cohesive, sliceable dream.
Get ready to transform simple ingredients into an extraordinary dessert experience. We’ll guide you through creating luscious vanilla pudding, perfectly ripe banana layers, and billows of homemade whipped cream, all layered with those iconic Nilla Wafers. The result is a dessert that looks as good as it tastes, offering a beautiful cross-section of creamy, fruity, and cookie-infused goodness. Whether you’re a seasoned dessert maker or a kitchen novice, this no-bake Banana Pudding Cake is your ticket to dessert heroism. Prepare to be showered with compliments!
Nutritional Information
Per serving (approximate values):
- Calories: 450 kcal
- Protein: 5g
- Carbohydrates: 60g
- Fat: 20g
- Fiber: 2g
- Sodium: 250mg
Ingredients
- 2 (3.4 ounce) packages instant vanilla pudding mix
- 4 cups cold whole milk
- 1 (14 ounce) can sweetened condensed milk (Eagle Brand recommended)
- 1 teaspoon vanilla extract
- 1 (8 ounce) package cream cheese, softened
- 1 (12 ounce) container frozen whipped topping, thawed (or 3 cups homemade whipped cream)
- 5-6 medium ripe bananas, sliced 1/4-inch thick
- 1 (11 ounce) box Nilla Wafers
- Optional: 1 tablespoon lemon juice (for banana slices)
- Optional: Extra Nilla Wafers or banana slices for garnish
Instructions
- In a large mixing bowl, combine the instant vanilla pudding mixes with the cold whole milk. Whisk thoroughly for about 2 minutes until the mixture begins to thicken. Set aside to firm up further while you prepare the other components.
- In a separate large mixing bowl, using an electric mixer, beat the softened cream cheese until smooth and creamy, about 1-2 minutes. Gradually add the sweetened condensed milk and vanilla extract, continuing to beat until well combined and smooth, scraping down the sides of the bowl as needed.
- Gently fold about half of the thawed whipped topping (or 1.5 cups of homemade whipped cream) into the cream cheese mixture until no streaks remain. Be careful not to overmix, as this can deflate the whipped topping.
- Add the prepared vanilla pudding to the cream cheese and whipped topping mixture. Fold gently until everything is fully incorporated and smooth. This creates your luscious, creamy pudding base.
- If using, lightly toss the sliced bananas with 1 tablespoon of lemon juice. This step helps prevent the bananas from browning too quickly, maintaining their fresh appearance.
- Now, it’s time to assemble your Banana Pudding Cake! Choose a 9×13-inch baking dish or a similarly sized clear glass dish to showcase the beautiful layers.
- Begin by spreading a thin layer of the creamy pudding mixture on the bottom of the dish. This will prevent the wafers from sticking and create a nice base.
- Arrange a single layer of Nilla Wafers over the pudding mixture. You may need to break some wafers to fit them snugly and cover the entire bottom of the dish.
- Next, arrange an even layer of the sliced bananas over the Nilla Wafers. Try to get them in a single, overlapping layer for consistent banana flavor in every bite.
- Spoon about one-third of the remaining creamy pudding mixture over the bananas, gently spreading it to cover them completely and reach the edges of the dish.
- Repeat the layering process: Add another layer of Nilla Wafers, followed by another layer of sliced bananas, and then another third of the creamy pudding mixture.
- For the final layer, arrange the last of the Nilla Wafers, followed by the remaining sliced bananas. Top this with the last of the creamy pudding mixture, spreading it smoothly over the top.
- Cover the dish tightly with plastic wrap. Refrigerate the Banana Pudding Cake for at least 4-6 hours, or preferably overnight. This crucial chilling time allows the Nilla Wafers to soften, the pudding to fully set, and all the flavors to meld together beautifully.
- Just before serving, remove the plastic wrap. Spread or pipe the remaining thawed whipped topping (or homemade whipped cream) evenly over the top of the cake. For an extra touch of elegance, you can pipe decorative swirls using a piping bag and a star tip.
- Garnish with additional Nilla Wafers, whole or crushed, and/or a few fresh banana slices. Serve chilled and enjoy your magnificent no-bake Banana Pudding Cake!
Cooking Tips and Variations
Achieving the perfect Banana Pudding Cake is all about a few key details and allowing enough time for the magic to happen. Here are some tips to ensure your dessert is an absolute triumph:
- Banana Ripeness: The ideal bananas for this dessert are ripe but still firm. Look for bananas that are bright yellow with a few small brown spots. Avoid overly green bananas, which lack sweetness, and very brown, mushy bananas, which can make your dessert watery and less appealing in texture. Using slightly firm bananas ensures they hold their shape and don’t turn to mush in the pudding.
- Preventing Banana Browning: As mentioned in the instructions, tossing your sliced bananas with a little lemon juice is a fantastic trick to keep them looking fresh. A light brush or quick dip in pineapple juice also works wonders. This is especially important if you plan to make the dessert ahead of time or if you want to use banana slices for garnish.
- Chilling Time is Non-Negotiable: This is arguably the most critical step for any no-bake dessert. While 4-6 hours is the minimum, an overnight chill is truly best. This extended refrigeration allows the Nilla Wafers to fully absorb moisture from the pudding, transforming them into soft, cake-like layers. It also gives the pudding ample time to set completely, ensuring clean, beautiful slices. Patience is a virtue here!
- Homemade Whipped Cream for the Win: While thawed whipped topping is convenient, making your own fresh whipped cream will elevate this dessert significantly. Simply whip 2 cups of heavy cream with 1/4 cup powdered sugar and 1 teaspoon vanilla extract until stiff peaks form. The flavor and texture are unparalleled.
- Cream Cheese Softening: Ensure your cream cheese is at room temperature before beating. This makes it much easier to achieve a smooth, lump-free mixture with the condensed milk, which is essential for a silky-smooth pudding base.
- Clear Dish for Presentation: If you have one, use a clear glass baking dish. The visible layers of Nilla Wafers, bananas, and creamy pudding are incredibly appealing and add to the overall “wow” factor of this dessert.
Variations to Explore:
- Cookie Alternatives: While Nilla Wafers are classic, don’t be afraid to experiment! Graham crackers, shortbread cookies, or even Biscoff cookies could offer interesting flavor twists. Just ensure they are a type of cookie that will soften nicely when exposed to moisture.
- Chocolate Banana Pudding Cake: For chocolate lovers, use instant chocolate pudding mix instead of vanilla, and consider adding a layer of chocolate shavings or mini chocolate chips between the banana layers.
- Caramel Swirl: Drizzle a thin layer of caramel sauce over the banana layers or mix a little into your pudding mixture for an indulgent caramel banana flavor.
- Spice It Up: A pinch of cinnamon or nutmeg in the pudding mixture can add a warm, comforting note that complements the bananas beautifully.
- Individual Servings: Instead of a large dish, assemble the Banana Pudding Cake in individual parfait glasses or small ramekins. This is excellent for portion control and elegant presentation.
- Add-ins: Consider adding a sprinkle of chopped toasted pecans or walnuts for an extra layer of texture and nutty flavor.
Storage and Reheating
This Banana Pudding Cake is a dream for make-ahead convenience, but knowing how to store it properly is key to maintaining its deliciousness.
- Refrigeration: Always store your Banana Pudding Cake in the refrigerator. Due to its dairy components (milk, cream cheese, whipped cream), it must be kept cold to remain safe and fresh. Cover the dish tightly with plastic wrap to prevent it from absorbing odors from the fridge and to keep the top layer of whipped cream from drying out.
- Shelf Life: When stored properly in the refrigerator, this dessert is best enjoyed within 2-3 days. While it might still be edible beyond that, the bananas tend to soften significantly and can start to weep, affecting the texture and appearance. The Nilla Wafers will also become very soft, losing their distinct “cake-like” texture over time.
- Freezing: Freezing is generally not recommended for this specific Banana Pudding Cake recipe. The texture of the bananas can become mushy and watery upon thawing, and the creamy pudding layers may separate or become grainy. It’s truly a dessert best enjoyed fresh and chilled from the refrigerator.
- Serving Leftovers: Simply uncover and serve directly from the refrigerator. There’s no need to “reheat” this dessert, as it’s meant to be enjoyed cold. If the whipped cream topping looks a little deflated after a day or two, you can always add a fresh layer just before serving.
Frequently Asked Questions
Can I use real bananas that are very ripe (brown spots) or should they be firm?
While some recipes for baked banana bread call for very ripe, even brown-spotted bananas, for this no-bake Banana Pudding Cake, it’s best to use ripe but still firm bananas. Look for bananas that are bright yellow with just a few small brown specks. Overly ripe, mushy bananas can make your pudding watery and won’t hold their shape as well in the layers, impacting the dessert’s overall texture and visual appeal.
My pudding didn’t set properly, what went wrong?
There are a few common reasons why pudding might not set. Firstly, ensure you used instant pudding mix, not cook-and-serve. Secondly, make sure your milk was very cold, as cold liquid aids in the setting process. Thirdly, whisk thoroughly for the recommended time (usually 2 minutes) to activate the setting agents. Finally, and most importantly, adequate chilling time is crucial. If it still seems too soft, it likely just needs more time in the refrigerator, preferably overnight, to fully firm up.
Can I make this dessert ahead of time for a party?
Absolutely! This Banana Pudding Cake is an excellent make-ahead dessert. In fact, it tastes even better after a good long chill, as it allows the Nilla Wafers to soften and all the flavors to meld beautifully. You can assemble the entire cake (without the final whipped cream topping) up to 24 hours in advance. Cover it tightly with plastic wrap and refrigerate. Add the final layer of whipped cream and any garnishes just before serving for the freshest look.
What if I don’t have Nilla Wafers?
While Nilla Wafers are the classic choice and contribute significantly to the authentic flavor and texture, you can certainly experiment with alternatives. Shortbread cookies, graham crackers, or even vanilla sandwich cookies (like Oreos, with the cream filling removed) could work. The key is to choose a cookie that will soften nicely when exposed to the moist pudding layers, transforming into a cake-like texture. Just be aware that the flavor profile will shift slightly with different cookie choices.