Introduction
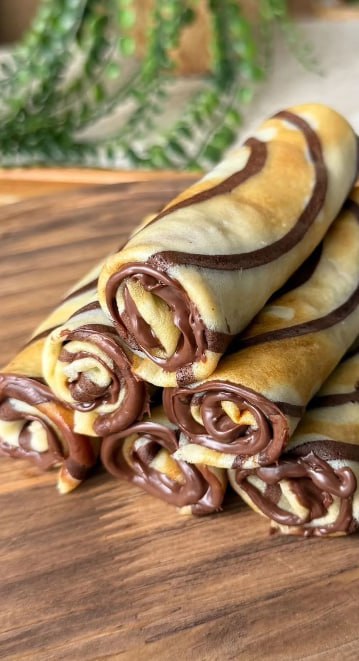
There are some breakfast dishes that simply transcend the ordinary, transforming a simple morning meal into an occasion. And then, there are these: Chocolate Swirl Crepes with Nutella Filling. Imagine delicate, golden-brown crepes, so thin they practically melt in your mouth, adorned with an elegant dark chocolate swirl pattern that promises a delicious surprise within. Each one is generously filled with the creamy, dreamy hazelnut-chocolate goodness of Nutella, rolled into a perfect cylinder, and ready to be devoured. This isn’t just breakfast; it’s an edible work of art, a sweet indulgence that’s surprisingly simple to create yet looks like it came straight from a gourmet patisserie.
What makes these crepes an absolute must-try? It’s the perfect harmony of textures and flavors. The light, airy crepe provides a tender canvas for the rich, decadent Nutella filling, while the subtle hint of cocoa in the swirl adds another layer of chocolatey depth. They are visually stunning, making them ideal for impressing brunch guests or simply elevating your weekend breakfast into something truly special. Whether you’re looking for a delightful start to your day, a show-stopping brunch centerpiece, or even a sophisticated dessert, these Chocolate Swirl Crepes deliver on all fronts. They’re a crowd-pleaser for all ages, offering comfort, elegance, and pure, unadulterated deliciousness in every bite.
Forget complicated recipes and endless hours in the kitchen; this dish, while looking elaborate, is incredibly approachable for home cooks of all skill levels. We’ll guide you through every step, from whipping up the silky-smooth batter to perfecting that eye-catching chocolate swirl and, of course, generously filling them with everyone’s favorite hazelnut spread. Prepare to fall in love with your new go-to indulgence, a breakfast experience that you’ll want to recreate again and again. Get ready to transform simple ingredients into a culinary masterpiece that tastes as incredible as it looks.
Nutritional Information
Per serving (approximate values):
- Calories: 380-420
- Protein: 8-10g
- Carbohydrates: 45-50g
- Fat: 20-25g
- Fiber: 2-3g
- Sodium: 200-250mg
Ingredients
- For the Crepe Batter:
- 1 cup all-purpose flour
- 2 large eggs
- 1/2 cup milk (whole or 2%)
- 1/2 cup water
- 1/4 teaspoon salt
- 2 tablespoons granulated sugar
- 2 tablespoons unsalted butter, melted and cooled, plus extra for greasing the pan
- 1 teaspoon vanilla extract
- For the Chocolate Swirl Batter:
- 2 tablespoons of the prepared basic crepe batter
- 1 tablespoon unsweetened cocoa powder
- 1 tablespoon powdered sugar
- 1-2 teaspoons milk (as needed for consistency)
- For the Filling:
- 1/2 cup Nutella (or your preferred chocolate hazelnut spread)
- For Serving (Optional):
- Powdered sugar for dusting
- Fresh berries (strawberries, raspberries, blueberries)
- Whipped cream
- Sliced bananas
- Chopped nuts
Instructions
- Prepare the Basic Crepe Batter: In a large mixing bowl, whisk together the flour, granulated sugar, and salt. In a separate bowl, whisk the eggs, milk, water, melted butter, and vanilla extract until well combined. Gradually add the wet ingredients to the dry ingredients, whisking continuously until the batter is smooth and free of lumps. If there are any lumps, you can strain the batter through a fine-mesh sieve. Cover the bowl with plastic wrap and refrigerate for at least 30 minutes, or preferably for an hour, or even overnight. This resting period allows the gluten to relax, resulting in more tender crepes.
- Prepare the Chocolate Swirl Batter: Once the basic crepe batter has rested, scoop out about 2 tablespoons of it into a small bowl. Add the unsweetened cocoa powder and powdered sugar to this small portion of batter. Whisk thoroughly until smooth. If the mixture is too thick, add 1-2 teaspoons of milk, one tiny bit at a time, until it reaches a similar thin consistency to the main crepe batter. Transfer this chocolate batter into a small squeeze bottle with a fine tip or a piping bag with a very small hole cut at the end. Set aside.
- Cook the Crepes: Heat a 6-8 inch non-stick crepe pan or frying pan over medium-low heat. Lightly grease the pan with a tiny bit of butter, wiping off any excess with a paper towel. The pan should be hot enough that a drop of water sizzles, but not smoking.
- Create the Chocolate Swirl: Once the pan is hot, use your squeeze bottle or piping bag to pipe a decorative chocolate swirl pattern onto the bottom of the dry, hot pan. Work quickly, as the chocolate batter will start to cook immediately. You can make concentric circles, a spiral, or any abstract design you like.
- Add the Main Crepe Batter: Immediately after piping the chocolate swirl, pour about 1/4 cup of the plain crepe batter into the center of the pan. Quickly lift and tilt the pan in a circular motion to evenly spread the batter over the entire bottom surface, covering the chocolate swirl completely and forming a thin, even layer.
- Cook and Flip: Cook the crepe for about 1-2 minutes, or until the edges begin to crisp and lift from the pan, and the top surface appears set and no longer wet. The chocolate swirl will be visible through the cooked crepe on the top side. Gently slide a thin spatula under the crepe and carefully flip it over. Cook for another 30-60 seconds on the second side, just until lightly golden.
- Repeat: Slide the cooked crepe onto a plate. Repeat the process with the remaining batter, lightly greasing the pan between each crepe if necessary. Stack the cooked crepes on top of each other; the residual heat will keep them warm and pliable.
- Fill and Roll the Crepes: Once all the crepes are cooked, it’s time to fill them. Lay one crepe flat on a clean surface with the chocolate swirl side facing up. Take a generous spoonful (about 1-2 tablespoons) of Nutella and spread it evenly over one half of the crepe, leaving a small border around the edges.
- Roll the Crepes: Gently fold the empty half of the crepe over the Nutella-spread half. Then, starting from one end, tightly roll the crepe into a neat cylinder. Repeat with the remaining crepes.
- Serve: Arrange the rolled crepes artfully on a serving platter. For an extra touch, dust them lightly with powdered sugar, and garnish with fresh berries, a dollop of whipped cream, or sliced bananas. Serve immediately and enjoy your beautiful and delicious creation!
Cooking Tips and Variations
For the Crepe Batter:
- Resting is Key: Don’t skip the resting time for the crepe batter. This allows the flour to fully hydrate and the gluten to relax, resulting in crepes that are incredibly tender and less likely to tear. If you’re short on time, even 15-20 minutes is better than none.
- Consistency Check: The batter should be thin, like heavy cream. If it seems too thick after resting, add a tablespoon or two of milk or water until it reaches the desired consistency. It should easily coat the bottom of the pan in a very thin layer.
- Smooth Batter: For the smoothest crepes, you can blend the batter in a blender for 30 seconds after mixing, or strain it through a fine-mesh sieve to remove any tiny lumps.
For the Chocolate Swirl:
- Precision Tool: A small squeeze bottle (like those used for condiments or decorating) is ideal for creating neat and precise chocolate swirls. Alternatively, a piping bag with a very small hole cut from the tip works well.
- Work Quickly: When piping the swirl onto the hot pan, do it swiftly. The chocolate batter will start to set almost immediately. The goal is to get your design down before it cooks too much, so the plain batter can adhere properly.
- Don’t Overfill: Only take out a small amount of basic batter for the chocolate swirl. You don’t need much, and it’s easier to work with a smaller, more concentrated amount.
Cooking Crepes:
- Pan Choice: A good quality non-stick crepe pan or a flat-bottomed non-stick frying pan is crucial. Cast iron can also work, but ensure it’s well-seasoned.
- Temperature Control: Medium-low heat is generally best. If the heat is too high, the crepes will brown too quickly and become crispy; if too low, they won’t cook properly and might be rubbery. Adjust as needed.
- First Crepe Syndrome: Don’t be discouraged if your first crepe isn’t perfect. It’s often a test run for adjusting pan temperature and batter amount. The subsequent ones usually turn out much better.
- Thin Layers: Use just enough batter to thinly coat the bottom of the pan. Too much batter will result in thick, pancake-like crepes. Swirl the pan quickly to distribute the batter evenly.
Filling and Rolling:
- Warm and Pliable: Crepes are easiest to fill and roll when they are still warm and flexible. If they cool too much, they might become brittle.
- Even Spread: Spread the Nutella evenly across the crepe, but don’t overload it. Too much filling can make rolling difficult and messy.
- Rolling Technique: For a neat roll, spread the filling on one half, fold the empty half over, then roll tightly from one end to the other.
Variations:
- Different Fillings: Experiment with other fillings like cream cheese frosting, fruit compotes (strawberry, blueberry, apple cinnamon), lemon curd, sweet ricotta, or even a simple cinnamon sugar butter.
- Savory Crepes: For a savory twist, omit the sugar from the basic crepe batter and fill with ham and cheese, sautéed mushrooms and spinach, or smoked salmon and cream cheese. (Note: the chocolate swirl wouldn’t apply here!)
- Citrus Zest: Add 1 teaspoon of orange or lemon zest to the basic crepe batter for a bright, aromatic twist.
- Spiced Crepes: A pinch of cinnamon or nutmeg in the batter can add warmth and depth of flavor.
- Boozy Batter: For an adult treat, a tablespoon of rum, Grand Marnier, or Kahlua can be added to the crepe batter or mixed into the Nutella filling.
- Chocolate Crepes (No Swirl): For an all-chocolate crepe, simply add 2-3 tablespoons of cocoa powder to the entire basic crepe batter recipe, along with an extra tablespoon or two of milk to maintain consistency.
Storage and Reheating
Storing Cooked Crepes (Unfilled):
- Room Temperature: Cooked crepes can be left at room temperature for a few hours, covered with plastic wrap, if you plan to fill and serve them soon.
- Refrigerator: For longer storage, stack cooled, unfilled crepes with a piece of parchment paper or wax paper between each one to prevent sticking. Wrap the stack tightly in plastic wrap or place in an airtight container. They will last for 2-3 days in the refrigerator.
- Freezer: To freeze, stack cooled crepes with parchment paper between them, then wrap the stack tightly in plastic wrap and then aluminum foil. Freeze for up to 1-2 months. Thaw in the refrigerator overnight before use.
Storing Filled Crepes:
- Refrigerator: Filled crepes (especially with Nutella) can be stored in an airtight container in the refrigerator for up to 1-2 days. However, they are best enjoyed fresh, as the crepes can become a bit softer and less delicate over time.
Reheating Cooked Crepes (Unfilled):
- Microwave: Place a stack of 2-3 crepes on a microwave-safe plate. Heat on medium power for 15-30 seconds, or until warm and pliable.
- Skillet: Gently warm individual crepes in a non-stick skillet over low heat for about 15-20 seconds per side, until soft and warm.
- Oven: Preheat oven to 300°F (150°C). Wrap a stack of crepes loosely in foil and heat for 5-10 minutes, or until warm.
Reheating Filled Crepes:
- Microwave: Place 1-2 filled crepes on a microwave-safe plate. Heat on medium power for 20-45 seconds, or until the filling is warm and gooey. Be careful not to overheat, as the crepes can become tough.
- Oven: Preheat oven to 300°F (150°C). Place filled crepes on a baking sheet. Heat for 5-10 minutes, or until warmed through. This method works well for multiple crepes.
Frequently Asked Questions
Can I use a different chocolate spread?
Absolutely! While Nutella is a classic for its hazelnut-chocolate flavor and smooth texture, you can certainly experiment with other chocolate spreads. Dark chocolate spread, milk chocolate spread, or even a homemade chocolate ganache would work wonderfully. Just ensure the spread has a consistency that is easy to spread thinly on the crepe.
How do I prevent my crepes from sticking to the pan?
Several factors contribute to sticking. First, ensure you are using a good quality non-stick pan. Second, make sure your pan is properly heated to medium-low before adding batter. If the pan isn’t hot enough, the batter will stick. Third, lightly grease the pan with a tiny bit of butter or oil before cooking each crepe, wiping off any excess with a paper towel. Too much grease can make the crepes greasy, but too little can cause sticking. Your first crepe is often a good indicator of whether your pan is at the right temperature and sufficiently greased.
Can I make the batter ahead of time?
Yes, making the batter ahead of time is highly recommended! The crepe batter benefits greatly from resting, allowing the flour to fully hydrate and the gluten to relax, which results in more tender and less prone-to-tearing crepes. You can prepare the basic crepe batter, cover it tightly, and refrigerate it for up to 24-48 hours. Give it a quick whisk before using, and if it seems too thick, add a tablespoon or two of milk or water to reach the desired consistency.
What can I do if my crepes are tearing when I try to flip them?
Tearing usually indicates one of a few issues: the crepe might not be cooked enough on the first side, the batter might be too thin or too thick, or the pan might not be hot enough. Ensure the edges of the crepe are visibly set and slightly crisp, and the top surface looks dry before attempting to flip. Use a thin, flexible spatula and be gentle. If the batter is too thin, add a teaspoon of flour to the remaining batter. If it’s too thick, thin it with a little milk. Also, make sure your pan is evenly heated.