Introduction
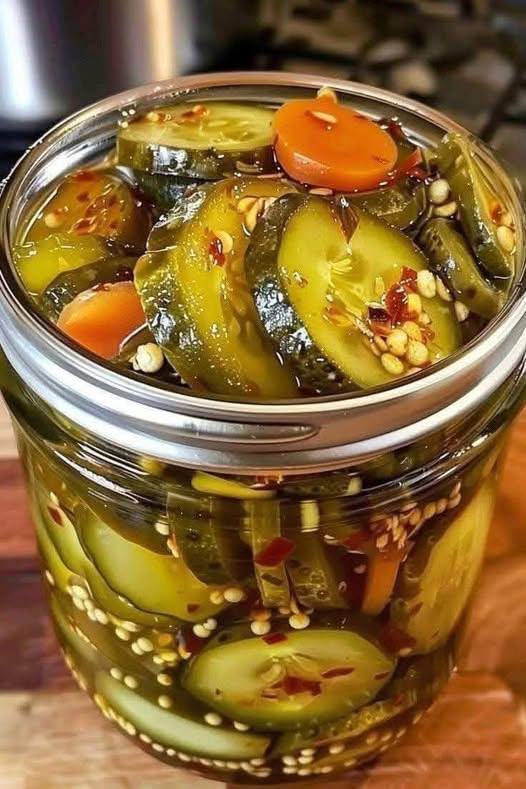
There’s something undeniably captivating about the sweet and spicy crunch of a homemade pickle. It’s a flavor sensation that dances on your tongue – a bright, tangy kick from vinegar, followed by a comforting sweetness, and then a delightful warmth that lingers just right. Forget those limp, one-note pickles from the store; these Sweet Heat Pickles are a vibrant explosion of taste and texture, handcrafted with love and designed to elevate any meal. Whether you’re a seasoned canner or just dipping your toes into the world of home preservation, this recipe promises an incredibly rewarding experience, resulting in jars of pure pickled perfection that you’ll be proud to share (or hoard!).
What makes these particular pickles so irresistible? It’s all in the exquisite balance. We’re not just talking about heat for heat’s sake, nor sweetness that overpowers. Instead, we’re crafting a symphony where crisp cucumber slices and tender carrots soak up a perfectly calibrated brine infused with the gentle fire of chili flakes and the earthy notes of mustard seeds. Each bite delivers that satisfying snap, followed by a complex interplay of sweet, tangy, and spicy that will leave you reaching for another. Beyond their incredible flavor, making your own pickles offers the immense satisfaction of knowing exactly what goes into your food, the joy of customizing flavors to your liking, and the sheer pleasure of transforming fresh produce into a shelf-stable delight.
These versatile pickles aren’t just for sandwiches and burgers (though they excel there!). Imagine them brightening up a charcuterie board, adding a zesty crunch to a pulled pork slider, or even being enjoyed straight from the jar as a refreshing snack. This recipe is designed to be straightforward and accessible, guiding you through each step of the canning process with clarity and confidence. Get ready to unlock a world of flavor and experience the immense satisfaction of creating your own delicious, perfectly preserved Sweet Heat Pickles.
Nutritional Information
Per serving (approximate values):
- Calories: 25-35
- Protein: 0.5g
- Carbohydrates: 6-8g
- Fat: 0.1g
- Fiber: 1g
- Sodium: 200-300mg
Ingredients
- 4-5 pounds pickling cucumbers, washed and trimmed
- 2 large carrots, peeled and sliced into ¼-inch rounds
- 6 cups white vinegar (5% acidity)
- 2 cups water
- 1 ½ cups granulated sugar
- ¼ cup pickling salt (not iodized table salt)
- 4-6 tablespoons red pepper flakes (adjust to desired heat level)
- 4 tablespoons mustard seeds
- 1 teaspoon pickle crisp granules (optional, for extra crunch)
Instructions
- Prepare Cucumbers and Carrots: Wash cucumbers thoroughly. For spears, cut off ends and slice lengthwise into quarters or eighths, depending on cucumber size. For rounds, slice into ¼-inch thick coins. Peel carrots and slice into ¼-inch rounds. If desired, soak cucumber slices or spears in an ice bath for at least 30 minutes (or up to 2 hours) to enhance crispness, then drain well.
- Sterilize Jars and Lids: Wash canning jars, lids, and bands in hot, soapy water. Rinse thoroughly. To sterilize jars, place them upright in a large pot or water bath canner. Fill jars and pot with water to cover jars by at least 1 inch. Bring to a boil and boil for 10 minutes. Keep jars in hot water until ready to fill. Place jar lids in a small saucepan with simmering (not boiling) water to soften the sealing compound; do not boil.
- Prepare Pickling Brine: In a large, non-reactive pot (stainless steel or enamel), combine white vinegar, water, granulated sugar, and pickling salt. Bring the mixture to a boil over medium-high heat, stirring occasionally to dissolve the sugar and salt. Once boiling, reduce heat to a simmer and keep hot.
- Pack Jars: Carefully remove hot jars from the canner, pouring out the hot water. Place 1-2 tablespoons of red pepper flakes and 1 tablespoon of mustard seeds into the bottom of each hot jar. If using, add ¼ teaspoon of pickle crisp granules to each jar. Tightly pack cucumber slices/spears and carrot rounds into the hot jars, leaving ½ inch of headspace from the rim of the jar. Try to arrange them attractively and tightly to minimize empty space.
- Add Brine and Remove Air Bubbles: Ladle the hot pickling brine over the packed vegetables, ensuring they are completely submerged and maintaining ½ inch of headspace. Use a non-metallic utensil (like a plastic chopstick or rubber spatula) to gently remove any air bubbles by running it around the inside of the jar. Top off with more brine if necessary to maintain the ½-inch headspace.
- Seal Jars: Wipe the rims of the jars clean with a damp paper towel to ensure a good seal. Center a hot lid on each jar, then screw on the band fingertip-tight (just until you feel resistance, do not overtighten).
- Process Jars in Water Bath Canner: Carefully place the filled jars onto the rack in the water bath canner. Ensure the jars are covered by at least 1-2 inches of water. Bring the water to a rolling boil. Once boiling, process pint jars for 10 minutes (for altitudes up to 1,000 feet). If using quart jars, process for 15 minutes. Adjust processing time for higher altitudes according to canning guidelines.
- Cool and Store: After the processing time, turn off the heat and carefully remove the canner lid. Let the jars stand in the hot water for 5 minutes before carefully removing them with a jar lifter and placing them on a clean towel or wire rack to cool undisturbed for 12-24 hours.
- Check Seals and Store: After cooling, check the seals. The center of the lid should be concave and should not flex when pressed. If any jar has not sealed, refrigerate it and consume within a few weeks. Remove bands from sealed jars (this prevents rust and allows for easier re-sealing if one comes loose), wipe jars clean, label with the date, and store in a cool, dark place. For best flavor, allow pickles to cure for at least 2-4 weeks before enjoying.
Cooking Tips and Variations
Achieving the perfect Sweet Heat Pickles involves a few key considerations and offers plenty of room for creative expression. Firstly, selecting the right cucumbers is paramount for crispness. Always opt for fresh, firm pickling varieties – look for Kirby or Persian cucumbers, which have thinner skins and fewer seeds, making them ideal for pickling. Avoid larger, softer slicing cucumbers, as they tend to become mushy. To further enhance their crisp texture, soaking your prepared cucumber slices or spears in an ice bath for at least 30 minutes before packing them into jars is a highly recommended step. You can also add a pinch of pickle crisp granules (calcium chloride) directly to each jar, or even a couple of washed grape leaves, which contain tannins that help maintain firmness.
When it comes to the “heat” element, this recipe provides a generous starting point with red pepper flakes, but feel free to adjust. For a milder pickle, reduce the flakes to 2-3 tablespoons. If you crave a fierier kick, you can increase them or even add a few thin slices of fresh jalapeño or serrano pepper to each jar. Remember that the heat will mellow slightly over time as the pickles cure. For flavor variations, the possibilities are endless. Consider adding a few peeled garlic cloves to each jar for a savory depth, a sprig of fresh dill for a classic pickle taste, or even a teaspoon of whole black peppercorns for a more complex spice profile. A touch of turmeric can also be added to the brine for a beautiful golden hue and subtle earthy notes. Just ensure any additions are clean and free of blemishes to maintain food safety.
Safe canning practices are non-negotiable. Always sterilize your jars and lids thoroughly; this prevents spoilage and ensures a safe, shelf-stable product. Precision in measuring ingredients, especially the vinegar, water, and salt for the brine, is crucial for proper preservation and flavor balance. Maintain the recommended ½-inch headspace in each jar, as this allows for proper vacuum sealing during processing. After processing, always check that your jars have sealed properly – the lids should be concave and not flex when pressed. If a jar doesn’t seal, simply refrigerate it and enjoy it within a few weeks. Don’t forget to remove the bands from sealed jars before storing; this prevents rust and makes it easier to spot if a seal fails later on.
Storage and Reheating
Proper storage is essential to ensure your Sweet Heat Pickles remain delicious and safe for consumption. Once your jars have cooled and you’ve confirmed they are properly sealed, they are shelf-stable. Store them in a cool, dark place, such as a pantry or basement, away from direct sunlight and extreme temperature fluctuations. Stored correctly, these pickles can maintain their quality for up to one year. While they are safe to eat immediately after sealing, the flavors really meld and deepen over time. For the best taste, it’s recommended to let them cure for at least 2-4 weeks before opening.
Once a jar has been opened, the pickles are no longer shelf-stable and must be refrigerated. Tightly reseal the jar with its lid after each use. In the refrigerator, opened pickles will typically last for several weeks, often up to 1-2 months, maintaining their crispness and vibrant flavor. There’s no “reheating” involved with pickles, as they are meant to be enjoyed cold or at room temperature as a condiment or snack. If you notice any signs of spoilage, such as mold, an off odor, or a cloudy brine (unless it was already cloudy due to spices), it’s best to discard the contents to ensure food safety.
Frequently Asked Questions
Why did my pickles turn soft?
Soft pickles are a common frustration but can usually be avoided. The main culprits are often using regular slicing cucumbers instead of pickling varieties, not soaking cucumbers in an ice bath before packing, or over-processing during canning. Ensure you select fresh, firm pickling cucumbers, give them an ice bath, and follow the exact processing times for your altitude. Adding pickle crisp granules or grape leaves can also significantly help.
Can I reduce the amount of sugar in the brine?
While some sugar reduction is possible, it’s crucial to understand that sugar plays a role in both flavor and texture, especially in sweet pickles. Significantly reducing sugar can alter the taste profile and potentially affect the crispness. For canning safety, the vinegar-to-water ratio is more critical than the sugar content. If you prefer a less sweet pickle, try reducing the sugar by no more than 25% for your first batch and adjust from there in subsequent batches. A very low-sugar brine might result in a more intensely sour pickle.
How do I know if my jars have sealed properly?
After your jars have cooled for 12-24 hours, check for a proper seal. The center of the lid should be concave (curved inwards) and should not flex or pop up and down when pressed with your finger. You might also hear a distinct “ping” sound as the jars cool and seal. If a lid does not seal, refrigerate that jar immediately and consume its contents within a few weeks, as it is not shelf-stable.
Can I use other vegetables besides cucumbers and carrots?
Absolutely! This brine is wonderfully versatile. You can experiment with pickling green beans, cauliflower florets, bell pepper strips, or even sliced onions. Just ensure that whatever vegetables you choose are fresh and firm. If you’re new to canning other vegetables, it’s always a good idea to consult a reliable canning guide for any specific preparation or processing time adjustments that might be necessary for different produce types to ensure safety and quality.