Introduction
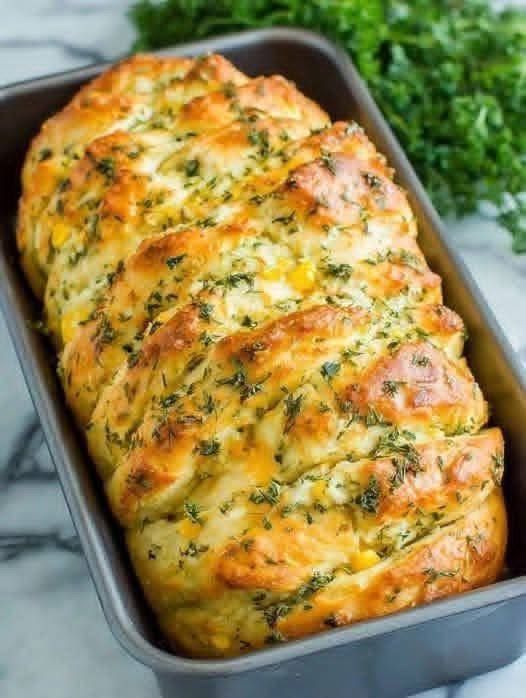
Get ready to experience the ultimate comfort food that’s as fun to make as it is to eat! We’re talking about Cheesy Garlic Pull-Apart Bread – a golden, aromatic masterpiece that’s practically guaranteed to disappear in minutes. Imagine warm, soft bread infused with pungent garlic, rich herbs, and gooey, melted cheese, all baked together in a way that encourages everyone to, well, pull apart their own delicious piece. It’s the kind of dish that sparks conversation, brings smiles, and fills your home with an irresistible aroma.
This isn’t just any garlic bread; it’s an interactive culinary delight perfect for any occasion. Whether you need a show-stopping appetizer for a party, a comforting side for a family dinner, or a game-day snack that will have everyone cheering, Cheesy Garlic Pull-Apart Bread fits the bill. Its impressive presentation belies its surprisingly simple preparation, making you look like a culinary genius without breaking a sweat. Plus, we’ve got a secret ingredient that adds a delightful pop of sweetness and texture, elevating this classic to a whole new level!
The magic of pull-apart bread lies in its unique structure. Instead of a traditional sliced loaf, individual pieces of dough are layered with all the cheesy, garlicky goodness before baking. This creates a loaf where each segment is perfectly coated and ready to be torn off, making for an incredibly engaging and delicious eating experience. It’s versatile, customizable, and utterly addictive – prepare to make this a regular in your recipe rotation!
Nutritional Information
Per serving (approximate values):
- Calories: 350
- Protein: 12g
- Carbohydrates: 40g
- Fat: 15g
- Fiber: 3g
- Sodium: 450mg
Ingredients
- 1 pound (about 450g) store-bought pizza dough or homemade bread dough
- 8 tablespoons (1 stick) unsalted butter, melted
- 6 cloves garlic, minced
- 1/4 cup fresh parsley, finely chopped
- 1/2 teaspoon dried oregano (optional)
- 1/4 teaspoon black pepper
- 1 1/2 cups shredded mozzarella cheese
- 1/2 cup shredded Monterey Jack cheese (or another good melting cheese like Colby Jack)
- 1/2 cup fresh or frozen corn kernels (thawed if frozen)
- 2 tablespoons grated Parmesan cheese, for topping
- Pinch of red pepper flakes (optional, for a little kick)
- Salt, to taste
Instructions
- Prepare the Dough: If using store-bought pizza dough, let it come to room temperature for at least 30 minutes to make it easier to work with. If using homemade dough, ensure it has completed its first rise.
- Preheat Oven & Prepare Pan: Preheat your oven to 375°F (190°C). Lightly grease a standard 9×5 inch loaf pan with butter or non-stick spray.
- Make the Garlic Herb Butter: In a small bowl, combine the melted butter, minced garlic, chopped fresh parsley, dried oregano (if using), and black pepper. Stir well to combine.
- Roll Out the Dough: On a lightly floured surface, roll out the dough into a large rectangle, approximately 12×18 inches. The thickness should be about 1/8 to 1/4 inch.
- Spread the Butter Mixture: Generously brush about half of the garlic herb butter mixture evenly over the entire surface of the rolled-out dough.
- Layer the Cheese and Corn: Sprinkle the shredded mozzarella and Monterey Jack cheeses evenly over the buttered dough. Then, scatter the corn kernels over the cheese. If using, sprinkle a pinch of red pepper flakes.
- Cut the Dough: Using a pizza cutter or a sharp knife, cut the dough lengthwise into 6 equal strips (each approximately 2 inches wide).
- Stack the Strips: Carefully stack the 6 strips of dough on top of each other, ensuring the cheesy, buttery sides are facing up.
- Cut into Squares: Cut the stacked strips crosswise into 6-8 equal squares (each approximately 2-3 inches wide). You will have a stack of small dough squares.
- Arrange in Loaf Pan: Gently pick up each stack of dough squares and arrange them vertically in the prepared loaf pan, standing them on their sides. They should be snug but not overly compressed. Try to keep the layers visible.
- Brush with Remaining Butter: Drizzle or brush the remaining garlic herb butter mixture over the top and sides of the arranged dough in the loaf pan.
- Second Rise (Optional but Recommended): For a softer, fluffier bread, cover the loaf pan loosely with plastic wrap or a clean kitchen towel and let it rise in a warm place for 20-30 minutes, or until slightly puffed.
- Bake: Place the loaf pan in the preheated oven. Bake for 30-35 minutes, or until the top is golden brown, the cheese is bubbly, and the bread is cooked through. If the top starts to brown too quickly, you can loosely tent it with aluminum foil for the last 10-15 minutes of baking.
- Finish with Parmesan: During the last 5 minutes of baking, sprinkle the grated Parmesan cheese over the top of the bread. This will give it a beautiful golden crust.
- Cool and Serve: Once baked, remove the loaf pan from the oven. Let it cool in the pan for 5-10 minutes before carefully inverting it onto a cutting board or serving platter. You can also serve it directly from the pan. Serve warm, encouraging everyone to pull apart their own cheesy, garlicky piece!
Cooking Tips and Variations
For the absolute best results with your Cheesy Garlic Pull-Apart Bread, start with dough that’s at room temperature. Cold dough is stiff and difficult to roll out evenly, leading to uneven layers. If you’re using store-bought pizza dough, take it out of the fridge at least 30 minutes to an hour before you plan to start assembling. When making your garlic herb butter, don’t skimp on the fresh garlic; it makes all the difference! Mince it finely to ensure it distributes well and infuses every bite with its pungent flavor. Brushing the dough thoroughly with this mixture before adding the cheese ensures maximum flavor penetration. Distribute your cheeses and corn as evenly as possible across the entire surface of the dough rectangle. This way, every “pull” will have a good balance of flavors and textures. The corn, while an unusual addition for some garlic breads, adds a wonderful subtle sweetness and a tender pop that contrasts beautifully with the savory cheese and garlic, making this recipe truly unique.
When stacking your dough strips, be gentle. You want them to be neat but not overly compressed. The goal is to create distinct layers that will separate easily after baking. Arranging these stacks vertically in the loaf pan helps maintain the pull-apart structure. Don’t be afraid to give the dough a little push to fit it snugly in the pan; this helps it rise upwards rather than outwards. The optional second rise, often called proofing, is a game-changer for homemade doughs or even some pizza doughs. It allows the yeast to activate further, resulting in a lighter, fluffier texture. Just 20-30 minutes in a warm spot can significantly improve the bread’s tenderness.
Keep a close eye on your bread as it bakes. Ovens can vary, and you want a golden-brown crust without burning the cheese. If you notice the top browning too quickly, a loose tent of aluminum foil can protect it for the remainder of the baking time. The final sprinkle of Parmesan cheese in the last few minutes adds another layer of savory depth and creates a beautiful, slightly crispy finish. Always let the bread cool in the pan for a few minutes after baking. This allows the cheese to set slightly, making it easier to handle and preventing it from being too molten and messy when you pull it apart. Serve it warm for the ultimate experience!
This recipe is highly adaptable to your taste and what you have on hand. For cheese variations, feel free to experiment with different blends. Sharp cheddar or Gruyere can add a more robust flavor, while provolone or fontina offer a creamier melt. A sprinkle of smoked gouda could introduce an intriguing smoky note. If you’re not a fan of corn, you can easily omit it, or replace it with other small, savory additions. Crispy bacon bits would be a fantastic complement to the cheese and garlic, or finely diced jalapeños for a spicy kick. Sun-dried tomatoes, finely chopped, would add a sweet and tangy element. For an even more herbaceous flavor, consider adding a pinch of dried thyme or rosemary to the garlic butter. You could also mix in some finely grated onion or shallots for a deeper savory base.
If you’re short on time, using canned refrigerated biscuit dough or crescent roll dough can significantly speed up the process. Simply separate the biscuits or crescent rolls, cut them into quarters, and toss them with the garlic butter, cheese, and corn before arranging them in the loaf pan. The baking time might need to be adjusted slightly, so keep an eye on it. For those who enjoy baking from scratch, a basic homemade white bread dough or even a slightly enriched brioche-style dough would work wonderfully, adding an extra layer of flavor and texture. Don’t be afraid to get creative with your spices either; a tiny pinch of cayenne pepper or a dash of onion powder can enhance the overall profile. This Cheesy Garlic Pull-Apart Bread is a canvas for your culinary imagination!
Storage and Reheating
Cheesy Garlic Pull-Apart Bread is best enjoyed warm and fresh from the oven, when the cheese is gooey and the bread is soft. However, if you find yourself with leftovers (a rare occurrence!), you can store them to enjoy later. Allow the bread to cool completely to room temperature before storing. This prevents condensation from forming and making the bread soggy. Once cool, wrap the entire loaf or individual slices tightly in aluminum foil, and then place it in an airtight container or a resealable plastic bag. Store it at room temperature for up to 2 days. For longer storage, you can refrigerate it for up to 4 days, though the bread may dry out slightly in the fridge.
Reheating is key to bringing back that fresh-baked deliciousness. The best method for reheating Cheesy Garlic Pull-Apart Bread is in the oven. Preheat your oven to 350°F (175°C). Wrap the loaf or individual pieces loosely in aluminum foil to prevent them from drying out. Place the foil-wrapped bread directly on the oven rack and heat for 10-15 minutes, or until the cheese is melted and bubbly again, and the bread is warmed through. If you prefer a crispier exterior, you can remove the foil for the last 2-3 minutes of reheating. For a quicker option, you can use a toaster oven for individual pieces, following similar temperature and time guidelines. The microwave can also be used, but it’s generally not recommended as it can make the bread chewy and the cheese rubbery. If you must use a microwave, heat in short bursts (15-30 seconds) until just warm, being careful not to overheat.
Frequently Asked Questions
Can I prepare Cheesy Garlic Pull-Apart Bread ahead of time?
Yes, you can do some prep work in advance! You can prepare the garlic herb butter mixture a day or two ahead and store it in the refrigerator. You can also shred the cheeses. If using homemade dough, you can prepare the dough and let it complete its first rise, then refrigerate it overnight. When you’re ready to bake, just take the dough out of the fridge to warm up slightly before rolling and assembling. For the assembled loaf, it’s best to bake it within an hour or two of assembly to ensure the best texture and rise, especially if you’ve allowed a second proofing.
What kind of bread dough is best for pull-apart bread?
A good quality, slightly enriched white bread dough or a basic pizza dough works wonderfully. These doughs are usually soft and pliable, making them easy to roll and layer. Store-bought pizza dough is a fantastic shortcut for convenience. If you’re feeling adventurous, a brioche-style dough will yield an incredibly rich and tender result due to its higher butter and egg content. Avoid very dense or crusty bread doughs, as they won’t pull apart as easily or absorb the flavors as well.
My bread is browning too quickly on top. What should I do?
If you notice the top of your pull-apart bread is browning too rapidly while the inside still needs to cook, simply tent the loaf pan loosely with aluminum foil. This will shield the top from direct heat and allow the rest of the bread to bake through without burning the crust. Check it periodically to ensure it’s not over-browning underneath the foil either. Every oven is different, so it’s always a good idea to keep an eye on your bake.
Can I freeze Cheesy Garlic Pull-Apart Bread?
Yes, you can freeze baked Cheesy Garlic Pull-Apart Bread. After baking, let the bread cool completely. Wrap the entire loaf tightly in several layers of plastic wrap, then an additional layer of aluminum foil. Place it in a freezer-safe bag or container. It can be stored in the freezer for up to 1-2 months. To reheat, unwrap the frozen bread, wrap it loosely in foil, and bake in a preheated oven at 350°F (175°C) for about 25-35 minutes, or until thoroughly heated through. The texture may be slightly different after freezing, but it will still be delicious.