Introduction
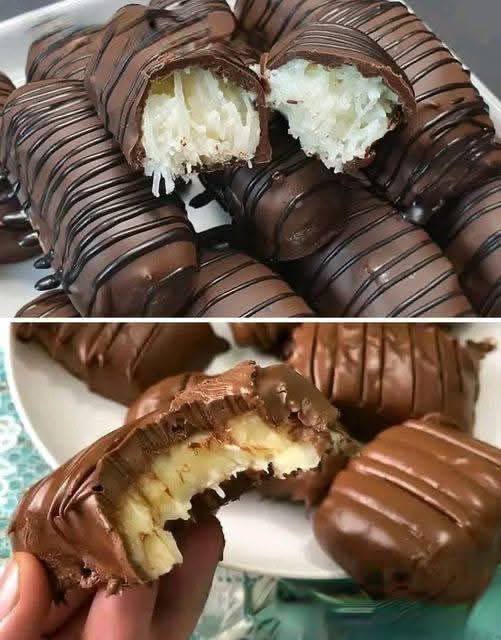
Prepare to embark on a delightful culinary journey with our Chocolate-Covered Coconut & Banana Bars! These irresistible treats combine the best of tropical flavors with the rich indulgence of chocolate, creating a dessert that’s both refreshing and deeply satisfying. Imagine biting into a crisp chocolate shell, revealing either a creamy, sweet banana interior or a chewy, fragrant coconut filling. It’s a symphony of textures and tastes that will transport your taste buds straight to paradise.
What makes these bars truly special is their delightful simplicity and incredible versatility. They’re remarkably easy to make, requiring no baking and minimal fuss, making them perfect for a quick snack, a crowd-plepleasing party treat, or a refreshing dessert on a warm day. Plus, they offer a healthier-ish alternative to many store-bought sweets, allowing you to control the ingredients and enjoy a homemade indulgence without guilt. Whether you’re a seasoned baker or a kitchen novice, our step-by-step guide will help you create these delightful bars with confidence and flair.
The magic of these bars lies in the harmonious trio of coconut, banana, and chocolate. The sweet, tropical essence of coconut, with its satisfying chewiness, pairs perfectly with the smooth, naturally sweet creaminess of banana. Encasing these delightful fillings is a generous layer of rich, decadent chocolate, providing a perfect counterpoint and an undeniable touch of luxury. The added drizzle of contrasting chocolate not only enhances their visual appeal but also adds another layer of chocolatey goodness, making each bite an experience to savor.
Nutritional Information
Per serving (approximate values, based on 10 bars from the recipe):
- Calories: 280-350
- Protein: 3-5g
- Carbohydrates: 35-45g
- Fat: 18-25g
- Fiber: 4-6g
- Sodium: 50-80mg
Ingredients
- 3 medium-sized ripe but firm bananas
- 2 cups (about 160g) sweetened shredded coconut
- 1/2 cup (120ml) sweetened condensed milk (or coconut cream for vegan option)
- 1 teaspoon vanilla extract
- 1/4 teaspoon sea salt (optional, for coconut mixture)
- 12 ounces (about 340g) good quality chocolate (milk, dark, or semi-sweet), chopped
- 1 tablespoon coconut oil (optional, for melting chocolate)
- 2 ounces (about 56g) darker chocolate (e.g., semi-sweet if main is milk, or dark if main is semi-sweet), chopped, for drizzling
- Parchment paper or silicone baking mat
Instructions
- Prepare the Banana Base: Peel the bananas. You can either slice them into 1-inch thick rounds or cut them in half lengthwise and then into smaller bar-like pieces (about 2-3 inches long). Arrange the banana pieces in a single layer on a parchment-lined baking sheet. Place them in the freezer for at least 2-3 hours, or until completely solid. This step is crucial for preventing the bananas from becoming mushy and for the chocolate to adhere properly.
- Create the Coconut Filling: In a medium bowl, combine the shredded coconut, sweetened condensed milk, vanilla extract, and optional sea salt. Mix well until the coconut is evenly coated and the mixture is sticky enough to hold its shape.
- Shape the Coconut Bars: Take small portions of the coconut mixture (about 1.5-2 tablespoons) and firmly press them into compact bar shapes, roughly 2-3 inches long and 1 inch wide. The firmer you press, the less likely they are to crumble. Arrange these coconut bars on another parchment-lined baking sheet. Place them in the freezer for at least 2-3 hours, or until completely solid.
- Melt the Main Chocolate: Once both the banana and coconut fillings are frozen solid, prepare your chocolate. Place the 12 ounces of chopped chocolate in a heatproof bowl. You can use a double boiler method (set the bowl over a saucepan of simmering water, ensuring the bottom of the bowl doesn’t touch the water) or microwave method (microwave in 30-second intervals, stirring well after each, until smooth). If using, stir in the 1 tablespoon of coconut oil to thin the chocolate slightly and give it a smoother, shinier finish. Let the melted chocolate cool slightly for a few minutes; it should still be warm enough to be liquid, but not piping hot.
- Assemble the Bars – Dipping: Set up your dipping station: the bowl of melted chocolate, the frozen banana/coconut pieces, and a fresh parchment-lined baking sheet. Working quickly, take one frozen banana or coconut piece at a time. Using a fork or a dipping tool, submerge the piece completely into the melted chocolate. Tap off any excess chocolate by gently tapping the fork against the side of the bowl.
- Place on Parchment: Carefully transfer the chocolate-covered piece to the clean parchment-lined baking sheet. Repeat with the remaining frozen banana and coconut pieces. If the chocolate in your bowl starts to thicken too much, gently rewarm it for a few seconds.
- Melt the Drizzle Chocolate: Once all the bars are dipped, melt the 2 ounces of darker chocolate using the same double boiler or microwave method. Transfer the melted chocolate to a small piping bag (or a ziplock bag with a tiny corner snipped off) or simply use a spoon.
- Add Finishing Touches & Set: Drizzle the darker chocolate over the coated bars in a decorative pattern. For a gourmet touch, sprinkle a few flakes of sea salt on some of the bars while the chocolate is still wet. Immediately transfer the baking sheets with the dipped and drizzled bars back to the freezer or refrigerator.
- Chill to Set: Chill the bars for at least 15-30 minutes, or until the chocolate coating is completely firm and set.
- Serve and Enjoy: Once firm, remove the bars from the freezer/refrigerator. You can serve them immediately or store them for later enjoyment.
Cooking Tips and Variations
For the best possible Chocolate-Covered Coconut & Banana Bars, selecting the right ingredients is key. Always opt for ripe but firm bananas; they offer the perfect natural sweetness without being overly mushy. Overripe bananas will be too soft to hold their shape when sliced and dipped. Similarly, using a good quality chocolate for both the main coating and the drizzle makes a significant difference in the overall flavor profile. A higher cocoa content chocolate will yield a more intense, less sweet bar, while milk chocolate provides a classic, sweeter experience. If you’re using unsweetened shredded coconut, you might want to slightly increase the amount of sweetened condensed milk or add a tablespoon of powdered sugar to the coconut mixture to achieve the desired sweetness.
Freezing is arguably the most critical step in this recipe. Ensure both your banana slices and coconut bars are frozen solid before dipping. This prevents the fruit or mixture from warming up and sliding off the chocolate during dipping, and it helps the chocolate set quickly and evenly, giving you that satisfying crisp shell. When melting your chocolate, always do so gently. Overheating can cause chocolate to “seize,” turning it into a thick, gritty, unusable paste. A double boiler offers more control than a microwave, but if using a microwave, stir frequently and heat in short bursts. Adding a tablespoon of coconut oil to your melted chocolate is a fantastic trick; it makes the chocolate thinner and smoother, easier to dip, and results in a beautiful, glossy finish when set. It also helps create that satisfying “snap” when you bite into the bar.
There are endless ways to customize these bars to your liking. For a different flavor profile, experiment with various types of chocolate – white chocolate for a creamy, sweet coating, or a very dark chocolate for a sophisticated, slightly bitter contrast. You can also add finely chopped nuts (like almonds, pecans, or walnuts) to the coconut mixture for added crunch and flavor. A pinch of ground cinnamon or cardamom in the coconut mixture can introduce a warm, exotic spice note. For a vegan option, substitute the sweetened condensed milk with full-fat coconut cream (chilled overnight, then scoop out the thick cream from the top) and ensure you use dairy-free chocolate. You can also press a whole almond or a few chopped pecans into the top of the coconut bars before dipping for an extra nutty treat. Don’t be afraid to get creative with your drizzles and toppings; a sprinkle of toasted coconut flakes, mini chocolate chips, or even colorful sprinkles can add a fun touch.
Storage and Reheating
These Chocolate-Covered Coconut & Banana Bars are best enjoyed chilled or at room temperature, but not warm. Proper storage is key to maintaining their texture and preventing the chocolate from melting or the fillings from spoiling. Once the chocolate coating is completely set, transfer the bars to an airtight container. If you are stacking them, place a piece of parchment paper between layers to prevent them from sticking together or the chocolate from getting scratched. Store the container in the refrigerator for up to 5-7 days. The chocolate will remain firm, and the banana and coconut interiors will stay fresh and delicious. For a firmer, more refreshing treat, especially the banana bars, you can also store them in the freezer for up to 2-3 weeks. If freezing, ensure they are in a freezer-safe airtight container to prevent freezer burn.
These bars do not require reheating. They are designed to be enjoyed cold or at cool room temperature. If stored in the freezer, it’s best to let them sit at room temperature for 5-10 minutes before serving, especially the banana bars, to allow the banana to soften slightly to a creamy consistency. The coconut bars can be enjoyed directly from the freezer for an extra chewy, icy treat, or allowed to soften slightly for a softer bite. Avoid leaving them out at warm room temperature for extended periods, as the chocolate will melt, and the banana may become too soft. If you find the chocolate has softened, simply pop them back into the refrigerator for a quick chill before serving.
Frequently Asked Questions
Can I use overripe bananas for this recipe?
While overripe bananas are great for baking (like banana bread), they are not ideal for these bars. You need ripe but firm bananas that will hold their shape when sliced and then frozen. Overripe bananas will be too soft and mushy, making them difficult to dip and resulting in a less pleasant texture in the final bar.
My chocolate seized when I melted it. What went wrong?
Chocolate seizing usually happens when it comes into contact with even a tiny amount of water or when it’s overheated. When melting chocolate, ensure your bowl and utensils are completely dry. If using a double boiler, make sure no steam or water splashes into the chocolate. If microwaving, heat in short 30-second bursts, stirring thoroughly after each, to prevent overheating. If your chocolate does seize, sometimes you can rescue it by stirring in a spoonful of hot vegetable oil or melted coconut oil, but it may not be as smooth as perfectly melted chocolate.
How can I make these bars vegan?
To make these bars vegan, you’ll need to make two main substitutions. First, replace the sweetened condensed milk with a full-fat canned coconut cream. Chill the can of coconut cream in the refrigerator overnight, then scoop out the thick cream that has solidified at the top, leaving the watery liquid behind. Use this thick cream in your coconut mixture. Second, ensure you use a certified dairy-free and vegan chocolate for both the main coating and the drizzle. Many dark chocolates are naturally dairy-free, but always check the ingredients label to be sure.
My chocolate coating cracked after setting. How can I prevent this?
Chocolate cracking can occur due to a few reasons. One common cause is too thick a chocolate coating; try to tap off more excess chocolate after dipping. Another reason can be a significant temperature difference between the frozen filling and the melted chocolate, causing the chocolate to set too quickly and become brittle. Ensure your melted chocolate isn’t too hot, and if dipping very cold items, work quickly. Adding a small amount of coconut oil (as recommended in the recipe) helps make the chocolate more pliable and less prone to cracking once set.