Introduction
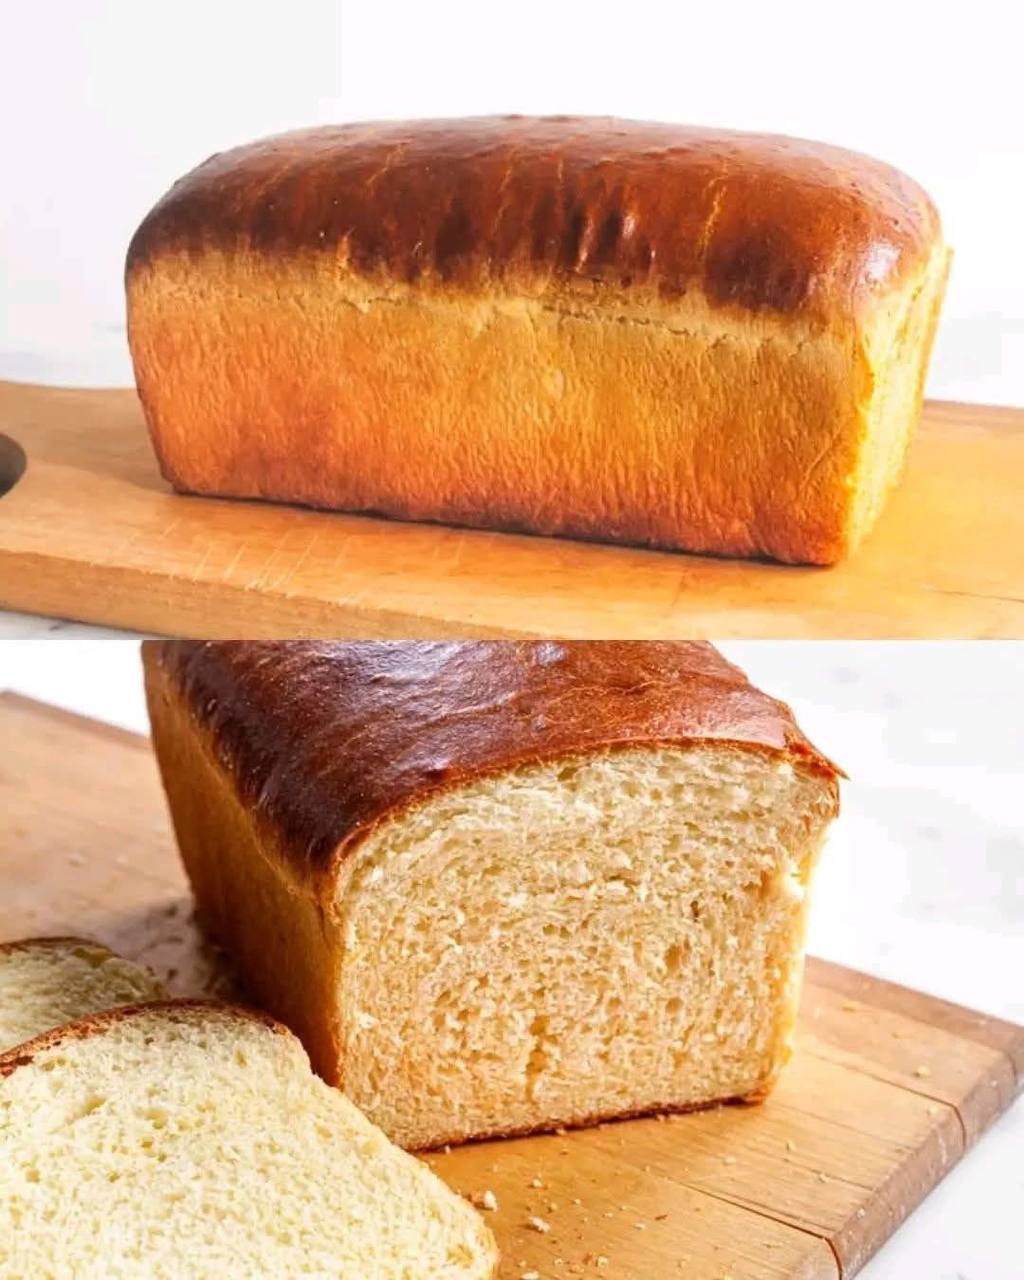
Prepare to elevate your baking game with a true classic: homemade Classic Brioche Bread. This isn’t just any bread; it’s a culinary masterpiece, a testament to the simple magic of flour, butter, and eggs. Originating from France, brioche is renowned for its incredibly rich, tender, and slightly sweet crumb, making it a beloved staple across the globe. Its golden-brown crust and impossibly soft interior set it apart from other breads, offering a luxurious experience with every bite.
What makes brioche so captivating is its remarkable versatility. While it shines as a standalone treat for breakfast, slathered with jam or butter, its delicate flavor profile also makes it an exceptional base for savory sandwiches. Transform it into the most decadent French toast you’ve ever had, or use it to create an unforgettable bread pudding. The process of making brioche from scratch, though requiring a bit of patience, is immensely satisfying, filling your home with an aroma that promises pure indulgence. Get ready to impress yourself and everyone you share it with – this classic French delight is within your reach!
At its heart, brioche’s special character comes from a generous amount of butter and eggs, which contribute to its distinctive richness and beautiful golden hue. The careful balance of ingredients and precise techniques result in a bread with a soft, airy, and almost cake-like crumb that practically melts in your mouth. The golden-brown crust, achieved through an egg wash, adds a subtle crispness and visual appeal, while a hint of sweetness rounds out its complex flavor. Beyond its delightful taste and texture, the unmistakable aroma of freshly baked brioche is an experience in itself, promising comfort and sophistication.
Nutritional Information
Per serving (approximate values):
- Calories: 350
- Protein: 9g
- Carbohydrates: 40g
- Fat: 17g
- Fiber: 2g
- Sodium: 280mg
Ingredients
- 1 cup (240ml) whole milk, warmed to 105-115°F (40-46°C)
- 2 ¼ teaspoons (1 packet or 7g) active dry yeast
- ⅓ cup (65g) granulated sugar, plus a pinch for yeast activation
- 4 cups (480g) all-purpose flour, plus more for dusting
- 1 teaspoon (5g) fine sea salt
- 4 large eggs, at room temperature, plus 1 egg for egg wash
- ¾ cup (170g) unsalted butter, softened and cut into 1-inch pieces
- 1 tablespoon water (for egg wash)
Instructions
- Activate the Yeast: In a small bowl, combine the warm milk, a pinch of granulated sugar, and the active dry yeast. Stir gently and let it sit for 5-10 minutes, or until the mixture becomes foamy. This indicates the yeast is active and ready to use.
- Combine Dry Ingredients: In the bowl of a stand mixer fitted with the dough hook attachment, combine the all-purpose flour, the remaining ⅓ cup (65g) granulated sugar, and the fine sea salt. Mix briefly on low speed to combine.
- Add Wet Ingredients (Except Butter): Pour the activated yeast mixture into the dry ingredients. Add the 4 large eggs, one at a time, mixing on low speed until each egg is fully incorporated before adding the next. The dough will be sticky and shaggy at this point.
- Knead the Dough: Increase the mixer speed to medium-low and knead the dough for 8-10 minutes. The dough will start to come together, pulling away from the sides of the bowl, but will still be quite soft.
- Incorporate the Butter: Reduce the mixer speed to low. Add the softened butter, one piece at a time, waiting until each piece is almost fully incorporated before adding the next. This process will take about 10-15 minutes. The dough will initially look like it’s separating and becoming very wet, but continue kneading.
- Final Kneading: Once all the butter is incorporated, increase the mixer speed to medium and knead for another 10-15 minutes. The dough should become smooth, elastic, and shiny, pulling away cleanly from the sides of the bowl. It will still be soft and slightly sticky to the touch. To test for proper kneading, perform the “windowpane test”: gently stretch a small piece of dough; if it can be stretched thin enough to see light through it without tearing, it’s ready.
- First Rise (Bulk Fermentation): Lightly grease a large bowl with a neutral oil. Transfer the brioche dough to the bowl, turning it once to coat the entire surface. Cover the bowl tightly with plastic wrap or a clean kitchen towel. Place the bowl in a warm spot (ideally around 75-80°F / 24-27°C) and let it rise for 2-3 hours, or until it has doubled in size. Alternatively, for a deeper flavor development, you can refrigerate the dough overnight (8-12 hours) for its first rise. If refrigerating, punch down the dough gently after 1 hour, then cover and refrigerate.
- Prepare for Shaping: Once the dough has doubled (or after refrigeration), gently punch it down to release the air. Lightly flour a clean work surface.
- Shape the Loaf: Transfer the dough to the floured surface. Gently shape the dough into a smooth log. You can divide it into three equal pieces and braid them for a traditional look, or simply form it into a single uniform log.
- Second Rise (Proofing): Lightly grease a 9×5-inch (23x13cm) loaf pan. Place the shaped brioche dough into the prepared pan. Cover the pan loosely with plastic wrap or a clean kitchen towel. Let it rise in a warm spot for another 1-1.5 hours, or until it has nearly doubled in size and looks puffy.
- Preheat Oven & Prepare Egg Wash: About 20 minutes before the end of the second rise, preheat your oven to 375°F (190°C). In a small bowl, whisk together the remaining large egg with 1 tablespoon of water to create the egg wash.
- Egg Wash & Bake: Gently brush the top of the risen brioche loaf with the egg wash. Be careful not to deflate the dough.
- Bake the Brioche: Place the loaf pan in the preheated oven. Bake for 30-40 minutes, or until the brioche is deeply golden brown on top and sounds hollow when tapped on the bottom. If the top is browning too quickly, you can loosely tent it with aluminum foil during the last 10-15 minutes of baking. For perfect doneness, an instant-read thermometer inserted into the center should register 195-200°F (90-93°C).
- Cooling: Once baked, carefully remove the brioche from the oven. Let it cool in the loaf pan for 5-10 minutes before gently transferring it to a wire rack to cool completely. Cooling completely is crucial for the crumb to set properly and for the best texture.
- Serve and Enjoy: Slice and serve your beautiful homemade Classic Brioche Bread!
Cooking Tips and Variations
Achieving brioche perfection requires a bit of attention to detail, but the results are always worth it. Firstly, the quality of your ingredients truly matters. Using good quality unsalted butter and fresh large eggs will significantly impact the richness, flavor, and texture of your brioche. These are the stars of the show, so don’t skimp on them!
Patience is a virtue when making brioche. Do not rush the rising times. Yeast needs warmth and time to work its magic, developing the airy texture and complex flavors that define this bread. If your kitchen is cool, find a warm spot for proofing, such as near a sunny window, in a slightly warm (but turned off) oven, or in a proofing box if you have one. Under-proofed brioche will be dense, while over-proofed can collapse in the oven.
Kneading is another crucial step. Brioche dough will initially be very sticky, especially after the butter has been incorporated. It’s tempting to add more flour, but resist this urge! Adding too much extra flour will result in a dry, tough brioche. Trust the process and allow the stand mixer to do its work. The dough will eventually become smooth, elastic, and pull away from the sides of the bowl. A well-kneaded dough is key to that signature soft, airy crumb.
The perfect golden crust is achieved through a thorough egg wash. Whisk one large egg with a tablespoon of water or milk until well combined, and gently brush it over the top of the risen dough just before baking. This not only gives it a beautiful shine and deep golden color but also contributes to a slightly crisp exterior. For an even richer color, you can add a pinch of sugar to your egg wash.
To tell if your brioche is baked through, in addition to the visual cues of a deep golden-brown crust, listen for a hollow sound when you tap the bottom of the loaf. For absolute certainty, an internal thermometer inserted into the center should read 195-200°F (90-93°C). This ensures the interior is fully cooked and not doughy.
Once out of the oven, it’s incredibly important to let your brioche cool completely on a wire rack before slicing. Slicing warm brioche can compress the delicate crumb, making it seem denser than it is. Cooling allows the internal structure to set fully, resulting in the perfect tender texture.
For variations, brioche is wonderfully adaptable. For a sweet treat, try adding chocolate chips or dried fruits like cranberries or raisins to the dough during the last few minutes of kneading. For a savory twist, incorporate finely chopped fresh herbs like rosemary or thyme, or mix in some grated Parmesan cheese. You can also experiment with different shapes, such as individual brioche buns (brioche à tête) or braided loaves, adjusting baking times accordingly. A touch of orange zest or vanilla extract can also enhance the brioche’s natural sweetness.
Storage and Reheating
Proper storage is key to maintaining the freshness and exquisite texture of your homemade brioche. Once completely cooled, brioche is best enjoyed within 2-3 days at room temperature. To store, wrap the loaf tightly in plastic wrap or aluminum foil, or place it in an airtight container. This prevents it from drying out and keeps it soft. Avoid refrigerating brioche, as this can actually accelerate staling, making the bread firm and dry.
For longer storage, brioche freezes beautifully. Slice the cooled loaf, then wrap individual slices or the entire loaf tightly in plastic wrap, followed by a layer of aluminum foil. Place it in a freezer-safe bag. Frozen brioche can be stored for up to 2-3 months. To thaw, simply remove it from the freezer and let it sit at room temperature for a few hours, or overnight in the refrigerator.
Reheating brioche can bring back some of its fresh-baked glory. If you have a whole loaf or large pieces, you can warm it in a preheated oven at 300°F (150°C) for about 10-15 minutes, or until warmed through. For individual slices, a toaster or toaster oven works wonderfully, yielding a slightly crisp exterior and soft interior. You can also quickly warm slices in a pan on the stovetop over medium-low heat. Be careful not to overheat, as this can dry out the bread. Reheated brioche is particularly delightful for French toast or served with a pat of melting butter.
Frequently Asked Questions
Why is my brioche dough so sticky and hard to work with?
Brioche dough is inherently very soft and sticky due to its high butter and egg content. This is normal and contributes to its tender texture. Resist the urge to add excessive amounts of flour during kneading, as this will make the final product tough and dry. Trust the kneading process – with enough time in a stand mixer, the dough will become smooth, elastic, and eventually pull away from the sides of the bowl, though it will remain soft to the touch. If chilling the dough, it will become much firmer and easier to handle.
Can I make brioche without a stand mixer?
While a stand mixer with a dough hook is highly recommended for brioche due to the extensive kneading required for such a rich, sticky dough, it is possible to make it by hand. Be prepared for a significant arm workout, as you’ll need to knead the dough for a good 20-30 minutes, or even longer, to develop the gluten properly and fully incorporate the butter. Using a French kneading technique (stretch and fold) on a lightly floured surface can be effective. Your hands will get messy, but the reward is worth it!
What’s the difference between active dry yeast and instant yeast in this recipe?
This recipe calls for active dry yeast, which requires activation in warm liquid before being added to the dry ingredients. If you’re using instant yeast, you can typically skip the activation step and mix it directly with the dry ingredients. However, for brioche, many bakers still prefer to “proof” instant yeast just to ensure it’s alive and active. If you do proof instant yeast, use slightly cooler water (around 100°F / 38°C) as it’s more sensitive to heat than active dry yeast. The quantity remains the same.
My brioche didn’t rise much. What went wrong?
Several factors could contribute to poor rising. The most common culprits are inactive yeast (check its expiration date or ensure your milk wasn’t too hot, killing the yeast), insufficient kneading (which prevents gluten development needed to trap gases), a too-cold environment for rising, or adding too much flour, which can make the dough too dense to rise effectively. Ensure your yeast is fresh, your liquids are at the correct temperature, and your dough is kneaded until it passes the windowpane test.