Introduction
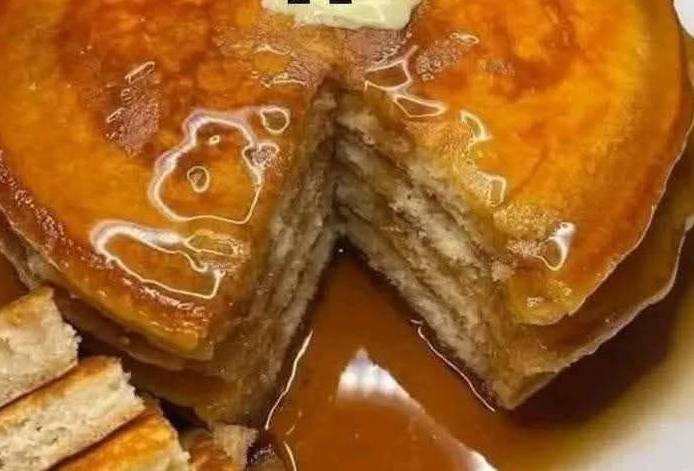
There’s something undeniably magical about a stack of homemade pancakes on a lazy weekend morning. The aroma alone is enough to pull even the deepest sleepers out of bed. Forget the fancy brunch spots; the true joy lies in crafting that perfect stack right in your own kitchen. And when we talk about perfection, we’re talking about classic buttermilk pancakes – the kind that are impossibly fluffy, tender, and kissed with a golden-brown hue, just waiting for a generous pour of warm maple syrup.
These aren’t just any pancakes; they are the quintessential breakfast staple, a testament to simple ingredients coming together to create something extraordinary. What makes them “classic”? It’s their traditional charm, their comforting familiarity, and the way they consistently deliver that airy, melt-in-your-mouth texture. Each bite is a nostalgic journey, a reminder of cozy mornings and delicious beginnings. The secret to their superior texture and subtle tang? You guessed it: buttermilk.
Buttermilk isn’t just an ingredient; it’s a game-changer. It reacts beautifully with leavening agents, creating a light, airy crumb that’s unparalleled. When you finally plate up your masterpiece – a tall, impressive stack, each pancake a perfect golden disc, glistening with syrup and topped with a pat of melting butter – you’ll know you’ve achieved breakfast nirvana. Get ready to master the art of the perfect pancake and transform your mornings forever.
Nutritional Information
Per serving (approximate values, based on 3 medium pancakes):
- Calories: 350
- Protein: 12g
- Carbohydrates: 50g
- Fat: 12g
- Fiber: 2g
- Sodium: 550mg
Ingredients
- 1 ½ cups all-purpose flour
- 2 tablespoons granulated sugar
- 1 ½ teaspoons baking powder
- 1 teaspoon baking soda
- ½ teaspoon salt
- 1 ½ cups buttermilk
- 1 large egg
- ¼ cup unsalted butter, melted, plus more for greasing the griddle
- 1 teaspoon vanilla extract (optional, but highly recommended)
- Maple syrup, for serving
- Butter, for serving
Instructions
- In a large bowl, whisk together the dry ingredients: all-purpose flour, granulated sugar, baking powder, baking soda, and salt. Make sure there are no lumps and everything is well combined.
- In a separate medium bowl, whisk together the wet ingredients: buttermilk, large egg, melted butter, and vanilla extract (if using). Whisk until the egg is fully incorporated and the mixture is smooth.
- Create a well in the center of the dry ingredients. Pour the wet ingredients into the well.
- Using a whisk or a rubber spatula, gently fold the wet and dry ingredients together until just combined. It’s crucial not to overmix; a few lumps are perfectly fine and even desired. Overmixing will develop the gluten in the flour, resulting in tough, chewy pancakes instead of light and fluffy ones.
- Let the batter rest for 5-10 minutes at room temperature. This resting period allows the gluten to relax and the baking powder and baking soda to start reacting with the buttermilk, leading to a lighter, fluffier pancake. You will notice small bubbles forming on the surface of the batter.
- While the batter rests, heat a large non-stick griddle or heavy-bottomed skillet over medium heat. You want it hot enough that a drop of water sizzles and evaporates quickly, but not so hot that it smokes.
- Lightly grease the griddle with a small amount of butter or oil. You can use a paper towel to spread it evenly and wipe off any excess.
- Pour or ladle about ¼ cup of batter for each pancake onto the hot griddle, leaving some space between them to prevent sticking and allow for spreading.
- Cook the pancakes for 2-3 minutes per side, or until golden brown. You’ll know it’s time to flip when you see bubbles forming on the surface of the pancake and the edges look set and slightly dry.
- Carefully slide a spatula under the pancake and flip it over. Cook for another 1-2 minutes on the second side, or until golden brown and cooked through.
- Transfer the cooked pancakes to a plate. To keep them warm while you cook the remaining batter, you can place them on a wire rack set over a baking sheet in a preheated oven at its lowest setting (around 200°F / 95°C).
- Repeat with the remaining batter, greasing the griddle lightly between batches if necessary.
- Serve the classic buttermilk pancakes immediately, stacked high and generously topped with a pat of butter and plenty of warm maple syrup. Fresh berries, whipped cream, or fruit compote also make delicious additions.
Cooking Tips and Variations
Achieving pancake perfection is an art, but with a few expert tips, you’ll be a master in no time. The golden rule for fluffy pancakes is simple: do not overmix the batter. Lumps are your friends here; they indicate that the gluten hasn’t been overdeveloped, ensuring a tender crumb. Stir just until the wet and dry ingredients are barely combined. Another crucial tip is to use fresh leavening agents. Baking powder and baking soda lose their potency over time, so check their expiration dates for optimal lift. For that perfect golden-brown exterior, proper pan temperature is key. A medium heat allows the pancakes to cook through without burning the outside. If your pancakes are browning too quickly, lower the heat; if they’re pale, increase it slightly. Don’t overcrowd the pan; give each pancake enough space to cook evenly and make flipping easier. For an extra touch, lightly warm your maple syrup before serving; it enhances its flavor and helps it absorb beautifully into the warm pancakes. If you’re feeling adventurous, try adding a tablespoon of lemon zest or a teaspoon of cinnamon to the dry ingredients for a subtle flavor variation. Fresh or frozen blueberries (don’t thaw if frozen) can also be gently folded into the batter just before cooking for a burst of fruity goodness.
Storage and Reheating
While these pancakes are best enjoyed fresh off the griddle, leftovers are definitely a treat! Allow any cooled pancakes to come to room temperature. To store, stack them with parchment paper in between each pancake to prevent sticking, then place them in an airtight container or a freezer-safe bag. They will keep in the refrigerator for up to 3-4 days. For longer storage, freeze them for up to 2-3 months. To reheat refrigerated pancakes, you can pop them in the microwave for 30-60 seconds, toast them in a toaster or toaster oven until warmed through and slightly crispy, or warm them on a lightly greased skillet over medium-low heat for a few minutes per side. For frozen pancakes, you can reheat them directly from frozen in a toaster oven, conventional oven (at 350°F / 175°C for about 5-10 minutes), or even directly in a toaster on a low setting, adjusting cooking time until heated through and golden.
Frequently Asked Questions
Why are my pancakes not fluffy?
The most common culprit for flat pancakes is overmixing the batter. When you overmix, you develop the gluten in the flour, which makes the pancakes tough and dense instead of light and airy. Another reason could be expired or inactive baking powder or baking soda. Always ensure your leavening agents are fresh for optimal lift.
Can I make buttermilk pancakes without actual buttermilk?
Absolutely! If you don’t have buttermilk on hand, you can easily make a substitute. For every 1 cup of buttermilk needed, measure 1 cup of regular milk (dairy or non-dairy) and stir in 1 tablespoon of white vinegar or lemon juice. Let it sit for 5-10 minutes until it slightly curdles. This acidity will mimic the tang and reaction of real buttermilk.
How do I know when to flip the pancakes?
Look for visual cues! When the pancakes are ready to flip, you’ll see plenty of bubbles forming on the surface of the batter. The edges will also start to look set and slightly dry. This usually takes about 2-3 minutes on the first side. Flipping too early can cause them to tear, while flipping too late can result in burned pancakes.
What’s the best way to keep pancakes warm for a crowd?
To keep a batch of pancakes warm while you finish cooking the rest, preheat your oven to its lowest setting (around 200°F or 95°C). Place a wire rack on a baking sheet and transfer the cooked pancakes to the rack in a single layer. The rack prevents them from becoming soggy, and the low oven temperature keeps them warm without overcooking them.