Instructions
- Preheat Oven and Prepare Baking Sheet: Preheat your oven to 400°F (200°C). Line a large baking sheet (approximately 13×18 inches) with parchment paper. Lightly spray the parchment paper with cooking spray to ensure no sticking, even though parchment paper is generally non-stick, this offers extra insurance.
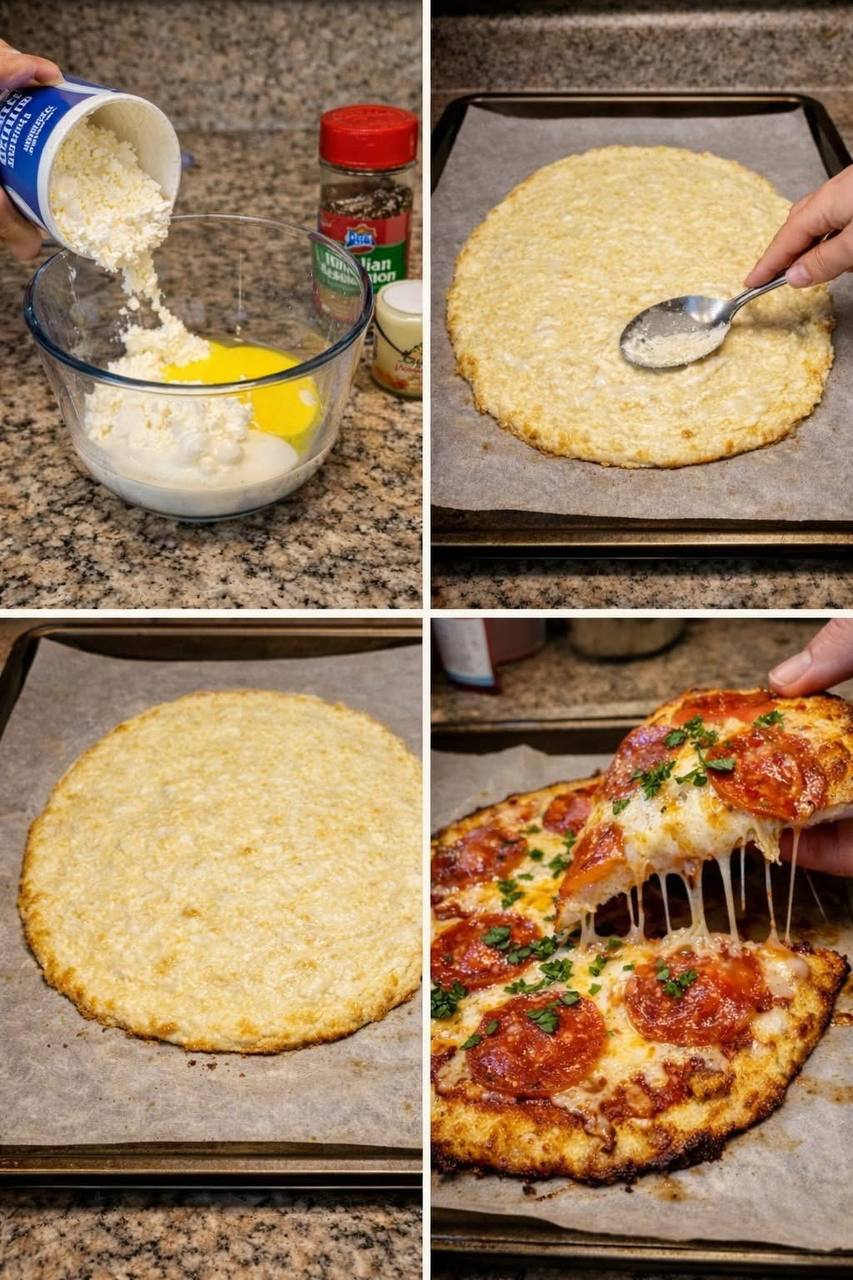
- Blend the Cottage Cheese Mixture: In a medium-sized bowl, combine the full-fat cottage cheese and large eggs. If using, add the optional Italian seasoning, garlic powder, and black pepper. For the crispiest and most uniform crust, it’s highly recommended to blend this mixture until completely smooth. You can use an immersion blender directly in the bowl, a standard blender, or a food processor. Blend until no curds remain and the mixture is a smooth, pourable batter. This step is crucial for achieving a sturdy, non-crumbly crust.
- Spread the Crust: Pour the blended cottage cheese mixture onto the prepared parchment-lined baking sheet. Using an offset spatula or the back of a spoon, carefully spread the mixture evenly into a thin, rectangular shape, aiming for about 1/4 inch thick. Try to make the edges slightly thicker as they tend to crisp up more. Ensure the crust is as even as possible for uniform cooking.
- Pre-Bake the Crust: Place the baking sheet with the spread crust into the preheated oven. Bake for 30-40 minutes, or until the crust is firm, golden brown around the edges, and appears mostly dry in the center. The baking time can vary depending on your oven and the thickness of your crust. It’s important for the crust to be quite firm and dry at this stage to prevent a soggy final pizza. If it’s still too moist, continue baking for another 5-10 minutes.
- Add Toppings: Once the crust is pre-baked to perfection, carefully remove the baking sheet from the oven. Now it’s time to add your favorite pizza toppings! Start with a thin layer of your preferred pizza sauce, leaving a small border for the crust. Follow with shredded mozzarella cheese and any other toppings like pepperoni, vegetables, or cooked meats. Be mindful not to overload the crust, as it is more delicate than a traditional dough.
- Final Bake: Return the pizza with toppings to the oven. Bake for an additional 10-15 minutes, or until the cheese is melted, bubbly, and slightly golden brown, and the toppings are heated through. If you like your cheese extra browned and bubbly, you can briefly switch the oven to broiler mode for 1-2 minutes, but watch it very closely to prevent burning.
- Cool and Serve: Carefully remove the pizza from the oven. Let it cool on the baking sheet for 5-10 minutes before sliding it onto a cutting board. This cooling period helps the crust to firm up further and makes it easier to slice. Slice into squares or triangles and serve immediately. Garnish with fresh parsley or basil if desired.
Cooking Tips and Variations
To achieve the absolute crispiest crust, ensure you blend the cottage cheese and eggs until completely smooth. Any remaining curds can introduce excess moisture, leading to a softer crust. Additionally, don’t skimp on the pre-baking time. The crust needs to be firm and golden before you add any toppings. If it still feels soft or looks pale, bake it longer. A slightly thicker crust will be more forgiving and easier to handle, while a thinner crust will yield maximum crispiness.
Preventing the crust from sticking is crucial. Always use parchment paper, and for extra insurance, lightly spray it with cooking spray. Some bakers even lightly flour (with a low-carb flour like almond flour for keto) the parchment paper after spraying, though this isn’t strictly necessary if the parchment is good quality. Make sure your baking sheet is clean and flat to ensure even heat distribution.
For topping suggestions, the world is your oyster! Keep in mind that heavy, watery toppings can make the crust soggy. Opt for drier ingredients or pre-cook vegetables to remove excess moisture. Classic pepperoni and mozzarella are always a hit. Other great options include sautéed mushrooms, bell peppers, cooked sausage, spinach (squeezed dry), or even a white pizza with ricotta, garlic, and herbs. For a spicier kick, add some red pepper flakes to the crust mixture or your toppings.
If you find your crust is still a bit soft, try increasing the oven temperature slightly (to 425°F/220°C) for the initial pre-bake, or extend the pre-baking time. You can also try pressing out any excess moisture from the cottage cheese before blending, though blending usually distributes it well enough. Using a pizza stone or baking steel can significantly improve crispiness. Place it in the oven during the preheating phase and carefully transfer your parchment-lined crust onto it for baking. This provides a more even and intense heat to the bottom of the crust.
For variations, consider adding different spices to the crust itself. A pinch of onion powder, smoked paprika, or even a dash of cayenne pepper can elevate the flavor. You can also experiment with different cheeses in the crust mixture, though cottage cheese is ideal for its protein structure. For a more “garlic bread” style crust, brush the pre-baked crust with garlic butter before adding cheese and baking again.
Storage and Reheating
To store any leftover cottage cheese pizza, allow it to cool completely to room temperature. Once cooled, transfer slices to an airtight container or wrap them tightly in aluminum foil or plastic wrap. Store in the refrigerator for up to 3-4 days. While the crust will lose some of its initial crispiness upon refrigeration, it will still be delicious.
For reheating, the best method to revive some crispness is using an oven or an air fryer. Preheat your oven to 350°F (175°C). Place the leftover pizza slices directly on a baking sheet or on the oven rack. Reheat for 8-12 minutes, or until the cheese is melted and bubbly and the crust feels heated through. An air fryer also works wonderfully; preheat to 350°F (175°C) and cook for 3-5 minutes, checking frequently to prevent burning. Avoid reheating in the microwave, as this will result in a soft, potentially rubbery crust.
You can also freeze the pre-baked crust without toppings. Once baked and completely cooled, wrap it tightly in plastic wrap and then in aluminum foil. It can be stored in the freezer for up to 1 month. When ready to use, thaw it in the refrigerator overnight or at room temperature for an hour, then proceed with adding toppings and baking as per the instructions.
Frequently Asked Questions
Can I use low-fat or fat-free cottage cheese?
While you technically can, full-fat cottage cheese is highly recommended for the best results. The fat content contributes to a better texture, flavor, and helps the crust crisp up more effectively. Low-fat or fat-free versions may result in a crust that is more watery, less sturdy, and potentially rubbery.
Is this crust truly gluten-free?
Yes, this crust is naturally gluten-free as it uses cottage cheese and eggs instead of traditional flour. However, always check the labels of your cottage cheese and any optional seasonings to ensure they are certified gluten-free if you have a strict gluten intolerance or allergy, as cross-contamination can occur in manufacturing facilities.
My crust isn’t getting crispy, what am I doing wrong?
There are a few common culprits. First, ensure you’ve blended the cottage cheese and eggs until completely smooth; curds can release excess moisture. Second, don’t under-bake the crust during the initial pre-bake. It needs to be firm and golden brown before adding toppings. Third, make sure your oven temperature is accurate and that you’re not overloading the pizza with too many wet toppings. Using parchment paper and pre-baking adequately are key.
Can I make this crust ahead of time?
Yes, you can! You can pre-bake the crust as per the instructions, let it cool completely, and then store it in an airtight container in the refrigerator for 1-2 days. When ready to use, simply add your toppings and bake as directed. This is a great meal prep hack for quick weeknight pizzas.