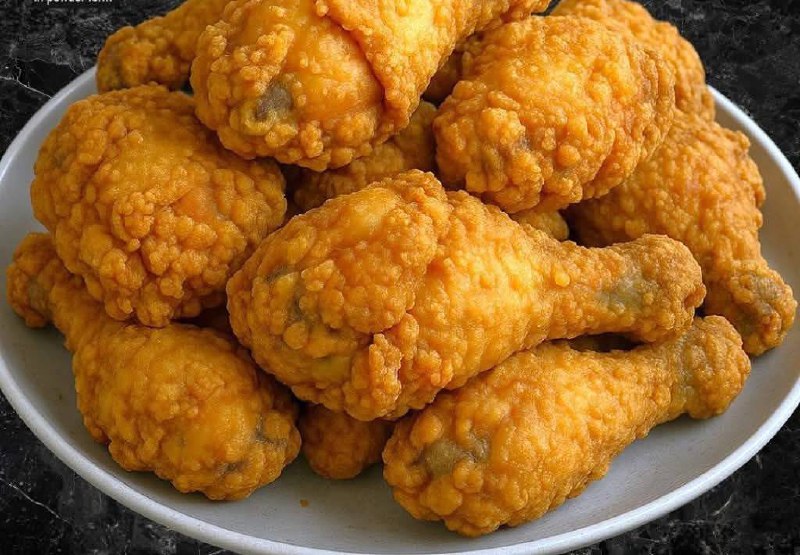
Crispy KFC-Style Fried Chicken
Introduction
There are few culinary delights that capture the heart and palate quite like a perfectly fried piece of chicken. That unmistakable crunch, the juicy, tender meat beneath, and that secret blend of spices that sings with every bite – it’s a symphony of textures and flavors that has made fried chicken a global comfort food icon. And when we talk about iconic fried chicken, one name often springs to mind: KFC. That distinctive, craggy, golden-brown crust and the succulent chicken underneath have inspired countless home cooks to try and replicate its magic. The good news? That legendary taste and texture are absolutely achievable in your own kitchen, and we’re here to show you how!
This recipe isn’t just about frying chicken; it’s about mastering the art of creating that “KFC-Style” experience. We’ll delve into the secrets behind the ultimate crisp, the juiciest chicken, and that signature flavor profile that keeps you coming back for more. Forget soggy coatings and dry meat; with our detailed guide, you’ll learn the crucial techniques, from the all-important buttermilk brine to the perfect oil temperature, ensuring every piece of chicken you fry is a masterpiece. Get ready to impress your family and friends with a batch of homemade fried chicken that rivals the drive-thru, delivering that satisfying crunch and mouthwatering flavor right to your dining table.
What makes this recipe truly special is its dedication to replicating the core characteristics of KFC’s beloved chicken. We’re talking about that wonderfully textured, golden-brown exterior that shatters with each bite, revealing incredibly moist and flavorful bone-in chicken. The secret lies in a combination of carefully selected ingredients and precise cooking methods, including a flavorful spice blend, a strategic dredging process, and meticulous temperature control during frying. Prepare to unlock the true potential of homemade fried chicken and transform your kitchen into your very own crispy chicken haven.
Nutritional Information
Per serving (approximate values for one drumstick):
- Calories: 350-400
- Protein: 25-30g
- Carbohydrates: 15-20g
- Fat: 20-25g
- Fiber: 1-2g
- Sodium: 600-800mg
Ingredients
- 8-10 pieces bone-in, skin-on chicken (a mix of drumsticks, thighs, and wings works best)
- 4 cups buttermilk
- 2 tablespoons hot sauce (optional, for extra flavor and tenderizing)
- 3 cups all-purpose flour
- 1/2 cup cornstarch
- 2 tablespoons salt
- 1 tablespoon freshly ground black pepper
- 1 tablespoon paprika
- 1 tablespoon garlic powder
- 1 tablespoon onion powder
- 1 teaspoon dried oregano
- 1 teaspoon dried thyme
- 1 teaspoon dried basil
- 1/2 teaspoon cayenne pepper (adjust to taste for heat)
- 1/2 teaspoon ground ginger
- 1/4 teaspoon white pepper
- 1/4 teaspoon ground mustard
- 6-8 cups vegetable oil, canola oil, or peanut oil, for frying
Instructions
- Prepare the Chicken: Thoroughly wash the chicken pieces under cold water and pat them completely dry with paper towels. Removing excess moisture is crucial for crispy skin. If using larger pieces like breasts, you may want to cut them in half to ensure even cooking.
- Marinate the Chicken: In a large bowl or a resealable plastic bag, combine the buttermilk and hot sauce (if using). Add the dried chicken pieces, ensuring they are fully submerged. Cover the bowl or seal the bag and refrigerate for at least 4 hours, or preferably overnight (up to 24 hours). This buttermilk brine is essential for tenderizing the chicken and infusing it with flavor.
- Prepare the Dredging Station: In a large, shallow dish or a sturdy resealable plastic bag, combine the all-purpose flour, cornstarch, salt, black pepper, paprika, garlic powder, onion powder, oregano, thyme, basil, cayenne pepper, ground ginger, white pepper, and ground mustard. Whisk or shake vigorously to ensure all the spices are evenly distributed throughout the flour mixture. This is your seasoned flour blend.
- Set Up for Frying: Choose a heavy-bottomed pot, Dutch oven, or deep fryer. Pour the frying oil into the pot, ensuring it’s at least 3-4 inches deep. Attach a deep-fry thermometer to the side of the pot, making sure the tip is submerged in the oil but not touching the bottom. Heat the oil over medium-high heat until it reaches a steady temperature of 350°F (175°C).
- Dredge the Chicken: Remove the chicken pieces from the buttermilk, allowing any excess to drip off, but do not pat them dry. Immediately transfer 2-3 pieces of chicken at a time into the seasoned flour mixture. Toss and press the flour onto the chicken firmly, ensuring every surface is thoroughly coated. For an extra craggy, crispy texture, you can double-dredge: after the first coating, dip the chicken back into the buttermilk briefly (just to moisten the flour), then return it to the flour mixture for a second, thorough coating. Place the dredged chicken pieces on a wire rack set over a baking sheet while you continue with the remaining chicken. Let the coated chicken rest for at least 10-15 minutes before frying; this helps the coating adhere better.
- Fry the Chicken (in Batches): Carefully lower 2-3 pieces of dredged chicken into the hot oil using tongs. Do not overcrowd the pot, as this will lower the oil temperature and result in soggy, greasy chicken. Maintain the oil temperature as close to 325-350°F (160-175°C) as possible.
- Cook Until Golden and Done: Fry drumsticks and wings for about 8-10 minutes, and thighs for 10-12 minutes, or until the chicken is a deep golden brown and cooked through. Flip the chicken occasionally to ensure even browning. The internal temperature of the thickest part of the chicken should reach 165°F (74°C) when tested with an instant-read thermometer.
- Rest the Fried Chicken: Once cooked, carefully remove the chicken from the oil and place it on a clean wire rack set over a baking sheet lined with paper towels. The wire rack allows air to circulate, preventing the bottom from becoming soggy, while the paper towels absorb any excess oil. Let the chicken rest for at least 5 minutes before serving. This allows the juices to redistribute, resulting in more tender and flavorful chicken.
- Repeat for Remaining Chicken: Continue frying the remaining chicken in batches, ensuring the oil temperature returns to 350°F (175°C) between batches. Remove any stray bits of flour from the oil between batches using a fine-mesh skimmer to prevent them from burning and affecting the flavor of subsequent batches.
- Serve Hot: Serve your crispy KFC-Style fried chicken immediately with your favorite sides.
Cooking Tips and Variations
Achieving truly crispy, juicy fried chicken is an art form, and these tips will help you master it. First and foremost, the buttermilk brine is non-negotiable for tenderizing the chicken and infusing it with flavor; aim for at least 4 hours, but overnight is truly best. When drying the chicken, be meticulous – any residual moisture can lead to a less crispy coating. For that signature craggy texture, don’t be afraid to double-dredge: after the first flour coating, a quick dip back into the buttermilk (just to moisten the flour) followed by a second flour coating creates those wonderful nooks and crannies that hold onto all that crispy goodness. Letting the coated chicken rest for 10-15 minutes before frying also helps the breading adhere better, preventing it from flaking off in the hot oil.
Oil temperature is perhaps the most critical factor. Invest in a good deep-fry thermometer and keep a close eye on it. Starting at 350°F (175°C) is ideal, but expect it to drop when you add the chicken. Aim to maintain it between 325-350°F (160-175°C) throughout the frying process. If the oil is too hot, the exterior will burn before the inside cooks; too cool, and the chicken will absorb too much oil, becoming greasy. Frying in small batches is essential to prevent overcrowding, which drastically lowers the oil temperature and results in less crispy chicken. After each batch, allow the oil to come back up to temperature. Finally, always rest your fried chicken on a wire rack after cooking, not directly on paper towels. This allows air to circulate underneath, keeping the bottom crispy while excess oil drips away. For cleanup, carefully strain and cool your frying oil; it can often be reused 1-2 more times.
For variations, consider adjusting the spice blend to your preference. For a spicier kick, increase the cayenne pepper or add a pinch of chili powder. For a smoky flavor, a touch of smoked paprika works wonders. You can also experiment with different dried herbs like marjoram or rosemary for a unique twist. While the recipe focuses on bone-in, skin-on pieces for maximum flavor and juiciness, you can certainly use boneless, skinless chicken breasts or tenders. Just be aware that cooking times will be significantly shorter (around 5-7 minutes), and they are more prone to drying out, so careful monitoring of the internal temperature is key. For a gluten-free option, you can experiment with a blend of gluten-free flour and cornstarch, though the texture may vary slightly. Another delicious variation is to add a tablespoon of baking powder to your flour mixture; this can contribute to an even lighter and crispier coating due to the creation of small air bubbles during frying.
Storage and Reheating
To store leftover fried chicken, allow it to cool completely to room temperature. This is crucial to prevent condensation, which can make the coating soggy. Once cool, place the chicken in an airtight container or wrap individual pieces tightly in aluminum foil. Store it in the refrigerator for up to 3-4 days. For longer storage, fried chicken can be frozen for up to 2-3 months. To freeze, arrange cooled pieces in a single layer on a baking sheet and freeze until solid. Then transfer the frozen pieces to a freezer-safe bag or container, separating layers with parchment paper to prevent sticking.
Reheating fried chicken properly is key to bringing back its crispiness. The microwave is generally not recommended, as it tends to make the coating soggy. The best method for reheating is in the oven or an air fryer. To reheat in the oven, preheat your oven to 375°F (190°C). Place the chicken pieces on a wire rack set over a baking sheet (this allows for even heating and keeps the bottom crispy). Bake for 15-20 minutes for refrigerated chicken, or 25-30 minutes for frozen chicken, until heated through and the coating is crispy again. For an air fryer, preheat to 350°F (175°C). Place chicken in a single layer in the air fryer basket and cook for 8-12 minutes for refrigerated chicken, or 15-20 minutes for frozen, flipping halfway through, until hot and crispy. Always ensure the internal temperature reaches 165°F (74°C) before serving.
Frequently Asked Questions
What kind of oil is best for frying chicken?
For frying chicken, it’s best to use oils with a high smoke point and a neutral flavor. Vegetable oil, canola oil, and peanut oil are excellent choices. Peanut oil is often favored for its extremely high smoke point and ability to impart a subtle, pleasant flavor, but vegetable or canola oil work just as well and are more commonly available.
How do I know if my chicken is cooked through without a thermometer?
While an instant-read thermometer is highly recommended for accuracy (it should read 165°F or 74°C in the thickest part of the meat), you can also check for doneness by piercing the thickest part of the chicken with a knife. The juices should run clear. If they are still pink or cloudy, the chicken needs more time. However, relying solely on this method can sometimes lead to overcooked or dry chicken, which is why a thermometer is preferred.
Why is my fried chicken soggy?
Soggy fried chicken is usually due to a few common issues. The most frequent culprit is oil that isn’t hot enough; low oil temperature causes the chicken to absorb too much oil instead of crisping up. Overcrowding the pot can also drop the oil temperature significantly. Additionally, not properly drying the chicken before dredging, or letting the cooked chicken sit on a flat surface (like paper towels) instead of a wire rack, can trap steam and moisture, leading to sogginess.
Can I make this recipe in an air fryer?
While you can make “fried” chicken in an air fryer, it will have a different texture than traditional deep-fried chicken. An air fryer will produce a crispy exterior, but it won’t achieve the same kind of craggy, deeply golden crust that comes from submerging the chicken in hot oil. If using an air fryer, you’ll still follow the marinating and dredging steps, then spray the coated chicken lightly with oil before air frying at around 375°F (190°C) for 20-30 minutes, flipping halfway, until cooked through and crispy.