Introduction
Imagine sinking your teeth into ribs so tender they practically melt in your mouth, the succulent meat effortlessly falling from the bone. Now, imagine achieving that culinary dream with minimal effort, thanks to the magic of your trusty crockpot. Crockpot barbecue ribs are the ultimate hands-off solution for achieving perfectly cooked, intensely flavorful ribs every single time. This isn’t just a meal; it’s an experience – a promise of sticky, sweet, and savory goodness that will have everyone reaching for seconds, all without the fuss and constant monitoring typically associated with barbecue.
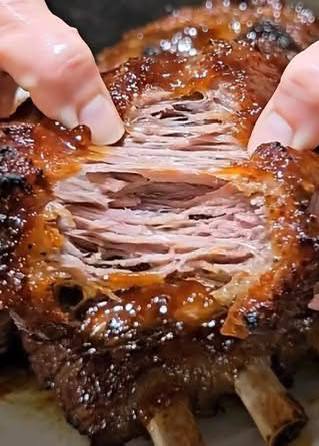
What makes crockpot ribs so special? It’s the slow, gentle cooking process that transforms tough cuts of meat into incredibly tender masterpieces. The moist, enclosed environment of the slow cooker ensures that every fiber of the rib is infused with flavor and moisture, preventing them from drying out. The result is a dish that boasts a rich, deep barbecue taste, a beautiful glossy glaze, and that coveted “fall-off-the-bone” texture that signals true barbecue perfection. Whether you’re a seasoned pitmaster or a kitchen novice, these crockpot ribs are designed to deliver restaurant-quality results right in your own home.
Get ready to unlock the secret to effortlessly delicious barbecue ribs. This recipe is more than just a set of instructions; it’s a gateway to stress-free entertaining, easy weeknight dinners, and a whole lot of satisfied smiles. We’ll guide you through every step, from selecting the best ribs to achieving that irresistible caramelized glaze, ensuring your crockpot barbecue ribs become an instant family favorite. Prepare to be amazed by how such a simple method can yield such incredibly rich and tender results.
Nutritional Information
Per serving (approximate values):
- Calories: 480
- Protein: 35g
- Carbohydrates: 25g
- Fat: 26g
- Fiber: 1g
- Sodium: 980mg
Ingredients
- 2-3 pounds pork spareribs or baby back ribs
- 1 tablespoon brown sugar, packed
- 1 tablespoon smoked paprika
- 1 teaspoon garlic powder
- 1 teaspoon onion powder
- 1 teaspoon kosher salt
- 1/2 teaspoon black pepper
- 1/4 teaspoon cayenne pepper (optional, for a kick)
- 1 cup chicken broth or apple juice
- 1/4 cup apple cider vinegar
- 1 cup your favorite barbecue sauce
Instructions
- Prepare the Ribs: Carefully remove the thin membrane from the back of the ribs. To do this, slide a butter knife under the membrane at one end of the rack, then grasp it with a paper towel and pull it firmly to remove. Trim any excess fat from the ribs. If your rack is too long for your crockpot, cut it into 2-3 smaller portions.
- Make the Dry Rub: In a small bowl, combine the brown sugar, smoked paprika, garlic powder, onion powder, kosher salt, black pepper, and cayenne pepper (if using). Mix well until thoroughly combined.
- Season the Ribs: Generously rub the dry rub mixture all over both sides of the prepared ribs. Make sure to get into all the nooks and crannies.
- Arrange in Crockpot: Pour the chicken broth (or apple juice) and apple cider vinegar into the bottom of your slow cooker. Stand the seasoned rib portions upright against the sides of the crockpot, or stack them if necessary. Try not to submerge them completely in the liquid, as the steam will do most of the work.
- Slow Cook: Cover the crockpot and cook on low for 6-8 hours, or on high for 3-4 hours, until the ribs are incredibly tender and the meat is easily pulling away from the bone. The exact cooking time will depend on your slow cooker and the thickness of your ribs.
- Apply BBQ Sauce & Finish (Optional but Recommended): Once the ribs are cooked, carefully remove them from the crockpot and place them on a foil-lined baking sheet. Discard the cooking liquid. Preheat your oven broiler to high.
- Broil for Glaze: Generously brush your favorite barbecue sauce over both sides of the cooked ribs. Place the baking sheet under the broiler for 3-5 minutes, watching carefully to prevent burning. You want the sauce to caramelize and become sticky and slightly bubbly. Alternatively, you can finish them on a hot grill for a few minutes per side for a smoky char.
- Rest and Serve: Let the ribs rest for 5-10 minutes before cutting them into individual portions between the bones. Serve immediately and enjoy the tender, fall-off-the-bone goodness!
Cooking Tips and Variations
Achieving truly perfect crockpot ribs goes beyond just following the steps; a few key tips can elevate your barbecue game significantly. First and foremost, never skip removing the membrane from the back of the ribs. This thin, silverskin layer becomes tough and chewy when cooked, preventing the ribs from becoming as tender as they should be and creating an unpleasant texture. A paper towel can provide a better grip when pulling it off. While some recipes call for a lot of liquid in the crockpot, remember that the goal is to steam and braise the ribs, not boil them. The minimal liquid suggested in this recipe, combined with the natural juices from the ribs, will create plenty of steam to ensure tenderness without diluting the flavor. Don’t overcrowd your slow cooker; if you have too many ribs, cook them in batches or use a larger slow cooker to ensure even cooking and proper steam circulation.
The dry rub is crucial for building a foundational layer of flavor. While this recipe provides a fantastic basic rub, feel free to customize it. For a spicier kick, increase the cayenne pepper or add a pinch of chili powder. If you prefer a sweeter profile, add an extra teaspoon of brown sugar. You can also experiment with different types of smoked paprika for varying smoky notes. For an even deeper flavor infusion, you can apply the dry rub to the ribs the night before and let them marinate in the refrigerator. This allows the spices to penetrate the meat more thoroughly. When it comes to the barbecue sauce, the sky’s the limit. Use your absolute favorite brand, or try making your own homemade sauce. Consider options like a smoky chipotle BBQ sauce for heat, a Carolina-style vinegar-based sauce for tang, or a classic Kansas City sweet and sticky sauce. The final broiling or grilling step is vital for that authentic barbecue finish. It caramelizes the sugars in the sauce, creating a beautiful glossy crust and intensifying the flavors, a step that cannot be achieved by simply cooking in the crockpot alone.
Beyond flavor, consider the type of ribs you choose. Baby back ribs are leaner and cook a bit faster, offering a tender, meatier bite. Spareribs, on the other hand, have more fat and connective tissue, which, when slow-cooked, renders down to create an incredibly rich and juicy result. St. Louis style ribs are spareribs that have been trimmed to a more uniform, rectangular shape, making them easier to handle. All types work wonderfully in the crockpot. For an aromatic boost, consider adding a sliced onion, a few cloves of smashed garlic, or even a bay leaf to the liquid in the crockpot. These aromatics will subtly infuse the ribs with additional depth of flavor as they cook. Don’t be afraid to experiment with the liquid base either; a dark beer or root beer can add unique sweet and malty notes to the final dish. Always ensure your ribs are cooked until the meat is easily pierced with a fork and shows no resistance, confirming that coveted fall-off-the-bone tenderness.
Storage and Reheating
Proper storage and reheating are key to enjoying your delicious crockpot barbecue ribs long after the initial meal. Allow any leftover ribs to cool completely to room temperature (within two hours of cooking) before storing. Once cooled, transfer the ribs to an airtight container. If you have any leftover barbecue sauce, you can store it separately or brush a little extra over the ribs before sealing the container. Stored properly in the refrigerator, these ribs will remain fresh and flavorful for 3-4 days. For longer storage, ribs can be frozen. Wrap individual portions tightly in plastic wrap, then place them in a freezer-safe bag or container. They will keep well in the freezer for up to 3 months.
When reheating, especially from the refrigerator, the goal is to warm them through without drying them out. The best method is often in the oven. Preheat your oven to 250-300°F (120-150°C). Place the ribs in an oven-safe dish, add a tablespoon or two of water or chicken broth to the bottom of the dish, and cover tightly with foil. This will create a steamy environment that helps re-moisturize the meat. Heat for 20-30 minutes, or until thoroughly warmed through. If you like a fresh glaze, you can brush with a little extra BBQ sauce and broil for a minute or two at the very end. From frozen, thaw the ribs in the refrigerator overnight before reheating in the oven as described above. Alternatively, for a quicker reheat, individual portions can be warmed in the microwave, though this method sometimes sacrifices tenderness and can make the sauce less appealing. If using the microwave, heat in short bursts, flipping occasionally, until hot.
Frequently Asked Questions
Can I use frozen ribs in the crockpot?
While technically possible, it’s highly recommended to thaw your ribs completely before placing them in the crockpot. Cooking frozen meat in a slow cooker can cause it to spend too much time in the “danger zone” temperature range, increasing the risk of bacterial growth. Thawing ensures safer cooking and more even results.
Do I have to remove the membrane?
Yes, absolutely! Removing the membrane (the silverskin on the underside of the ribs) is crucial for achieving truly tender, fall-off-the-bone ribs. If left on, the membrane becomes tough and chewy, preventing the meat from becoming as succulent as it should be. It’s a small step that makes a huge difference in the final texture.
My ribs aren’t “fall-off-the-bone” tender. What went wrong?
The most common reason for ribs not being tender enough is insufficient cooking time. Slow cookers vary, and rib thickness can impact cooking duration. If your ribs aren’t tender, simply continue cooking them on low for another 1-2 hours. You want the meat to easily pull away from the bone with just a gentle tug or a twist of a fork.