Introduction
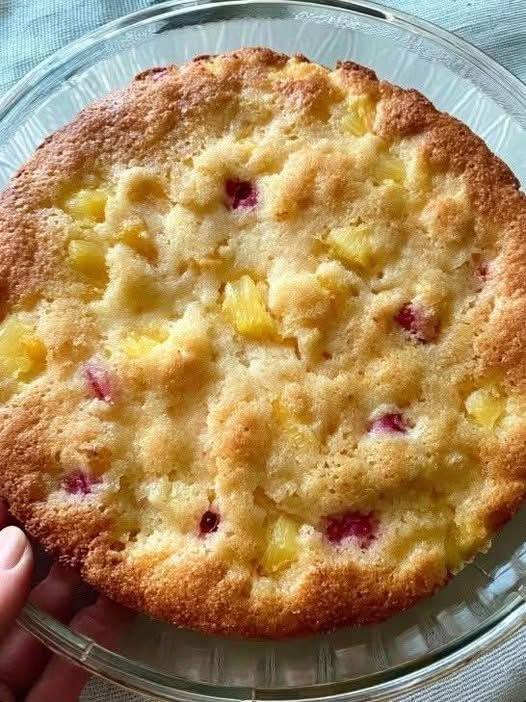
Get ready to meet your new favorite dessert: the Cuppa Cuppa Cake! This isn’t just any cake; it’s a celebration of simplicity, comfort, and undeniably delicious flavor, all wrapped up in one golden, fruit-studded package. Imagine a cake that’s incredibly moist, bursting with sweet pineapple and vibrant red fruit, and so easy to make that even the most novice baker can achieve perfection. The Cuppa Cuppa Cake is exactly that – an approachable, comforting treat that feels like a warm hug from your grandmother’s kitchen, yet requires minimal fuss and effort. It’s the kind of cake that disappears quickly from any gathering, leaving everyone craving another slice, and it’s perfect for everything from a casual weeknight dessert to a special occasion.
The magic behind the “Cuppa Cuppa” name lies in its delightfully straightforward approach to baking. Forget precise gram measurements or complex ratios; this recipe embraces the beauty of measuring by the cup, making it incredibly intuitive and forgiving. It’s a true “dump cake” in spirit, where ingredients are often combined with little more than a stir, yet the results are consistently spectacular. This method not only simplifies the baking process but also instills confidence in those who might typically shy away from baking. If you can measure a cup, you can absolutely master this cake. The promise here is a moist, tender crumb, rich with the natural sweetness of fruit, and a golden crust that beckons you to take that first bite. Prepare to fall in love with a cake that’s as delightful to make as it is to eat.
What truly sets the Cuppa Cuppa Cake apart is its irresistible combination of textures and flavors. Each bite offers a tender, buttery cake base complemented by juicy pockets of sweet pineapple and the intriguing tartness of vibrant red fruit. The golden-brown exterior gives way to a soft, fluffy interior, creating a sensory experience that is both satisfying and incredibly comforting. It’s a cake that doesn’t just taste good; it evokes a feeling of warmth, nostalgia, and pure homemade goodness. Whether you’re a seasoned baker looking for a quick and reliable recipe or a beginner eager to impress, the Cuppa Cuppa Cake promises a delicious adventure with minimal fuss and maximum flavor. Get ready to bake, enjoy, and share this delightful creation!
Nutritional Information
Per serving (approximate values):
- Calories: 320 kcal
- Protein: 4g
- Carbohydrates: 55g
- Fat: 10g
- Fiber: 2g
- Sodium: 250mg
Ingredients
- 1 ½ cups all-purpose flour
- 1 cup granulated sugar
- 1 teaspoon baking powder
- ½ teaspoon baking soda
- ¼ teaspoon salt
- 2 large eggs
- ½ cup unsalted butter, melted and cooled (or ½ cup vegetable oil)
- ½ cup buttermilk (or regular milk + 1 teaspoon lemon juice/vinegar)
- 1 teaspoon vanilla extract
- 1 cup crushed pineapple, well-drained
- ½ cup chopped maraschino cherries, well-drained (or other red fruit like cranberries)
- Optional: Powdered sugar for dusting, for serving
Instructions
- Preheat your oven to 350°F (175°C). Grease and flour a 9-inch round cake pan, or spray with non-stick baking spray.
- In a large mixing bowl, whisk together the all-purpose flour, granulated sugar, baking powder, baking soda, and salt until well combined.
- In a separate medium bowl, whisk together the eggs, melted butter (or oil), buttermilk, and vanilla extract until smooth.
- Pour the wet ingredients into the dry ingredients. Mix with a spatula or wooden spoon until just combined. Be careful not to overmix; a few lumps are okay. Overmixing can lead to a tough cake.
- Gently fold in the well-drained crushed pineapple and chopped maraschino cherries (or other red fruit) until evenly distributed throughout the batter. Ensure the fruit is thoroughly drained to prevent a soggy cake.
- Pour the cake batter into the prepared 9-inch round cake pan, spreading it evenly with the spatula.
- Bake for 30-40 minutes, or until a wooden skewer or toothpick inserted into the center of the cake comes out clean. The cake should be golden brown on top and spring back lightly when touched.
- Once baked, remove the cake from the oven and let it cool in the pan on a wire rack for 10-15 minutes.
- After cooling slightly in the pan, carefully invert the cake onto the wire rack to cool completely. If serving warm, you can serve after about 20-30 minutes of cooling.
- Once completely cooled, you can dust the top with powdered sugar for a simple and elegant finish, if desired. Slice and serve!
Cooking Tips and Variations
For the ultimate Cuppa Cuppa Cake experience, don’t overmix the batter. Overmixing develops the gluten in the flour too much, leading to a tough, dense cake. Mix until just combined, even if a few small lumps remain. The key to a moist cake is to ensure your fruit is thoroughly drained. Whether using canned pineapple or maraschino cherries, press out as much liquid as possible. Excess moisture can make your cake soggy in the middle. If using fresh fruit like raspberries or chopped peaches, pat them dry with a paper towel before folding them into the batter. Always preheat your oven completely before baking; this ensures an even rise and proper cooking. Oven temperatures can vary, so keep an eye on your cake, especially during the last 10 minutes of baking. A toothpick test is the most reliable indicator of doneness.
Feel free to get creative with your fruit choices! This cake is incredibly versatile. Instead of pineapple and cherries, try a cup of mixed berries (blueberries, raspberries, blackberries), diced peaches, chopped apples with a sprinkle of cinnamon, or even a can of fruit cocktail, well-drained. For an extra flavor boost, consider adding a teaspoon of almond extract in addition to or instead of vanilla, especially if using cherries or berries. A pinch of nutmeg or cardamom can also elevate the flavor profile. If you prefer a richer, more decadent cake, you can substitute half of the buttermilk with sour cream or plain yogurt. For a delightful topping, instead of just powdered sugar, consider a simple glaze made from powdered sugar and a little milk or lemon juice, drizzled over the cooled cake. You could also serve it warm with a scoop of vanilla ice cream or a dollop of whipped cream.
Storage and Reheating
To store your Cuppa Cuppa Cake, ensure it has cooled completely to room temperature. Once cool, place the cake in an airtight container. It can be stored at room temperature for up to 2-3 days. For longer storage, you can refrigerate the cake for up to 5-7 days. If refrigerating, it’s best to bring slices back to room temperature before serving for the best flavor and texture. The cake can also be frozen for up to 2-3 months. To freeze, wrap individual slices or the whole cake (if uncut) tightly in plastic wrap, then an additional layer of aluminum foil. Thaw frozen cake overnight in the refrigerator, then bring to room temperature before serving.
Reheating this cake is simple if you prefer it warm, especially if serving with ice cream. For individual slices, you can gently warm them in a microwave for 15-30 seconds, or until just warm, being careful not to overheat, which can dry out the cake. Alternatively, you can warm slices in a preheated oven at 250°F (120°C) for about 5-10 minutes, or until warmed through. If reheating a larger portion or the whole cake, cover it loosely with foil to prevent drying and warm in a 300°F (150°C) oven for 15-20 minutes, or until heated through. Always ensure the cake is covered when reheating in the oven to maintain its moisture.
Frequently Asked Questions
Can I use fresh fruit instead of canned?
Yes, absolutely! If using fresh pineapple, make sure to peel, core, and dice it into small pieces. For fresh red fruits like raspberries or chopped strawberries, gently pat them dry with a paper towel to remove excess moisture, which can make the cake soggy. Using fresh fruit can often enhance the natural flavors of the cake.
What can I use if I don’t have buttermilk?
No buttermilk? No problem! You can easily make a substitute at home. Simply pour ½ cup of regular milk (whole, 2%, or even skim) into a measuring cup, then stir in 1 teaspoon of lemon juice or white vinegar. Let it sit for 5-10 minutes until it slightly curdles. This DIY buttermilk will work perfectly in the recipe, providing the necessary acidity and moisture.
My cake came out a bit dry. What went wrong?
A dry cake is often a result of overbaking or overmixing. Ensure you’re testing for doneness with a toothpick and removing the cake from the oven as soon as it comes out clean. Ovens can vary, so the baking time is a guideline. Also, remember to mix the batter until just combined; vigorous or prolonged mixing can develop gluten, leading to a tougher, drier texture. Using a good quality, well-drained fruit also helps maintain moisture.
Can I make this cake in a different pan size?
While the recipe specifies a 9-inch round pan, you can adapt it. If using an 8-inch round pan, the cake will be thicker and may require an additional 5-10 minutes of baking time. If using a 9×13 inch rectangular pan, the cake will be thinner, and the baking time will likely be reduced to 25-35 minutes. Always adjust baking time and use the toothpick test to ensure proper doneness when changing pan sizes.