Introduction
There’s something undeniably magical about a perfectly crafted piece of old-fashioned fudge. It evokes memories of childhood, holiday gatherings, and the simple joy of a truly decadent treat. This isn’t just any fudge; this is a rich, smooth, melt-in-your-mouth confection that promises to transport you to a state of pure chocolate bliss with every bite. Forget the grainy, crumbly disappointments of the past; our Decadent Old Fashioned Fudge recipe is designed to deliver a consistently perfect texture and an intensely satisfying chocolate flavor that will have everyone begging for more.
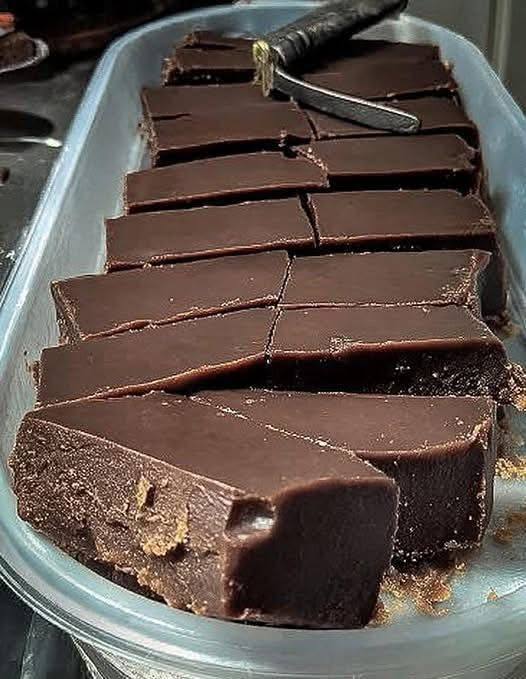
What makes this particular fudge so special? It’s the harmonious blend of classic techniques and high-quality ingredients, resulting in a fudge that is both firm enough to hold its shape beautifully and exquisitely soft to the bite. The deep, dark brown hue and slightly glossy surface hint at the luxurious experience awaiting you. Each square is a testament to the timeless appeal of homemade sweets, proving that some traditions are simply too delicious to ever fade away. Whether you’re a seasoned fudge maker or a curious beginner, prepare to master the art of creating this beloved dessert.
This recipe isn’t just about making fudge; it’s about creating an experience. It’s perfect for gifting during the holidays, a delightful addition to any dessert spread, or simply a well-deserved treat for yourself after a long day. We’ve meticulously broken down each step, ensuring that even first-time fudge makers can achieve professional-quality results. Get ready to impress your friends and family with a homemade confection that tastes like it came straight from a gourmet candy shop, but with all the love and care only a home kitchen can provide.
Nutritional Information
Per serving (approximate values, based on 36 servings from an 8×8 inch pan):
- Calories: 220-250
- Protein: 2-3g
- Carbohydrates: 30-35g
- Fat: 10-15g
- Fiber: 1-2g
- Sodium: 50-70mg
Ingredients
- 4 ½ cups granulated sugar
- 1 ½ cups whole milk
- 1 cup (2 sticks) unsalted butter, cut into cubes
- 1 teaspoon salt
- 12 ounces (about 2 cups) high-quality semi-sweet chocolate chips or chopped semi-sweet chocolate bar
- 1 (7-ounce) jar marshmallow creme (fluff)
- 2 teaspoons pure vanilla extract
Instructions
- Prepare Your Pan: Grease an 8×8 inch square baking pan with butter or line it with parchment paper, leaving an overhang on two sides to easily lift the fudge out later. Set aside.
- Combine Wet Ingredients: In a large, heavy-bottomed saucepan (at least 4-quart capacity to prevent boil-overs), combine the granulated sugar, whole milk, unsalted butter, and salt.
- Bring to a Boil: Place the saucepan over medium heat. Stir constantly with a wooden spoon or heat-proof spatula until the butter is melted and the sugar is fully dissolved. Once dissolved, stop stirring.
- Boil to Temperature: Bring the mixture to a rolling boil. Insert a candy thermometer, ensuring the tip does not touch the bottom of the pan. Continue to boil without stirring until the thermometer reaches 234-238°F (112-114°C), which is the soft-ball stage. This usually takes about 5-10 minutes once boiling begins.
- Remove from Heat and Add Chocolate & Marshmallow: Immediately remove the saucepan from the heat once the desired temperature is reached. Quickly add the chocolate chips (or chopped chocolate) and the entire jar of marshmallow creme to the hot mixture.
- Do NOT Stir Yet: Allow the chocolate and marshmallow creme to sit on top of the hot mixture, undisturbed, for about 5 minutes. This allows them to melt from the residual heat.
- Add Vanilla and Beat: After 5 minutes, add the pure vanilla extract. Using a wooden spoon or a stand mixer with a paddle attachment (if you have one, this makes beating easier), begin to beat the fudge mixture vigorously. Beat constantly until the fudge thickens significantly, loses its glossy sheen, and becomes very creamy and slightly stiff. This beating process is crucial for achieving a smooth, non-grainy texture and typically takes 5-7 minutes by hand, or 3-5 minutes with a stand mixer. You’ll notice the mixture becoming difficult to stir and starting to pull away from the sides of the pan.
- Pour into Prepared Pan: Immediately pour the hot, beaten fudge into the prepared 8×8 inch pan. Work quickly, as the fudge will set rapidly.
- Smooth and Cool: Using an offset spatula or the back of a spoon, quickly spread the fudge evenly into the pan. Do not press down too hard, as this can squeeze out butter.
- Set the Fudge: Allow the fudge to cool completely at room temperature for at least 2-4 hours, or until firm. Do not refrigerate immediately, as rapid cooling can sometimes lead to a drier texture. Once firm, you can transfer it to the refrigerator for about 30 minutes to make cutting easier, if desired.
- Cut and Serve: Once fully set, use the parchment paper overhang to lift the fudge out of the pan. Place it on a cutting board and cut into 1-inch squares using a sharp knife. For clean cuts, wipe the knife blade clean between cuts.
Cooking Tips and Variations
Achieving perfect fudge every time is a skill that comes with a few key insights. Firstly, invest in a reliable candy thermometer. This is arguably the most critical tool for fudge making, as reaching the precise soft-ball stage (234-238°F or 112-114°C) is paramount to achieving the right texture. Too low, and your fudge won’t set properly; too high, and it will be dry and crumbly. Always ensure the thermometer’s tip isn’t touching the bottom of the pan, which can give an inaccurate reading. Another common pitfall is sugar crystallization, which leads to grainy fudge. To avoid this, once your sugar, milk, and butter mixture comes to a boil, refrain from stirring it. Any sugar crystals clinging to the sides of the pan can be gently brushed down with a wet pastry brush. The initial stirring to dissolve the sugar is fine, but once boiling, let it cook undisturbed to temperature. The quality of your ingredients also plays a significant role; using good quality semi-sweet chocolate will yield a superior flavor profile, making your fudge truly decadent. Pure vanilla extract, as opposed to imitation, also contributes to a richer, more authentic taste.
When it comes to the beating stage, patience and speed are key. The rapid beating helps to form small sugar crystals, which is what gives fudge its characteristic smooth texture. If you under-beat, the crystals will be too large, resulting in grainy fudge. If you over-beat, the fudge can become crumbly. You’re looking for that moment when the fudge loses its glossy sheen and begins to thicken significantly, becoming fudgy and slightly stiff. Work quickly once it reaches this stage, as it sets fast. Humidity can also affect fudge making; on very humid days, sugar mixtures tend to absorb more moisture, which can make it harder for the fudge to set or cause it to be softer. Some experienced fudge makers will boil their mixture a degree or two higher on humid days to compensate. Always allow the fudge to cool completely at room temperature before cutting; rushing this step can cause it to crumble or not hold its shape as well.
Variations can transform this classic recipe into new and exciting treats. For a nutty twist, fold in 1 to 1 ½ cups of chopped pecans, walnuts, or almonds after the beating stage, just before pouring into the pan. You can experiment with different types of chocolate; using dark chocolate chips will result in a more intense, less sweet fudge, while milk chocolate will yield a creamier, sweeter version. For a hint of mint, add ½ teaspoon of peppermint extract along with the vanilla. A pinch of cayenne pepper can be added for a subtle spicy kick in a Mexican hot chocolate-inspired fudge. Swirl in a couple of tablespoons of creamy peanut butter or a spoonful of caramel sauce just before pouring for a marbled effect and added flavor. You can also press mini marshmallows, sprinkles, or crushed candy canes on top of the fudge while it’s still warm but starting to set, for visual appeal and extra texture. The possibilities are endless, allowing you to customize this decadent base to suit any craving or occasion.
Storage and Reheating
Proper storage is essential for maintaining the freshness and perfect texture of your decadent old-fashioned fudge. Once the fudge has completely cooled and been cut into squares, it should be stored in an airtight container at room temperature. Lining the container with parchment paper and placing parchment paper between layers of fudge can prevent the pieces from sticking together. Stored this way, the fudge will remain fresh and delicious for up to 1-2 weeks. Avoid direct sunlight or warm environments, as this can cause the fudge to soften and potentially melt or become sticky. If you live in a very warm or humid climate, you may opt to store your fudge in the refrigerator. However, be aware that refrigeration can sometimes alter the texture slightly, making it firmer or drier. If refrigerating, ensure it’s in a well-sealed container to prevent it from absorbing odors from other foods. When serving refrigerated fudge, allow it to come to room temperature for about 15-30 minutes before enjoying, as this will restore its creamy, melt-in-your-mouth texture.
For longer-term storage, fudge freezes beautifully. Wrap individual pieces or small batches tightly in plastic wrap, then place them in an airtight freezer-safe container or freezer bag. Frozen fudge can last for up to 3 months. To thaw, simply remove the desired amount from the freezer and let it sit at room temperature for several hours or overnight until completely defrosted. Do not attempt to speed up the thawing process in the microwave, as this can melt the fudge unevenly and ruin its texture. Fudge is generally not meant to be “reheated” in the traditional sense, as it’s a confection enjoyed at room temperature. If your fudge has become dry or crumbly due to improper storage, unfortunately, it’s difficult to fully restore its original texture. The best approach is always to store it correctly from the start to preserve its decadent quality.
Frequently Asked Questions
Why did my fudge turn out grainy?
Grainy fudge is a common issue and is usually caused by sugar crystallization. This happens when sugar crystals don’t fully dissolve or reform into large crystals during the cooking and cooling process. To prevent this, ensure all sugar is dissolved before the mixture comes to a boil, avoid stirring the mixture once it’s boiling (brush down any crystals on the side of the pan with a wet pastry brush), and beat the fudge vigorously and continuously after adding the chocolate and marshmallow until it loses its gloss and thickens appropriately. The beating process helps create very small, undetectable sugar crystals, resulting in a smooth texture.
My fudge didn’t set. What went wrong?
If your fudge didn’t set, it’s most likely because the mixture didn’t reach the correct temperature during boiling. The soft-ball stage (234-238°F or 112-114°C) is crucial for the sugar syrup to reach the right concentration to set properly. An inaccurate candy thermometer or removing the mixture from the heat too early can lead to unset fudge. Ensure your candy thermometer is accurate by testing it in boiling water (it should read 212°F/100°C). Humidity can also affect setting; on very humid days, you might need to cook the fudge a degree or two higher.
Can I make this fudge without a candy thermometer?
While it is possible to make fudge without a candy thermometer using the “cold water test” method, it is significantly more challenging to achieve consistent and perfect results. The cold water test involves dropping a small amount of the boiling sugar mixture into a cup of very cold water and observing its consistency. For the soft-ball stage, it should form a soft, pliable ball that can be flattened between your fingers but doesn’t dissolve. However, this method requires practice and experience to accurately judge the stage. For reliable and decadent fudge, a candy thermometer is highly recommended as it removes the guesswork.
How can I make my fudge extra glossy?
The glossiness of fudge often comes from the fat content and the way it’s handled during cooling. Using high-quality butter and chocolate contributes to a natural sheen. To encourage glossiness, ensure you don’t over-beat the fudge; beat it just until it loses its initial high gloss and thickens. Also, avoid pressing down too hard when spreading the fudge into the pan, as this can sometimes squeeze out butter and dull the surface. Allowing the fudge to cool slowly and undisturbed at room temperature, rather than rushing it in the refrigerator, can also help maintain a beautiful, slightly glossy finish.