Instructions
- Prepare the Crust: Preheat your oven to 350°F (175°C). Line an 8×8-inch baking pan with parchment paper, leaving an overhang on the sides to easily lift out the bars later.
- In a medium bowl, combine the almond flour, granulated erythritol/monk fruit sweetener, xanthan gum (if using), and salt. Stir until well combined.
- Add the melted butter and vanilla extract to the dry ingredients. Mix with a fork or your hands until the mixture resembles wet sand and holds together when pressed.
- Press the crust mixture evenly into the bottom of the prepared baking pan. Use the back of a spoon or your fingers to compact it firmly.
- Bake the crust for 12-15 minutes, or until lightly golden brown around the edges. Remove from the oven and let it cool completely on a wire rack while you prepare the filling.
- Prepare the Gelatin: In a small bowl, sprinkle the unflavored gelatin powder over ¼ cup of cold water. Let it sit for 5-10 minutes to bloom (thicken and become jelly-like).
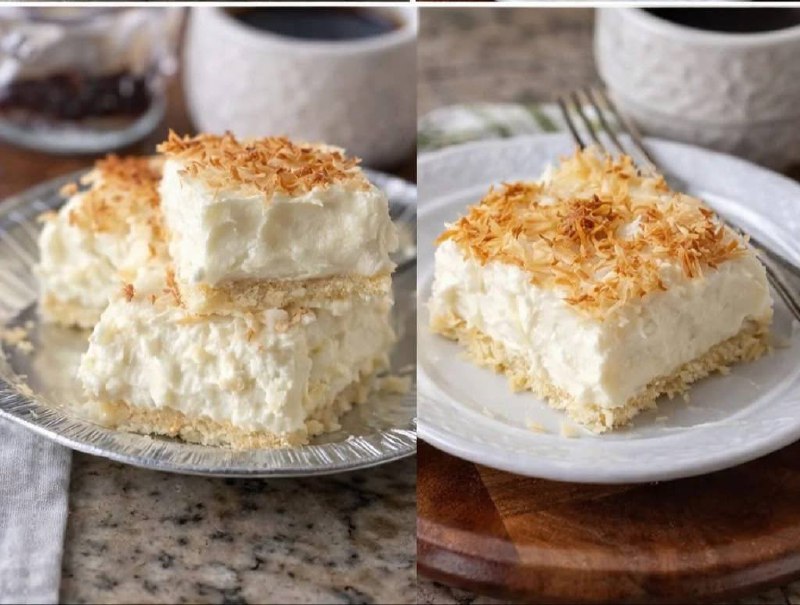
- Prepare the Coconut Cream Filling: While the gelatin is blooming, open the chilled can of full-fat coconut milk. Scoop out only the thick, solid cream from the top, leaving the watery liquid behind (you should get about 1 cup of cream).
- In a large mixing bowl, beat the softened cream cheese with an electric mixer until smooth and creamy, about 2 minutes.
- Add the thick coconut cream, powdered erythritol/monk fruit sweetener, 2 tablespoons unsweetened shredded coconut, vanilla extract, and optional coconut extract to the cream cheese. Beat on medium speed until the mixture is light, fluffy, and well combined, scraping down the sides of the bowl as needed.
- Dissolve the Gelatin: Once the gelatin has bloomed, microwave it for 10-15 seconds, or until it becomes clear and liquid again. Be careful not to boil it.
- With the mixer on low speed, slowly pour the dissolved gelatin into the coconut cream filling mixture. Increase the speed to medium-high and beat for another 1-2 minutes until everything is thoroughly incorporated and the filling is smooth.
- Assemble the Bars: Pour the coconut cream filling evenly over the cooled crust in the baking pan. Use an offset spatula or the back of a spoon to spread it smooth.
- Cover the pan loosely with plastic wrap and refrigerate for at least 4 hours, or preferably overnight, until the bars are completely set and firm.
- Toast the Coconut Topping: While the bars are chilling or just before serving, preheat your oven to 300°F (150°C). Spread the ½ cup unsweetened shredded coconut in a single layer on a baking sheet.
- Toast for 5-10 minutes, stirring every 2-3 minutes, until the coconut is golden brown and fragrant. Watch it closely as it can burn quickly. Remove from the oven and let it cool completely.
- Serve: Once the bars are fully set, use the parchment paper overhangs to carefully lift the entire slab out of the pan. Place it on a cutting board.
- Cut the bars into 16 squares using a sharp knife. For cleaner cuts, you can run the knife under hot water and wipe it clean between each slice.
- Sprinkle the toasted coconut evenly over the top of the bars just before serving. Enjoy your delicious Diabetes-Friendly Coconut Cream Bars!
Cooking Tips and Variations
For the best results with your Diabetes-Friendly Coconut Cream Bars, consistency is key, especially when it comes to chilling. Ensure your full-fat coconut milk is well-chilled overnight in the refrigerator. This allows the thick cream to separate from the liquid, which is crucial for achieving a firm, rich filling. When scooping out the cream, try to get as much of the solid part as possible and leave the watery liquid behind. If your cream cheese isn’t soft enough, it will result in a lumpy filling. Let it sit at room temperature for at least 30-60 minutes before you start mixing.
When toasting the shredded coconut for the topping, keep a close eye on it. Coconut goes from perfectly golden to burnt very quickly. Stir it frequently and remove it from the oven as soon as you achieve your desired color and aroma. Allowing the crust to cool completely before adding the filling is also important; a warm crust can cause the filling to melt and not set properly.
For variations, you can experiment with different extracts in the filling. A few drops of almond extract can complement the coconut beautifully, or a touch of lime zest can add a bright, zesty twist, turning them into a “key lime pie” inspired bar. For an extra touch of decadence, you could drizzle a sugar-free chocolate sauce over the top before serving, or sprinkle with finely chopped sugar-free nuts like pecans or macadamia nuts. To make them even lower in carbs, you could omit the xanthan gum in the crust; it’s there to add a little extra crispness but isn’t essential for structure. You can also adjust the amount of sweetener in both the crust and the filling to suit your personal taste preferences, but remember to taste as you go.
Storage and Reheating
These Diabetes-Friendly Coconut Cream Bars are best stored in an airtight container in the refrigerator. They will maintain their freshness and texture for up to 5 days. It’s important to keep them chilled, as the filling is cream cheese-based and will soften significantly at room temperature. If you’ve already added the toasted coconut topping, it might lose some of its crispness over time due to moisture from the filling. For optimal texture, you can store the toasted coconut separately and sprinkle it on just before serving each bar.
These bars are not really suitable for reheating, as they are a chilled dessert and heating would cause the filling to melt and become runny. They are meant to be enjoyed cold, straight from the refrigerator. For longer storage, you can freeze the bars. Place the cut bars on a baking sheet lined with parchment paper and freeze until solid, about 2-3 hours. Then, transfer the frozen bars to an airtight freezer-safe container or a freezer bag, separating layers with parchment paper to prevent sticking. They can be stored in the freezer for up to 1 month. To enjoy, simply remove a bar from the freezer and let it thaw in the refrigerator for a few hours, or at room temperature for about 15-30 minutes, until it reaches a desirable consistency. Do not refreeze thawed bars.
Frequently Asked Questions
Can I use a different type of flour for the crust?
For a diabetes-friendly and low-carb crust, almond flour is highly recommended. Coconut flour can be used, but it absorbs much more liquid, so the amount would need to be significantly reduced (likely by half or more) and additional liquid might be required. Other flours like wheat flour would significantly increase the carbohydrate content and would no longer be considered diabetes-friendly or low-carb.
Why do I need to chill the coconut milk overnight?
Chilling a can of full-fat coconut milk overnight allows the thick, solid coconut cream to separate and rise to the top, leaving the watery liquid at the bottom. For this recipe, you only want the thick cream, which gives the filling its rich, creamy texture and helps it set properly. If you don’t chill it, the cream and liquid will be mixed, and your filling will be too thin and won’t set.
Can I make these bars dairy-free?
Yes, you can make these bars dairy-free. For the crust, use a dairy-free butter substitute (like a vegan butter stick) instead of regular butter. For the filling, substitute the cream cheese with a dairy-free cream cheese alternative. Ensure the coconut milk you use is full-fat and intended for culinary use. Always check ingredient labels to confirm they meet your dietary needs.
What if my bars don’t set firmly?
There are a few reasons why your bars might not set firmly. The most common reasons include not using enough of the thick coconut cream (using too much of the watery part of the coconut milk), not letting the gelatin bloom properly, or not allowing the bars to chill for a long enough time. Ensure your gelatin is fully dissolved before adding it, and always allow the full chilling time (preferably overnight) for the best results.