Introduction
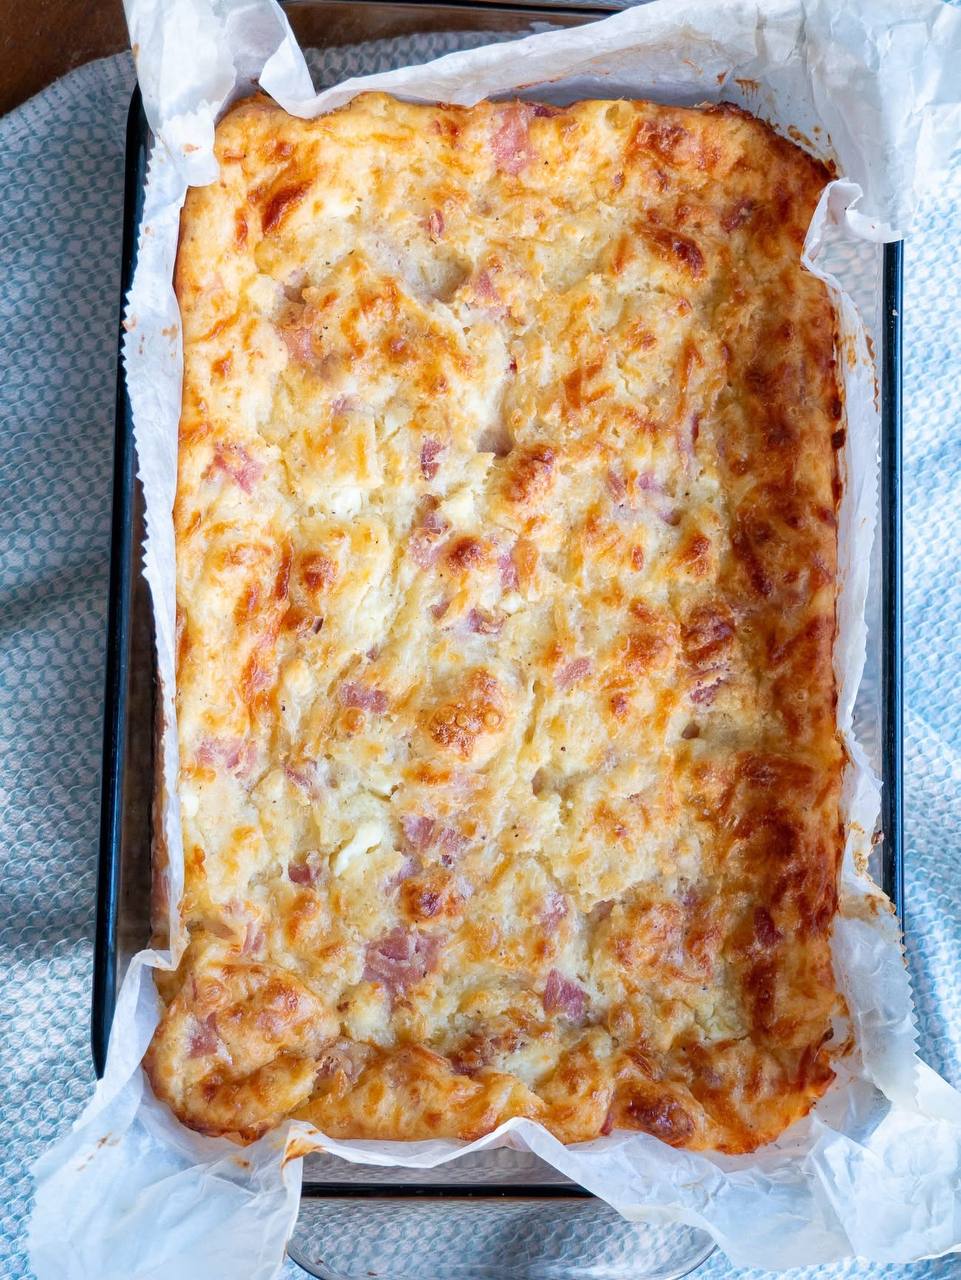
There’s nothing quite like waking up to the aroma of a hearty, bubbling breakfast bake, and this Ham and Cheese Breakfast Bake is the epitome of morning comfort. Imagine tender chunks of savory ham, melty cheese, and a fluffy, golden-brown base, all baked together in one dish. It’s the kind of breakfast that makes everyone gather around the table, perfect for a leisurely weekend brunch, a holiday feast, or even a comforting weeknight dinner when you’re craving something warm and satisfying.
This recipe isn’t just delicious; it’s incredibly versatile and designed for convenience. Whether you’re feeding a hungry crowd or looking for a delicious make-ahead option to simplify your mornings, this bake delivers. Its simple ingredients come together to create a dish that’s both familiar and exciting, offering a perfect balance of savory flavors and a wonderfully satisfying texture. Plus, with a few clever tips, you can customize it to your heart’s content, making it a staple in your recipe rotation.
What sets this Ham and Cheese Breakfast Bake apart is its incredible ability to be both effortlessly easy and deeply flavorful. The combination of salty ham with rich, gooey cheese nestled in a light, egg- and potato-based custard creates a symphony of tastes and textures that will have everyone asking for seconds. It’s truly weekend brunch perfection in a pan, and we can’t wait for you to try it!
Nutritional Information
Per serving (approximate values):
- Calories: 380
- Protein: 25g
- Carbohydrates: 20g
- Fat: 22g
- Fiber: 2g
- Sodium: 950mg
Ingredients
- 1 tablespoon olive oil or butter
- 1 cup diced yellow onion (about 1 medium onion)
- 1 cup diced bell pepper (any color, about 1 medium bell pepper)
- 4 cups frozen shredded hash browns, thawed (or 4 cups diced cooked potatoes)
- 2 cups cooked ham, diced into 1/2-inch pieces
- 1 1/2 cups shredded sharp cheddar cheese, divided
- 1/2 cup shredded Monterey Jack cheese (or another good melting cheese)
- 8 large eggs
- 1 1/2 cups whole milk (or half-and-half for a richer bake)
- 1 teaspoon Dijon mustard
- 1/2 teaspoon garlic powder
- 1/4 teaspoon black pepper
- 1/4 teaspoon salt (adjust based on ham’s saltiness)
- Optional: 2 tablespoons chopped fresh chives or parsley for garnish
Instructions
- Preheat your oven to 375°F (190°C). Lightly grease a 9×13 inch baking dish or line it with parchment paper, leaving an overhang on the sides for easy lifting.
- Heat the olive oil or butter in a large skillet over medium heat. Add the diced onion and bell pepper and cook for 5-7 minutes, or until softened.
- Add the thawed hash browns (or diced cooked potatoes) to the skillet with the onions and bell peppers. Cook for another 5-8 minutes, stirring occasionally, until the hash browns start to lightly brown and some of the moisture has evaporated. This step helps ensure the potatoes are tender and adds flavor.
- Spread the cooked potato mixture evenly over the bottom of the prepared baking dish.
- Distribute the diced ham evenly over the potato layer.
- Sprinkle 1 cup of the shredded sharp cheddar cheese and all of the Monterey Jack cheese over the ham layer.
- In a large bowl, whisk together the eggs, milk, Dijon mustard, garlic powder, black pepper, and salt until well combined and frothy.
- Carefully pour the egg mixture evenly over the cheese and ham layers in the baking dish. Gently shake the dish or use a spatula to ensure the egg mixture seeps down into all the nooks and crannies.
- Sprinkle the remaining 1/2 cup of shredded sharp cheddar cheese over the top of the bake.
- Bake for 40-50 minutes, or until the top is golden brown, the edges are set, and a knife inserted into the center comes out clean (indicating the eggs are fully cooked). If the top starts to brown too quickly, you can loosely tent it with aluminum foil.
- Once baked, remove the dish from the oven and let it rest for 5-10 minutes before slicing and serving. This resting time allows the bake to set further, making for cleaner cuts.
- Garnish with fresh chives or parsley, if desired, before serving.
Cooking Tips and Variations
To ensure your Ham and Cheese Breakfast Bake turns out perfectly every time, consider these cooking tips. First and foremost, always line your baking dish with parchment paper. This simple step makes for incredibly easy removal of the bake from the dish and even easier cleanup, preventing any sticking. When it comes to achieving that beautiful golden-brown crust, make sure your oven is preheated to the correct temperature. If you find the top isn’t as golden as you’d like towards the end of baking, you can place it under the broiler for 1-2 minutes, but watch it very carefully as it can go from golden to burnt quickly!
For checking doneness, a good indicator is when the edges are set and lightly browned, and the center no longer jiggles. If you insert a knife or a wooden skewer into the center, it should come out clean, indicating the eggs are fully cooked. After removing the bake from the oven, allow it to rest for 5-10 minutes. This crucial resting time allows the internal structure of the bake to set, resulting in cleaner, more defined slices and preventing it from falling apart when served.
When choosing your ham, pre-cooked diced ham is a fantastic time-saver. You can also use leftover holiday ham, which adds a wonderful depth of flavor, or even thick-cut deli ham cut into small cubes. For the cheese, don’t be afraid to experiment with a cheese blend. A combination of sharp cheddar for its robust flavor and Monterey Jack or mozzarella for its excellent melting properties creates a more complex and satisfying cheesy experience. You could also try Gruyere, Swiss, or even a touch of smoked gouda for a different twist.
This recipe is highly customizable! Feel free to add more vegetables to boost the nutrition and flavor. Sautéed mushrooms, finely chopped spinach (make sure to squeeze out excess water), or even a handful of frozen peas can be added along with the ham. A pinch of red pepper flakes can introduce a subtle heat, or a dash of hot sauce in the egg mixture for a bolder kick. If you prefer a completely potato-free version, you can omit the hash browns and increase the egg mixture slightly, or replace them with a layer of sautéed vegetables like zucchini or sweet potatoes.
For a make-ahead option, you can assemble the entire bake (steps 1-9) the night before, cover it tightly with plastic wrap, and refrigerate. In the morning, simply remove it from the fridge while the oven preheats, then bake as directed, adding an extra 10-15 minutes to the baking time since it will be starting from cold. This makes busy mornings so much easier!
Storage and Reheating
Storing your Ham and Cheese Breakfast Bake properly will ensure you can enjoy delicious leftovers for days. Once the bake has cooled completely to room temperature, cover the baking dish tightly with plastic wrap or aluminum foil. Alternatively, you can cut the bake into individual servings and store them in airtight containers. Refrigerate for up to 3-4 days. For longer storage, the breakfast bake can be frozen. Cut it into individual portions, wrap each portion tightly in plastic wrap, then aluminum foil, and place them in a freezer-safe bag or container. It will keep well in the freezer for up to 2-3 months.
When it comes to reheating, there are a few good options depending on whether you’re reheating a single slice or the entire remaining bake. For individual slices from the refrigerator, the microwave is your quickest friend. Place a slice on a microwave-safe plate and heat for 1-2 minutes, or until warmed through. Be careful not to overheat, as this can make the eggs rubbery. For a crispier texture, you can reheat individual slices in a toaster oven or a regular oven at 350°F (175°C) for 10-15 minutes, or until heated through and the cheese is bubbly again.
If you’re reheating a larger portion or the entire remaining bake from the refrigerator, cover it loosely with foil to prevent the top from over-browning, and bake in a preheated oven at 325°F (160°C) for 20-30 minutes, or until warmed through. If reheating from frozen, it’s best to thaw individual portions in the refrigerator overnight. Then, reheat them using the methods described above for refrigerated portions. You can also reheat directly from frozen in the oven, but it will take considerably longer (45-60 minutes or more for a larger piece), and you might need to adjust the temperature to prevent drying out.
Frequently Asked Questions
Can I prepare this Ham and Cheese Breakfast Bake ahead of time?
Absolutely! This recipe is fantastic for make-ahead convenience. You can assemble the entire bake, including layering all the ingredients and pouring the egg mixture, the night before. Cover the dish tightly with plastic wrap and refrigerate. In the morning, remove it from the fridge while your oven preheats, then bake as directed, adding an extra 10-15 minutes to the baking time to account for starting with a cold dish.
What kind of ham is best for this recipe?
For this breakfast bake, pre-cooked diced ham is the most convenient option. This can be found in most grocery stores in the refrigerated meats section. You can also use leftover holiday ham, which adds a wonderful flavor, or even thick-cut deli ham that you dice yourself. Just make sure it’s cooked ham, as raw ham would require different preparation.
Can I add other vegetables to this breakfast bake?
Yes, this recipe is incredibly versatile and welcomes additions! Sautéed vegetables like mushrooms, finely chopped spinach (make sure to squeeze out all excess moisture), zucchini, or even a handful of frozen peas or corn kernels would work wonderfully. You can add them along with the ham layer. Just be sure to pre-cook any harder vegetables like bell peppers or onions to ensure they are tender by the end of the baking time.
How do I prevent my breakfast bake from becoming watery?
To prevent a watery breakfast bake, especially if using vegetables with high water content like spinach or mushrooms, make sure to thoroughly sauté them and squeeze out any excess moisture before adding them to the bake. If using frozen hash browns, ensure they are fully thawed and any excess ice is drained. Also, avoid overfilling the baking dish, as too many ingredients can lead to a denser, potentially watery result.