Introduction
Imagine the bright, zesty aroma filling your kitchen – that’s the irresistible allure of homemade lemon curd! This vibrant, silky-smooth spread is a true ray of sunshine in a jar, offering a perfect balance of tangy and sweet that awakens the taste buds. Unlike its often bland store-bought counterparts, homemade lemon curd boasts a depth of flavor and a luxurious, creamy texture that simply can’t be replicated. It’s a versatile condiment, equally at home slathered on warm toast, dolloped onto fluffy scones, or forming the luscious filling for elegant tarts and cakes. Once you experience the superior taste and satisfaction of crafting this golden confection yourself, you’ll wonder why you ever settled for anything less.
Making your own lemon curd is a surprisingly simple culinary adventure, requiring just a handful of basic ingredients and a little patience. The magic happens as fresh lemon juice and zest mingle with rich egg yolks, sugar, and butter, slowly transforming into a thick, glossy masterpiece. The process itself is therapeutic, and the reward is a batch of intensely flavored curd that radiates homemade goodness. This recipe is designed to guide you through each step, ensuring a perfect result every time – a smooth, vibrant yellow creation that’s as beautiful to behold as it is delicious to taste.
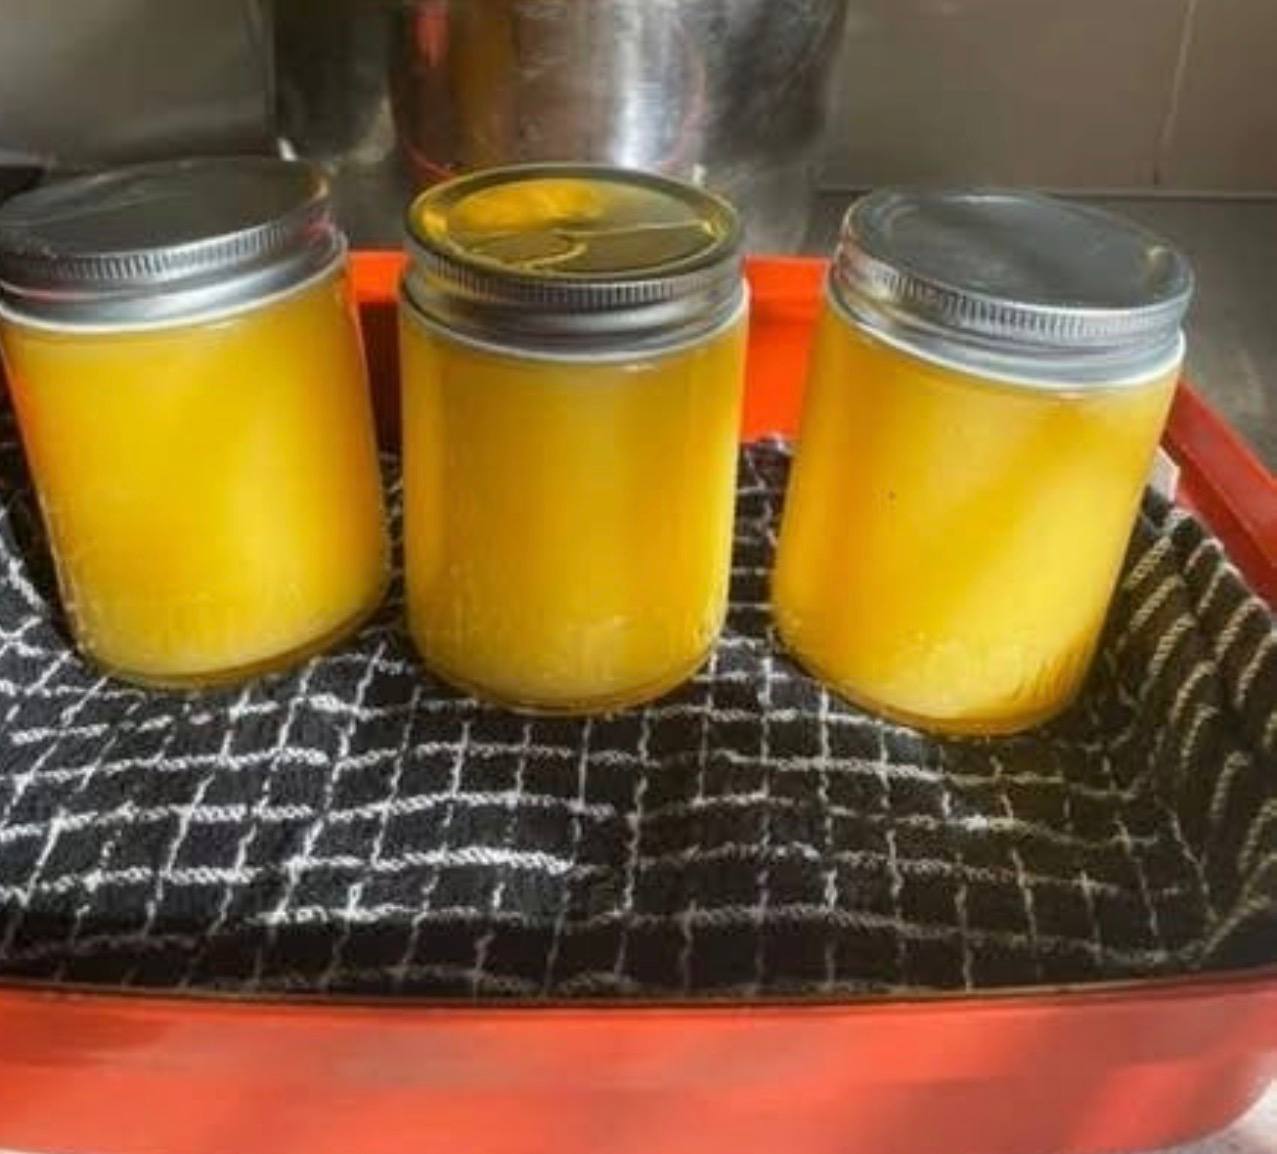
Beyond its incredible flavor, homemade lemon curd offers the significant advantage of complete control over its ingredients. You choose the freshest lemons, the best butter, and can adjust the sweetness and tartness to perfectly suit your palate. The absence of artificial flavors, colors, or preservatives means you’re enjoying a pure, wholesome treat. Plus, as our inspiring image shows, these beautiful jars of golden goodness make for truly thoughtful and impressive edible gifts, spreading a little sunshine to friends and family. Get ready to transform simple ingredients into something truly extraordinary!
Nutritional Information
Per serving (approximate values, based on 1/4 cup serving):
- Calories: 250 kcal
- Protein: 3g
- Carbohydrates: 30g
- Fat: 15g
- Fiber: 0g
- Sodium: 50mg
Ingredients
- 4 large egg yolks
- 2 large whole eggs
- 1 cup (200g) granulated sugar
- 1/2 cup (120ml) fresh lemon juice (from about 3-4 medium lemons)
- 2 tablespoons finely grated lemon zest (from about 2-3 medium lemons)
- 1/2 cup (113g) unsalted butter, cut into 8-10 pieces
- Pinch of salt (optional, to balance flavors)
Instructions
- Prepare Your Equipment: Set up a double boiler. You can do this by placing a heatproof bowl (preferably glass or stainless steel) over a saucepan filled with about 1-2 inches of simmering water. Ensure the bottom of the bowl does not touch the water. Have a fine-mesh sieve ready, placed over another clean bowl or heatproof container. Sterilize your jars if you plan on longer storage; otherwise, ensure they are thoroughly clean and dry.
- Combine Wet Ingredients: In the heatproof bowl of your double boiler, whisk together the egg yolks and whole eggs until well combined and slightly frothy.
- Add Sugar and Lemon: Gradually whisk in the granulated sugar until completely incorporated. Then, slowly whisk in the fresh lemon juice and lemon zest. Add a pinch of salt if using.
- Begin Cooking: Place the bowl over the simmering water. Immediately begin whisking constantly. This constant whisking is crucial to prevent the eggs from scrambling and to ensure a smooth, creamy curd.
- Add Butter: As the mixture starts to warm, gradually add the pieces of cold butter, one or two at a time, continuing to whisk until each piece has melted and is incorporated before adding the next.
- Thicken the Curd: Continue to whisk constantly over medium-low heat. The curd will gradually thicken. This process can take anywhere from 10 to 15 minutes, depending on the heat and your whisking. You’ll know it’s done when it’s thick enough to coat the back of a spoon, and when you run your finger across the spoon, it leaves a clear path. Another good indicator is when the curd reaches about 170-175°F (77-79°C) on an instant-read thermometer. Do not let it boil, as this can cause the eggs to curdle.
- Strain for Silkiness: Once the curd has reached the desired thickness, immediately remove the bowl from the heat. Pour the hot lemon curd through the fine-mesh sieve into the clean bowl or container below. Use a spatula to press any remaining curd through the sieve, ensuring a perfectly smooth and silky texture. This step removes any tiny bits of cooked egg or zest that might compromise the curd’s luxurious consistency.
- Cool the Curd: To prevent a skin from forming on top, place a piece of plastic wrap directly onto the surface of the hot lemon curd, pressing it down gently. Allow the curd to cool at room temperature for about 30-60 minutes.
- Chill and Store: Once slightly cooled, ladle the lemon curd into your prepared jars. Seal the jars and transfer them to the refrigerator. Allow the curd to chill for at least 2-4 hours, or preferably overnight, to fully set and achieve its firm, spoonable consistency.
Cooking Tips and Variations
Achieving perfect lemon curd every time is within reach with a few key techniques. Firstly, the double boiler method is your best friend for gentle, even cooking. This prevents the direct heat from scrambling the eggs, which is the most common pitfall. If you don’t have a formal double boiler, a heatproof glass or stainless steel bowl set over a saucepan of simmering water works just as well. Just ensure the bottom of the bowl doesn’t touch the water, as this would defeat the purpose of gentle heat. Secondly, constant whisking is non-negotiable. From the moment you place the bowl over the heat until the curd is thick, keep that whisk moving. This aerates the mixture, promotes even cooking, and prevents any part of the curd from sticking or cooking too quickly on the bottom of the bowl.
To know when your curd is perfectly cooked, look for the “nappe” stage – when it’s thick enough to coat the back of a spoon. If you draw a line with your finger across the back of the coated spoon, the line should remain clear without the curd running back into it. An instant-read thermometer can also be a great tool, aiming for a temperature between 170-175°F (77-79°C). Going much higher risks overcooking and a grainy texture. Don’t be afraid to pull it off the heat slightly before it looks “done” if you’re worried about overcooking, as it will continue to thicken slightly as it cools.
For the smoothest possible curd, straining is essential. Even with careful whisking, tiny bits of cooked egg or zest might remain. Passing the warm curd through a fine-mesh sieve ensures a luxuriously silky texture. After straining, pressing plastic wrap directly onto the surface of the curd while it cools is a simple trick to prevent a “skin” from forming, which can be unappealing. Finally, always use fresh ingredients. The flavor of freshly squeezed lemon juice and freshly grated zest is paramount to the vibrant taste of homemade lemon curd. Zest your lemons before you juice them – it’s much easier to get the zest from a whole lemon!
Want to explore variations? This basic recipe is a fantastic starting point. You can easily adapt it to other citrus fruits. Try lime curd for a more intense, bright flavor, or orange curd for a sweeter, less tart alternative. You can even combine citrus juices for a unique blend. For an extra punch of flavor, consider adding a tiny splash of vanilla extract or a tablespoon of your favorite liqueur (like limoncello or Cointreau) after the curd has been strained and is slightly cooled. If you prefer a less tart curd, you can slightly increase the sugar, though be mindful not to make it overly sweet. For a richer, deeper yellow color and even more luscious texture, some recipes call for using only egg yolks instead of a combination of whole eggs and yolks; this recipe strikes a good balance for both texture and ease.
Storage and Reheating
Proper storage is key to enjoying your homemade lemon curd for as long as possible. Once your lemon curd has been chilled and set in the refrigerator, it should be stored in airtight, clean jars or containers. Make sure the containers are completely sealed to prevent any air from getting in, which can lead to spoilage or absorption of refrigerator odors. Stored this way, homemade lemon curd will last beautifully in the refrigerator for approximately 2-3 weeks. The high acidity of the lemon juice and the sugar act as natural preservatives, contributing to its decent shelf life.
To prolong its freshness even further, you can freeze lemon curd. Spoon the cooled curd into freezer-safe containers or jars, leaving about half an inch of headspace to allow for expansion. Label with the date. Frozen lemon curd can last for up to 3-4 months. When you’re ready to use it, simply transfer the container to the refrigerator and allow it to thaw slowly overnight. Once thawed, give it a good stir to restore its smooth consistency, as it might separate slightly during the freezing and thawing process. The texture and flavor should remain excellent.
Lemon curd is typically enjoyed chilled or at room temperature, so reheating is generally not necessary. However, if you’re using it as a warm sauce or filling and need to soften it slightly, you can gently warm it. The best way to do this is in a double boiler over low heat, whisking constantly, just until it reaches your desired consistency. Be very careful not to overheat it, as the eggs can scramble, and the curd can lose its smooth texture. Avoid reheating in the microwave unless absolutely necessary, and if you do, use short bursts on low power, stirring frequently, to prevent hot spots and curdling.
Frequently Asked Questions
Why did my lemon curd turn out grainy or lumpy?
A grainy or lumpy texture is usually a sign of overcooked eggs or insufficient whisking. When the eggs heat up too quickly or are not constantly stirred, they can scramble, leading to a lumpy curd. Using a double boiler and whisking continuously over gentle heat are crucial steps to prevent this. If your curd does end up with small lumps, straining it through a fine-mesh sieve immediately after cooking can often save it and restore a smooth consistency.
Can I make this recipe with less sugar?
While you can slightly reduce the amount of sugar, it’s important to understand that sugar plays a role beyond just sweetness. It also contributes to the curd’s texture and acts as a preservative. Significantly reducing the sugar might result in a tarter curd that is thinner and has a shorter shelf life. If you prefer a less sweet curd, try reducing the sugar by no more than 1/4 cup. Taste the raw mixture before cooking (without consuming it, just a tiny bit on a clean spoon) to get an idea of the tartness, and adjust if necessary.
What if my lemon curd is too thin and won’t thicken?
If your lemon curd isn’t thickening, it likely hasn’t cooked long enough or hasn’t reached the correct temperature. Return the curd to the double boiler and continue whisking over gentle heat. Ensure the water in the saucepan is simmering steadily, but not boiling vigorously. Keep whisking until the curd coats the back of a spoon and leaves a clear path when a finger is drawn across it, or until it reaches 170-175°F (77-79°C). Remember that curd will also thicken considerably as it chills in the refrigerator, so don’t expect it to be as thick as jam when it’s hot.
Can I use bottled lemon juice instead of fresh?
While you technically can use bottled lemon juice, it is strongly recommended to use fresh lemon juice and zest for the absolute best flavor. Bottled lemon juice often contains preservatives and lacks the bright, nuanced flavor of fresh lemons. The fresh zest is also crucial for contributing a significant amount of concentrated lemon aroma and flavor that cannot be replicated by bottled juice alone. For a truly exceptional homemade lemon curd, the investment in fresh lemons is well worth it.