Instructions
- Before you begin, ensure your heavy cream and sweetened condensed milk are thoroughly chilled. This is crucial for achieving the best texture.
- In a large mixing bowl, pour the very cold heavy cream. Using an electric hand mixer or a stand mixer fitted with the whisk attachment, beat the heavy cream on medium-high speed until stiff peaks form. This means when you lift the beaters, the cream should hold its shape firmly. Be careful not to overbeat, as it can turn grainy.
- In a separate medium-sized bowl, combine the chilled sweetened condensed milk and the vanilla extract. Stir these together until well combined.
- Gently fold about one-third of the whipped cream into the sweetened condensed milk mixture. Use a spatula and a gentle motion to incorporate it, lightening the condensed milk base.
- Add the remaining whipped cream to the sweetened condensed milk mixture. Continue to fold gently until no streaks of white cream remain, and the mixture is uniform and airy. Be careful not to deflate the whipped cream, as the air is what gives the ice cream its light, creamy texture.
- Divide the ice cream base into two equal portions in separate bowls.
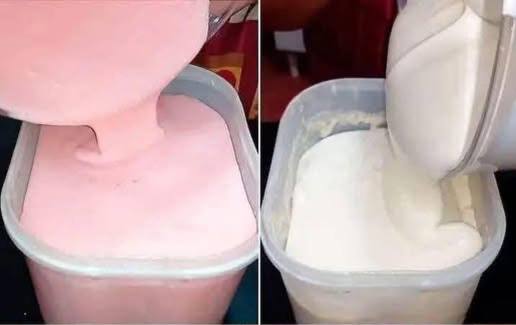
- To one portion, gently fold in the strawberry puree. If desired, add a few drops of red or pink food coloring to enhance the pink color. Mix until just combined, being careful not to overmix.
- Prepare a freezer-safe container, such as a loaf pan or a shallow airtight container.
- Spoon alternating dollops of the plain vanilla ice cream base and the strawberry ice cream base into the prepared container.
- Using a knife or a skewer, gently swirl the two flavors together a few times to create a marbled effect. Do not overmix, or the colors will blend entirely.
- Cover the container tightly with plastic wrap or a lid.
- Place the container in the freezer for at least 6 hours, or preferably overnight, until the ice cream is completely firm.
- When ready to serve, remove the ice cream from the freezer and let it sit at room temperature for 5-10 minutes to soften slightly, making it easier to scoop.
- Scoop and enjoy your homemade no-churn ice cream!
Cooking Tips and Variations
For the absolute best results, ensure all your dairy ingredients, especially the heavy cream, are well-chilled before you start. Cold cream whips up faster and holds its peaks better, which is essential for the airy texture of no-churn ice cream. If your heavy cream isn’t cold enough, you might struggle to get it to stiff peaks, leading to a less creamy and more icy final product. Another key tip is to always fold gently. Once you’ve whipped the cream, you want to preserve as much of that incorporated air as possible. Aggressive mixing will deflate the cream, making your ice cream denser and potentially icier.
When it comes to variations, the sky’s the limit with no-churn ice cream! For a classic vanilla, simply omit the strawberry puree and add an extra teaspoon of vanilla extract to the entire base. For chocolate lovers, melt 1/2 cup of good quality chocolate chips and fold it into the sweetened condensed milk mixture before combining with the whipped cream, or simply swirl in 1/4 cup of unsweetened cocoa powder. Coffee fanatics can dissolve 2 tablespoons of instant espresso powder in 1 tablespoon of hot water, let it cool, and then stir it into the condensed milk. You can also add mix-ins like chocolate chips, chopped nuts, cookie pieces, or fresh fruit after the base is mixed and before freezing. Just be sure to add them gently to avoid deflating the mixture. For fruit flavors, consider using other pureed fruits like raspberries, blueberries, or mango, adjusting sweetness as needed.
Don’t forget about texture! For an extra rich and creamy ice cream, make sure your sweetened condensed milk is full-fat. The fat content contributes significantly to the smooth mouthfeel. You can also experiment with different extracts beyond vanilla, such as almond, peppermint, or even a touch of orange zest, to create unique flavor profiles. If you’re planning to make a large batch for a crowd, it’s often better to make two smaller batches rather than one very large one, as whipping a huge quantity of cream can be tricky. Always use an airtight container for freezing to prevent ice crystals from forming on the surface, which can make your ice cream grainy.
Storage and Reheating
Storing homemade no-churn ice cream correctly is crucial for maintaining its creamy texture and preventing freezer burn. Once your ice cream is fully frozen, ensure it is in an airtight container. Plastic freezer containers with tight-fitting lids work perfectly, or you can use a loaf pan covered tightly with several layers of plastic wrap and then a layer of aluminum foil. This double protection helps to keep out air and moisture, which are the main culprits for ice crystal formation. Homemade no-churn ice cream will keep well in the freezer for up to 2-3 weeks. Beyond this time, while still safe to eat, its texture may start to degrade and become icier.
When you’re ready to enjoy your ice cream, it’s best not to reheat it, as it is a frozen dessert. However, allowing it to soften slightly before serving is highly recommended. Take the container out of the freezer and let it sit on your countertop at room temperature for about 5-10 minutes. This brief softening period makes the ice cream easier to scoop and enhances its creamy, melt-in-your-mouth texture. If you try to scoop it directly from the deep freeze, it will be very hard and difficult to serve. Do not let it sit out for too long, as it will melt quickly due to its high fat content. If it does melt significantly, refreezing it will likely result in a less pleasant, icier texture due to the formation of larger ice crystals.
If you have any leftovers after serving, simply return the container to the freezer as quickly as possible. Avoid leaving the ice cream out at room temperature for extended periods, as repeated thawing and refreezing will compromise the quality. For the best experience, try to enjoy your homemade no-churn ice cream within the recommended storage period, ensuring each scoop is as delicious as the first.
Frequently Asked Questions
Why is my no-churn ice cream icy instead of creamy?
The most common reasons for icy no-churn ice cream are not whipping the heavy cream to stiff peaks, or overmixing the base once the whipped cream is folded in. The air incorporated into the heavy cream is vital for preventing large ice crystals. Also, ensure your container is airtight in the freezer to prevent moisture from getting in and forming crystals.
Can I use low-fat ingredients for no-churn ice cream?
It is not recommended to use low-fat alternatives for heavy cream or sweetened condensed milk in this recipe. The high fat content in these ingredients is essential for creating the creamy, smooth texture without churning. Using low-fat versions will likely result in an icier, less satisfying ice cream.
How long does it take for no-churn ice cream to freeze completely?
No-churn ice cream typically needs at least 6 hours to freeze completely, but for the best results and a truly firm consistency, it’s best to freeze it overnight (8-12 hours). The exact time can vary slightly depending on the temperature of your freezer and the size and shape of your container.