Introduction
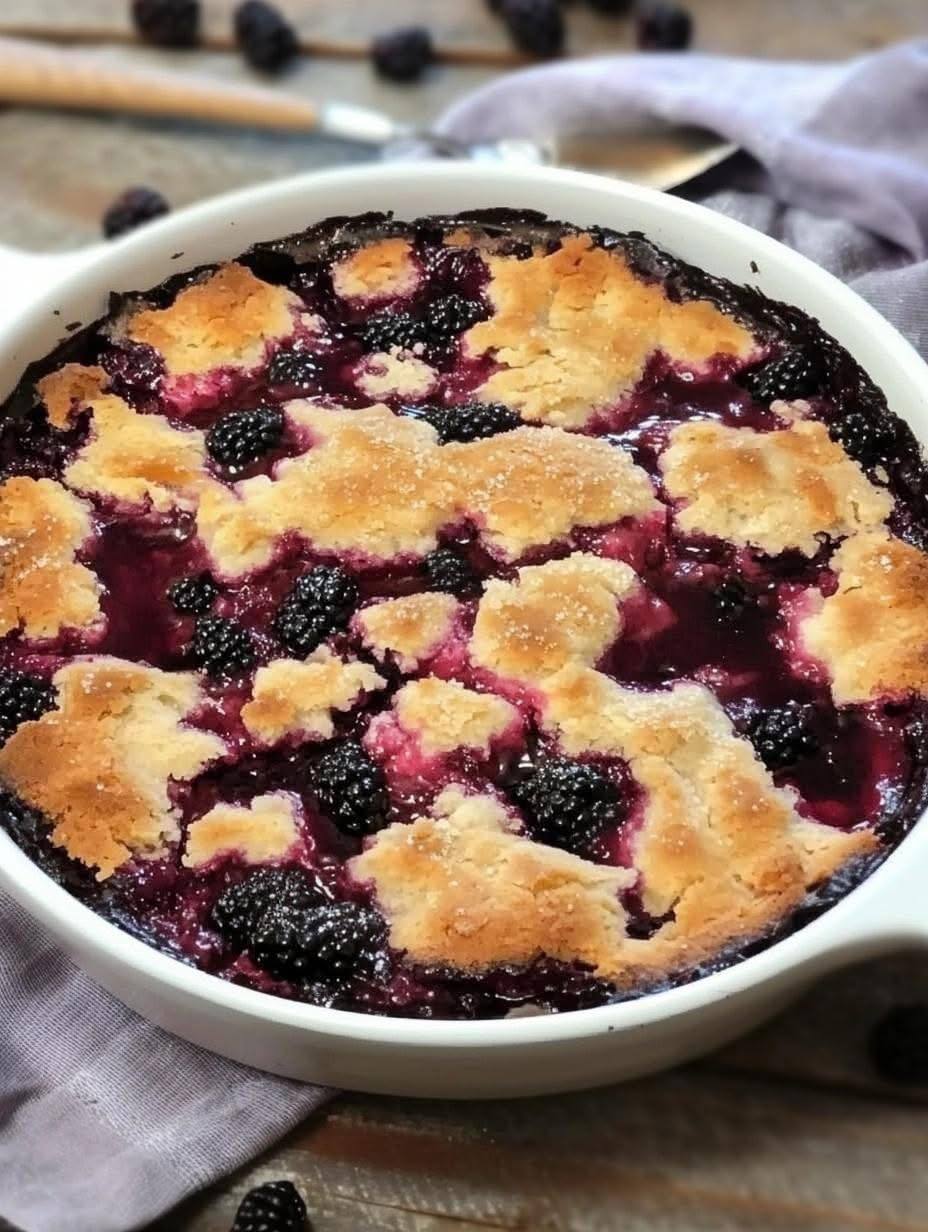
There are some desserts that instantly transport you back to simpler times, to grandma’s kitchen, or to a sun-drenched summer afternoon. Iron Skillet Blackberry Cobbler is undeniably one of them. This classic, comforting dessert marries the vibrant, sweet-tart burst of ripe blackberries with a tender, golden biscuit-like topping, all baked to perfection in a sturdy iron skillet. It’s the kind of treat that doesn’t just satisfy a sweet tooth; it warms the soul and creates lasting memories with every delicious spoonful.
What makes this particular cobbler so special? Beyond the irresistible combination of juicy fruit and a perfectly baked topping, the iron skillet plays a starring role. Its exceptional ability to distribute heat evenly ensures a beautifully caramelized bottom crust and a uniformly cooked fruit filling, while also lending a rustic charm that’s perfect for oven-to-table presentation. Whether you’re gathering fresh berries from your garden, picking them up from a local market, or even using frozen ones, this recipe is designed to be straightforward, yielding spectacular results every time. It’s a celebration of seasonal flavors, a testament to comforting home cooking, and remarkably easy to prepare.
This Iron Skillet Blackberry Cobbler is more than just a dessert; it’s an experience. Imagine the aroma filling your kitchen as it bakes, the satisfying sizzle as it comes out of the oven, and the sheer delight of digging into a warm, bubbling serving, perhaps with a scoop of vanilla bean ice cream melting into its fruity depths. It’s perfect for any occasion, from a casual family dinner to a backyard barbecue, offering a taste of homemade goodness that everyone will adore. Get ready to create a truly unforgettable dessert that you’ll want to make again and again.
Nutritional Information
Per serving (approximate values):
- Calories: 420
- Protein: 5g
- Carbohydrates: 68g
- Fat: 16g
- Fiber: 8g
- Sodium: 280mg
Ingredients
For the Blackberry Filling:
- 6 cups fresh or frozen blackberries (about 24 oz)
- 3/4 cup granulated sugar (adjust to taste, depending on berry sweetness)
- 2 tablespoons cornstarch
- 1 tablespoon fresh lemon juice
- 1/2 teaspoon vanilla extract
- 1/4 teaspoon ground cinnamon (optional)
- 2 tablespoons unsalted butter, cut into small pieces
For the Biscuit Topping:
- 1 1/2 cups all-purpose flour
- 1/4 cup granulated sugar, plus 1 tablespoon for sprinkling
- 1 1/2 teaspoons baking powder
- 1/4 teaspoon baking soda
- 1/4 teaspoon salt
- 6 tablespoons cold unsalted butter, cut into small cubes
- 1/2 cup buttermilk (or regular milk with 1/2 teaspoon lemon juice/vinegar)
- 1 large egg yolk (for brushing, optional)
Instructions
- Preheat your oven to 375°F (190°C). If using an iron skillet, ensure it’s oven-safe. A 10-inch cast iron skillet or a 9×13 inch baking dish will work well.
- Prepare the Blackberry Filling: In a large bowl, gently combine the blackberries, 3/4 cup granulated sugar, cornstarch, lemon juice, vanilla extract, and cinnamon (if using). Toss carefully to coat the berries without crushing them too much.
- Pour the blackberry mixture into your chosen iron skillet or baking dish. Dot the top of the filling with the 2 tablespoons of unsalted butter pieces.
- Prepare the Biscuit Topping: In a separate medium bowl, whisk together the flour, 1/4 cup granulated sugar, baking powder, baking soda, and salt.
- Add the cold, cubed butter to the dry ingredients. Using a pastry blender, two knives, or your fingertips, cut the butter into the flour mixture until it resembles coarse crumbs with some pea-sized pieces of butter remaining.
- Pour in the buttermilk and mix with a fork or your hands until just combined. Be careful not to overmix; the dough should be slightly shaggy.
- Assemble the Cobbler: Drop spoonfuls of the biscuit dough onto the blackberry filling. You can create distinct dollops or spread it out a bit more, leaving some gaps for the fruit to bubble through.
- If desired, whisk the egg yolk with a teaspoon of water and lightly brush the tops of the biscuit dough with this mixture. This will help with browning. Sprinkle the remaining 1 tablespoon of granulated sugar evenly over the biscuit topping.
- Bake the Cobbler: Place the skillet (or baking dish) on a baking sheet to catch any potential drips. Bake for 35-45 minutes, or until the fruit filling is bubbling thickly around the edges and the biscuit topping is golden brown and cooked through.
- Remove from the oven and let the cobbler cool on a wire rack for at least 15-20 minutes before serving. This allows the filling to set and prevents it from being too runny.
Cooking Tips and Variations
For the most vibrant flavor, always choose ripe, plump blackberries. If using frozen berries, do not thaw them completely before mixing with the other filling ingredients; this helps prevent the cobbler from becoming too watery. You might need to add a few extra minutes to the baking time if using frozen berries. To ensure your filling isn’t runny, make sure your cornstarch is well incorporated and the cobbler bakes long enough for the fruit juices to thicken. You’ll see thick, slow bubbles around the edges.
Achieving a perfectly golden-brown topping is key. Brushing the biscuit topping with an egg wash (egg yolk mixed with a little water or milk) before baking, and then sprinkling with a little extra granulated sugar, will give it a beautiful sheen and a slightly crisp, sugary crust. If your topping is browning too quickly before the fruit is bubbly, you can loosely tent the cobbler with aluminum foil for the last 10-15 minutes of baking.
Feel free to experiment with other berries or fruit! A mix of blackberries and raspberries, or even peaches and blueberries, would be delicious. For added zest, incorporate 1 teaspoon of lemon zest into the biscuit topping. A pinch of nutmeg or cardamom can also elevate the spice profile of the filling. If you don’t have buttermilk, you can easily make a substitute by adding 1/2 teaspoon of lemon juice or white vinegar to 1/2 cup of regular milk and letting it sit for 5 minutes before using.
Serve this cobbler warm for the ultimate comfort food experience. It’s absolutely divine on its own, but truly shines when paired with a scoop of premium vanilla bean ice cream, a dollop of freshly whipped cream, or even a drizzle of crème fraîche. The contrast of the warm, tart fruit with the cold, creamy topping is simply irresistible. This rustic dessert is perfect for summer gatherings, holiday meals, or simply as a cozy treat on a chilly evening.
Storage and Reheating
To store leftover Iron Skillet Blackberry Cobbler, allow it to cool completely to room temperature. Once cooled, cover the skillet tightly with plastic wrap or aluminum foil. It can be stored at room temperature for up to 1 day, or in the refrigerator for up to 3-4 days. Store any ice cream or whipped cream separately.
For reheating, individual portions can be gently warmed in the microwave for 30-60 seconds, or until heated through. For a crispier topping, reheat the entire cobbler (or larger portions) in a preheated oven at 300°F (150°C) for 15-20 minutes, or until warmed through and the topping has re-crisped slightly. Avoid overheating, as this can dry out the fruit filling. A little trick is to cover it loosely with foil for the first part of reheating to prevent the topping from over-browning, then remove the foil for the last few minutes.
Frequently Asked Questions
What’s the difference between a cobbler, a crisp, and a crumble?
While often used interchangeably, these desserts have distinct toppings. A cobbler, like this recipe, typically features a biscuit or scone-like topping dropped over the fruit, which bakes into individual “cobblestones.” A crisp usually has a topping made of oats, flour, butter, and sugar, which bakes to a crunchy texture. A crumble is similar to a crisp but generally lacks oats in its streusel-like topping.
Can I make this cobbler ahead of time?
You can prepare the blackberry filling mixture and the biscuit dough separately, storing them in the refrigerator for up to 24 hours. Keep the dough covered tightly and the fruit mixture in an airtight container. When ready to bake, assemble as directed and bake. For the best texture, cobblers are generally best baked and served on the same day, but the individual components can be prepped.
My cobbler filling is too runny. What went wrong?
A runny filling typically happens for a few reasons. First, the fruit might have a very high water content, especially if using frozen berries that were thawed. Second, there might not be enough cornstarch or other thickener. Lastly, it might not have baked long enough for the cornstarch to fully activate and thicken the juices. Ensure the cobbler is bubbling thickly around the edges before removing it from the oven, and allow it to cool and set for at least 15-20 minutes after baking.
Can I use other types of berries or fruit?
Absolutely! This recipe is very adaptable. You can use raspberries, blueberries, sliced peaches, nectarines, or a combination of fruits. If using very juicy fruits like peaches, you might want to slightly increase the cornstarch by half a tablespoon to ensure the filling thickens properly. Adjust the sugar content based on the sweetness of the fruit you choose.