Introduction
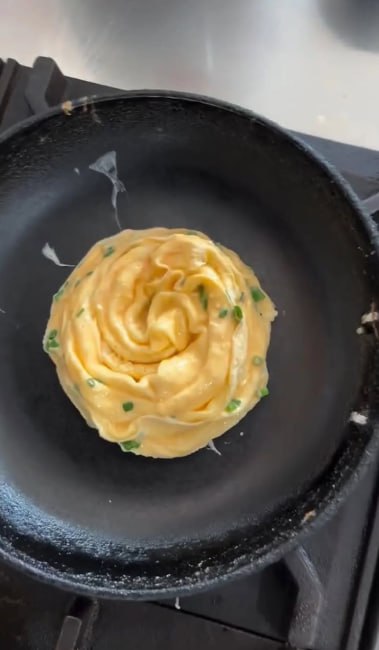
“J’ai regardé ma petite amie cuisiner et j’ai réalisé…” This simple phrase, uttered in a moment of quiet observation, perfectly encapsulates the magic of the dish we’re about to explore: the “Realization” Rose Egg. It wasn’t a grand culinary experiment or a complex recipe from a Michelin-starred chef; it was a moment of pure, unadulterated beauty created with just a few humble ingredients. I watched, mesmerized, as she transformed ordinary eggs into something truly extraordinary—a delicate, rolled omelet that resembled a blooming rose. It was then I realized that elegance in cooking doesn’t have to be complicated; sometimes, the most impressive dishes are born from simple techniques and a touch of creativity.
The Rose Egg, or Floral Omelet as some affectionately call it, is more than just a breakfast item; it’s a statement. It’s a testament to how a little effort can elevate the everyday into something special. Imagine serving this to your loved ones on a lazy Sunday morning, or surprising a guest with a breakfast that looks like it belongs in a five-star hotel, yet took mere minutes to prepare. Its visual charm is undeniable, with its beautifully layered, almost petal-like appearance, and its tender, fluffy texture melts in your mouth. This dish proves that you don’t need fancy equipment or exotic ingredients to create a culinary masterpiece that is both delicious and incredibly appealing to the eye.
What makes this Rose Egg truly special is its deceptive simplicity. While it presents itself as a work of art, the technique behind it is surprisingly straightforward, making it accessible to even the most novice of cooks. It’s wonderfully versatile, equally at home as the star of a brunch spread, a light and satisfying lunch, or a charming way to start the day. The “realization” for me was not just about the beauty of the dish itself, but about the joy and connection that can be found in sharing such a simple yet elegant creation. It’s a dish that promises to impress without demanding hours of your time, making it the perfect addition to your culinary repertoire.
Nutritional Information
Per serving (approximate values):
- Calories: 180 kcal
- Protein: 13g
- Carbohydrates: 2g
- Fat: 13g
- Fiber: 0.5g
- Sodium: 250mg
Ingredients
- 2 large eggs
- 1 tablespoon milk or cream (optional, for extra fluffiness)
- 1 tablespoon finely chopped scallions or chives
- Salt, to taste
- Black pepper, freshly ground, to taste
- 1 teaspoon butter or olive oil, for greasing the pan
Instructions
- In a small bowl, crack the two large eggs. Add the optional milk or cream, chopped scallions or chives, a pinch of salt, and a grind of black pepper.
- Whisk the mixture vigorously with a fork or a small whisk until the yolks and whites are fully combined and slightly frothy. Ensure the scallions/chives are evenly distributed.
- Heat a small (6-8 inch) non-stick frying pan or a well-seasoned cast iron pan over medium-low heat. Add the butter or olive oil and swirl to coat the bottom evenly. Ensure the heat is not too high to prevent rapid browning.
- Once the butter is melted and shimmering (or oil is hot), pour about half of the egg mixture into the pan. Tilt the pan to spread the egg thinly and evenly across the bottom.
- Allow the egg to cook for about 1-2 minutes, or until the edges are set but the top is still slightly wet and glossy. Do not let it cook completely through.
- Using a spatula, gently push one edge of the partially cooked egg towards the center, then begin to roll it slowly and tightly towards the opposite side of the pan. The key is to roll continuously and gently.
- Once you have rolled the first layer to one side of the pan, push the rolled egg to one edge of the pan, leaving a clear space on the other side.
- Pour the remaining half of the egg mixture into the empty space in the pan, ensuring some of it seeps underneath the rolled egg layer. Tilt the pan again to spread the new egg layer thinly.
- Allow this new layer to cook until the edges are set and the top is still slightly wet, similar to the first layer.
- Once the second layer is partially set, continue rolling the existing egg roll over the newly cooked egg layer, incorporating it into the “rose.” Keep rolling until the entire omelet is a tight, cylindrical shape.
- Cook the rolled omelet for another 30 seconds to 1 minute, gently turning it to ensure all sides are lightly golden and cooked through.
- Carefully slide the Rose Egg onto a serving plate. You can slice it diagonally to reveal its beautiful layers, or serve it whole. Garnish with a sprinkle of fresh scallions or chives if desired.
Cooking Tips and Variations
For the perfect Rose Egg, the choice of pan is crucial. A good quality non-stick pan, ideally 6-8 inches in diameter, will make the rolling process incredibly smooth and prevent sticking. If you’re using cast iron, ensure it’s impeccably seasoned and use slightly more fat to prevent the egg from adhering. Heat control is another vital aspect; maintain a consistent medium-low heat. Too high, and your egg will brown too quickly and become rubbery, losing that delicate, tender interior. Too low, and it will take too long to set, making rolling difficult. The goal is a gentle, even cook that allows the egg to set just enough for rolling while remaining moist.
Mastering the rolling technique takes a little practice, but don’t be discouraged if your first attempt isn’t perfectly rose-shaped. The trick is to be continuous and gentle, using a thin, flexible spatula. As you roll, don’t press too hard; you want to create soft, fluffy layers. If you find the egg sticking, lightly grease your spatula with a little butter or oil. Don’t worry if the layers aren’t perfectly sealed; the beauty of the Rose Egg is in its organic, floral appearance.
The beauty of this dish also lies in its versatility. While simple scallions provide a beautiful contrast and mild flavor, feel free to experiment with other herbs. Fresh parsley or chives add a lovely aroma and color. For a cheesy delight, sprinkle a tablespoon of finely grated cheese like cheddar, Gruyère, or Parmesan over the partially set egg before rolling. A tiny pinch of red pepper flakes can add a subtle kick, or a dash of paprika for a smoky undertone. You can even incorporate finely diced vegetables like bell peppers or spinach, just be sure they are cooked down and very dry to prevent excess moisture, and use a very small amount so as not to hinder the rolling process. Remember, the key is not to overcrowd the egg mixture, as this can make rolling challenging.
Storage and Reheating
While the Rose Egg is best enjoyed immediately after cooking for optimal texture and warmth, leftovers can be stored. Allow the cooked Rose Egg to cool completely to room temperature. Once cool, place it in an airtight container and refrigerate for up to 2 days. Storing it properly will prevent it from drying out or absorbing refrigerator odors. It’s important to note that the texture of reheated eggs, especially omelets, can change slightly, often becoming a bit firmer. However, it will still retain its flavor.
For reheating, the gentlest methods are best to preserve as much of the original texture as possible. You can reheat the Rose Egg in a microwave on a low setting (around 50% power) for 30-60 seconds, or until just warmed through. Be careful not to overheat, as this can make the egg rubbery. Alternatively, you can reheat it in a non-stick pan over very low heat, covered, for a few minutes, adding a tiny splash of water or broth to create some steam and help keep it moist. This method allows for a more even reheating without the risk of overcooking in spots. Avoid high heat when reheating, as it will inevitably lead to a tougher texture.
Frequently Asked Questions
Can I make the egg mixture ahead of time?
While you can whisk the eggs with seasoning and herbs a few hours in advance and store them in the refrigerator, it’s generally best to cook them fresh. Eggs tend to lose some of their fluffiness if left to sit for too long after whisking. If you do prepare it in advance, give it another quick whisk before pouring it into the pan.
My Rose Egg isn’t holding its shape. What am I doing wrong?
There are a few common reasons. Firstly, ensure your pan isn’t too large; a smaller 6-8 inch pan provides a thicker base for rolling. Secondly, the egg might be too wet when you start rolling; let it set a bit more on the surface before you begin. Conversely, if it’s too cooked and dry, it will crack instead of roll smoothly. Practice makes perfect, so don’t worry if your first few aren’t perfectly tight rolls!
Can I make a larger batch for multiple servings?
It’s best to make Rose Eggs one at a time for individual servings. The technique relies on rolling a thin layer of egg, which is difficult to achieve with a large volume of egg mixture in a single pan. If you’re serving multiple people, prepare the egg mixture for each serving separately and cook them sequentially. This ensures each Rose Egg is perfectly crafted.