Introduction
Prepare to be enchanted by a culinary marvel that epitomizes simplicity and deliciousness: the “Just Banana + Flour in a Mold” creation. This isn’t just a recipe; it’s an invitation to discover the magic that unfolds when humble ingredients are treated with a little love and a clever technique. Imagine beautifully caramelized banana slices, glistening with natural sweetness, nestled into a golden, tender base that’s reminiscent of your favorite pancake or a light, fluffy fritter. This delightful treat is proof that you don’t need a lengthy ingredient list or complex methods to achieve extraordinary flavor and satisfying texture.
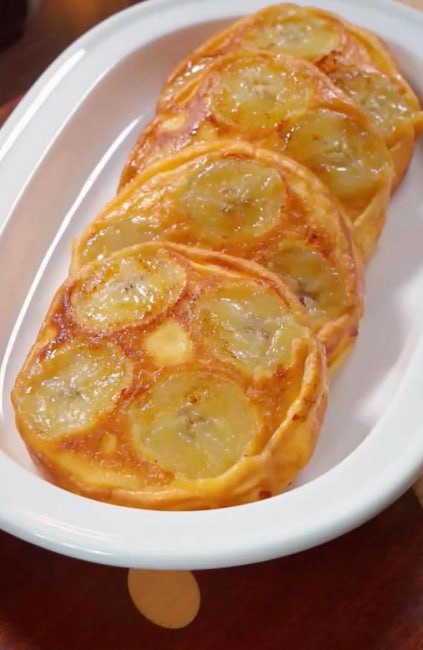
What makes this dish so utterly captivating? Its charm lies in its deceptive simplicity. With just two core ingredients – ripe bananas and flour – transformed within the confines of a mold, you unlock a world of culinary possibility. The mold ensures perfectly uniform, bite-sized portions, each a little golden disc crowned with soft, sweet banana. It’s a dish that appeals to all senses: the visual allure of the golden crust and caramelized fruit, the enticing aroma that fills your kitchen, and the delightful contrast of textures with every bite. It’s quick enough for a spontaneous breakfast, elegant enough for a brunch spread, and comforting enough for an afternoon snack or a light dessert.
This recipe celebrates accessibility and the inherent deliciousness of natural ingredients. It’s perfect for utilizing those ripe bananas lingering on your counter, transforming them into something truly special rather than letting them go to waste. The process itself is incredibly satisfying, watching as the simple batter comes to life and the bananas transform into a sweet, gooey topping. Whether you’re a seasoned chef or a kitchen novice, this “mold-baked” banana delight offers an uncomplicated path to a truly rewarding culinary experience, proving that sometimes, the most extraordinary pleasures come from the simplest of combinations.
Nutritional Information
Per serving (approximate values):
- Calories: 220
- Protein: 4g
- Carbohydrates: 45g
- Fat: 4g
- Fiber: 3g
- Sodium: 120mg
Ingredients
- 2 very ripe medium bananas
- 1 cup all-purpose flour
- ¾ cup water or milk (dairy or non-dairy)
- 1 tablespoon granulated sugar (optional, for extra sweetness and caramelization)
- ½ teaspoon vanilla extract (optional)
- ¼ teaspoon ground cinnamon (optional)
- Pinch of salt
- 2 tablespoons cooking oil (e.g., vegetable, canola, or coconut oil), plus extra for greasing molds
Instructions
- Prepare the Bananas: Peel the ripe bananas. Slice one banana into ¼-inch thick rounds. For the second banana, mash it thoroughly in a small bowl with a fork until smooth.
- Make the Batter: In a medium mixing bowl, combine the all-purpose flour, mashed banana, sugar (if using), vanilla extract (if using), cinnamon (if using), and pinch of salt. Gradually add ¾ cup of water or milk, whisking continuously, until a smooth batter forms. The consistency should be similar to a thick pancake batter – not too thin, not too thick. If it seems too thick, add another tablespoon or two of liquid; if too thin, add a tablespoon of flour.
- Prepare the Molds: Heat a large non-stick skillet or griddle over medium-low heat. Lightly grease the inside of your chosen molds (e.g., pancake rings, silicone molds, or even metal cookie cutters) with a little cooking oil. Place the greased molds onto the hot skillet.
- Arrange Bananas: Carefully place 3-4 banana slices into the bottom of each mold, arranging them in a single layer. This will form the beautiful caramelized top of your banana bites.
- Pour the Batter: Gently pour the prepared batter over the banana slices in each mold, filling them about ¾ full. Be careful not to disturb the banana slices.
- Cook the First Side: Cook for 3-5 minutes, or until the edges of the batter begin to set and small bubbles appear on the surface. The bottom should be golden brown. If the bananas on top are browning too quickly, slightly reduce the heat.
- Flip and Cook the Second Side: Carefully remove the molds (if using metal rings or cookie cutters). If using silicone molds, they can remain. Using a spatula, gently flip each banana bite to cook the other side. Cook for another 3-4 minutes, or until golden brown and cooked through. The banana slices that were originally on the bottom will now be exposed and caramelizing beautifully.
- Check for Doneness: To ensure they are cooked through, you can gently press on the center; it should feel firm, not gooey.
- Serve: Transfer the cooked banana bites to a plate. Let them cool for a minute or two before serving.
Cooking Tips and Variations
Achieving Golden Caramelization: The secret to those beautifully golden, slightly crispy banana slices is good heat control and ripe bananas. Use medium-low heat to allow the sugars in the banana to caramelize slowly without burning. If you’re using the optional sugar in your batter, it will also aid in achieving a deeper golden hue. For an extra boost of caramelization, you can briefly pan-fry the banana slices alone in a tiny bit of butter or oil before placing them in the molds, though this is not strictly necessary.
Batter Consistency is Key: The ideal batter should be thick enough to hold its shape but fluid enough to pour easily and spread around the banana slices. If your batter is too thick, your banana bites might be dense or gummy. If it’s too thin, they might spread too much or be difficult to flip. Adjust with a tablespoon of liquid or flour as needed until it resembles a thick pancake batter.
Mold Choices: While the image suggests round pancake rings, you can get creative with your molds! Silicone muffin cups or even a mini loaf pan can work, though cooking times will vary. For pan-frying, metal pancake rings or cookie cutters are ideal as they retain heat well. Just ensure whatever mold you use is oven-safe if you decide to bake them instead of pan-fry, and always grease them thoroughly.
Flavor Boosters: Elevate your banana bites with simple additions. A pinch of nutmeg alongside the cinnamon adds warmth. A teaspoon of lemon or orange zest brightens the flavor profile. For a sophisticated touch, a few drops of almond extract instead of vanilla can be delightful. Don’t be afraid to experiment with your favorite spices!
Exciting Add-ins: Once you’ve mastered the basic recipe, consider stirring in some fun additions to the batter. Mini chocolate chips are always a hit, especially with banana. Chopped walnuts or pecans add a lovely crunch and nutty flavor. A sprinkle of shredded coconut introduces a tropical twist. For a healthier option, a spoonful of chia seeds can boost fiber and texture.
Serving Suggestions: These banana bites are incredibly versatile. For breakfast, drizzle them with maple syrup, honey, or agave nectar. A dollop of Greek yogurt or a scoop of vanilla ice cream makes them a decadent dessert. Fresh berries, a sprinkle of powdered sugar, or a light dusting of cocoa powder can also enhance their presentation and flavor. For a truly indulgent treat, a warm chocolate fudge sauce or a homemade caramel sauce is divine.
Don’t Overmix: When preparing the batter, mix until just combined. A few small lumps are perfectly fine. Overmixing can develop the gluten in the flour, leading to a tougher, less tender final product.
Heat Management: Keep your skillet on a consistent medium-low heat. Too high, and the outside will burn before the inside cooks through. Too low, and they’ll take too long and might absorb too much oil, becoming greasy. Patience is a virtue here for even cooking and perfect caramelization.
Storage and Reheating
Storage: These banana bites are best enjoyed fresh, but leftovers can be stored. Allow them to cool completely to room temperature. Place them in an airtight container with parchment paper between layers to prevent sticking. Store in the refrigerator for up to 2-3 days.
Freezing: For longer storage, you can freeze them. Once completely cooled, arrange them in a single layer on a baking sheet and freeze until solid. Then transfer them to a freezer-safe bag or container, again with parchment paper between layers. They can be frozen for up to 1-2 months. Thaw in the refrigerator overnight before reheating.
Reheating:
- Microwave: For a quick reheat, place one or two banana bites on a microwave-safe plate. Heat on medium power for 15-30 seconds, or until warmed through. Be careful not to overheat, as they can become rubbery.
- Toaster Oven/Oven: For best results and to regain a slight crispiness, preheat your toaster oven or conventional oven to 300°F (150°C). Place the banana bites on a baking sheet and heat for 5-10 minutes, or until warmed and slightly crisped.
- Skillet: Reheat in a non-stick skillet over medium-low heat for 1-2 minutes per side, until warm. This method can help restore some of the original texture.
Frequently Asked Questions
Can I use overripe bananas?
Absolutely, yes! Overripe bananas with brown spots are actually ideal for this recipe. They are sweeter, softer, and mash more easily, contributing more flavor and moisture to the batter and caramelizing beautifully when cooked. Avoid using green or very firm bananas, as they lack the necessary sweetness and texture.
Can I make it gluten-free?
Yes, you can easily adapt this recipe to be gluten-free. Simply substitute the all-purpose flour with a good quality gluten-free all-purpose flour blend. Look for a blend that contains xanthan gum for best results, as it helps with the binding and texture. The cooking process remains the same, though you might find a slightly different texture depending on the specific GF flour blend you use.
What if my banana bites are sticking to the mold?
Sticking is usually a sign of insufficient greasing or not letting them cook long enough on the first side. Ensure you generously grease your molds with oil or butter before placing them on the hot skillet. You can also lightly brush the inside edges of the molds with oil after placing the banana slices. Additionally, make sure the batter has set and the bottom is golden brown before attempting to remove the mold or flip, as this creates a stable crust that won’t stick as easily.
Can I bake these instead of pan-frying?
Yes, you can bake these for a less hands-on approach. Preheat your oven to 375°F (190°C). Grease a muffin tin or silicone muffin molds very well. Arrange the banana slices at the bottom of each cavity, then pour the batter over them. Bake for 15-20 minutes, or until golden brown and a toothpick inserted into the center comes out clean. Baking will result in a softer, more cake-like texture rather than the slightly crisper exterior from pan-frying.