Instructions
- Prepare the Ice Cream Base: In a large mixing bowl, combine the heavy cream, unsweetened almond milk, 1/2 cup powdered erythritol, and vanilla extract.
- Whisk the ingredients together until the sweetener is fully dissolved and the mixture is well combined. If using xanthan gum, sprinkle it over the surface of the mixture and whisk vigorously for about 1 minute until fully incorporated and no lumps remain. This helps prevent ice crystals and improves texture.
- Cover the bowl with plastic wrap and refrigerate the ice cream base for at least 4 hours, or preferably overnight. Chilling the base thoroughly is crucial for achieving the best ice cream texture.
- Prepare the Raspberry Swirl: In a small saucepan, combine the fresh or frozen raspberries, 2 tablespoons powdered erythritol, and lemon juice.
- Heat the mixture over medium-low heat, stirring occasionally, until the raspberries soften and break down, about 5-7 minutes.
- Use a fork or potato masher to further mash the raspberries. For a smoother swirl, you can press the mixture through a fine-mesh sieve to remove seeds, or use an immersion blender to puree it directly in the saucepan. If pureeing, be careful as the hot liquid can splatter.
- Once the raspberry mixture reaches your desired consistency, remove it from the heat and let it cool completely to room temperature. Then, transfer it to a small container, cover, and refrigerate until thoroughly chilled, at least 1 hour.
- Churn the Ice Cream: Once both the ice cream base and the raspberry swirl are thoroughly chilled, pour the ice cream base into your pre-chilled ice cream maker bowl.
- Churn according to the manufacturer’s instructions. This usually takes between 20-30 minutes, or until the ice cream reaches the consistency of soft-serve.
- Create the Raspberry Swirl: When the ice cream is churned to a soft-serve consistency, remove the churning paddle from the ice cream maker.
- Gently scoop about one-third of the churned ice cream into a freezer-safe container.
- Drizzle about one-third of the chilled raspberry swirl over the ice cream layer.
- Repeat the layering process: add another third of the ice cream, then another third of the raspberry swirl. Finish with the remaining ice cream and the final drizzle of raspberry swirl.
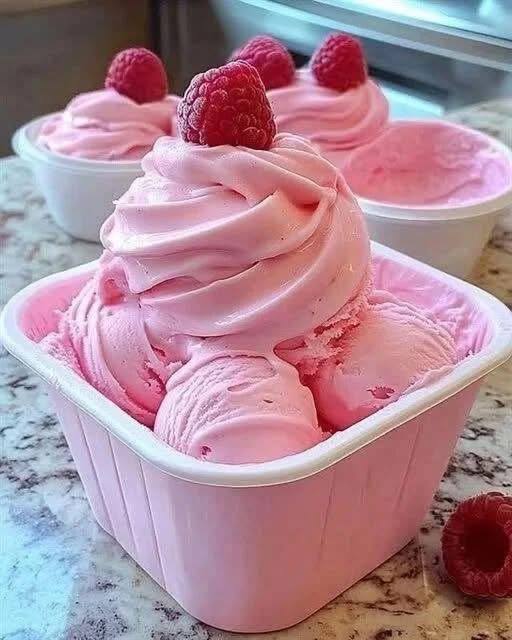
- Using a knife or a spoon, gently swirl the raspberry mixture into the ice cream. Do not overmix; you want distinct swirls, not a uniformly pink ice cream.
- Freeze for Firmness: Cover the container tightly with an airtight lid or plastic wrap.
- Place the container in the freezer for at least 4-6 hours, or preferably overnight, to allow the ice cream to firm up to a scoopable consistency.
- Serve: When ready to serve, remove the ice cream from the freezer and let it sit at room temperature for 5-10 minutes to soften slightly, making it easier to scoop. Enjoy your delicious low-carb raspberry swirl ice cream!
Cooking Tips and Variations
Achieving the perfect scoop of low-carb ice cream can sometimes feel like a delicate balance, but with a few key tips, you’ll be a pro in no time. First and foremost, ensure all your ingredients are thoroughly chilled before churning. A cold base churns more efficiently and results in a smoother, creamier texture. Don’t skip the chilling step for both the ice cream base and the raspberry swirl – it truly makes a difference. If you’re finding your ice cream is too icy, increasing the fat content slightly (a touch more heavy cream) or adding a tiny pinch of xanthan gum (as suggested in the recipe) can significantly improve the texture by preventing large ice crystal formation. When it comes to the raspberry swirl, don’t be afraid to taste and adjust the sweetness. Low-carb sweeteners can vary in intensity, so find the balance that works best for your palate. For a more intense raspberry flavor, consider adding a few drops of natural raspberry extract to the swirl mixture.
For variations, the possibilities are endless! Instead of raspberries, try a blueberry or blackberry swirl for a different berry experience. You could even make a chocolate swirl by melting sugar-free dark chocolate with a bit of heavy cream and swirling that in. To add a nutty crunch, fold in some chopped pecans, walnuts, or almonds during the last few minutes of churning, or sprinkle them on top before the final freeze. A hint of lemon zest in the ice cream base can brighten the flavor, or a touch of almond extract can add a delightful complexity. For a richer, more decadent base, you can incorporate a small amount of cream cheese (ensure it’s softened and well-blended into the base) or even a spoonful of sugar-free peanut butter for a peanut butter swirl variation. Remember to adjust the sweetener if adding other flavored ingredients. Experimentation is key to finding your ultimate low-carb ice cream creation!
Storage and Reheating
Proper storage is essential to maintain the quality and texture of your homemade Low Carb Raspberry Swirl Ice Cream. After churning and swirling, transfer the ice cream to a freezer-safe, airtight container. This is crucial for preventing freezer burn, which can lead to an unappetizing icy texture and dull flavor. Press a piece of plastic wrap directly onto the surface of the ice cream before putting on the lid; this creates an extra barrier against air and moisture. Store the ice cream in the coldest part of your freezer, typically towards the back, rather than near the door, where temperature fluctuations are more common. When stored correctly, your low-carb ice cream should maintain its best quality for up to 2-3 weeks. Beyond that, while still safe to eat, the texture might start to degrade.
Unlike some dishes, ice cream is not meant for “reheating” in the traditional sense, but rather for softening to an optimal scooping consistency. When you’re ready to enjoy a scoop, simply remove the container from the freezer and let it sit at room temperature for about 5-15 minutes. The exact time will depend on how cold your freezer is and how firm you prefer your ice cream. If you’re in a hurry, you can place the container in the refrigerator for 20-30 minutes. Avoid microwaving, as this can melt the ice cream unevenly and create an undesirable texture. For very hard ice cream, you can run a sharp knife under hot water for a few seconds before slicing through to help create cleaner scoops. Always re-cover the container tightly and return any unused ice cream to the freezer immediately to preserve its quality.
Frequently Asked Questions
Why is my homemade ice cream icy?
Icy ice cream is a common issue with homemade versions, especially low-carb ones. This usually happens when there’s too much water in the mixture or when the ice cream isn’t churned or frozen quickly enough. To combat this, ensure your ice cream base is thoroughly chilled before churning, and consider adding a small amount of xanthan gum (as in this recipe) or a tablespoon of vodka (which doesn’t freeze) to the base. These ingredients help prevent large ice crystals from forming, resulting in a creamier texture. Also, make sure your freezer is set to a sufficiently cold temperature.
Can I make this recipe without an ice cream maker?
While an ice cream maker yields the best results for a smooth and creamy texture, you can try a no-churn method. After preparing the base, pour it into a shallow freezer-safe container. Freeze for 30-45 minutes, then remove and beat with an electric mixer to break up ice crystals. Repeat this process every 30-45 minutes for about 3-4 hours, or until it reaches a soft-serve consistency, incorporating the raspberry swirl during the last few mixing sessions. This method requires more effort but can still produce delicious ice cream.
What’s the best low-carb sweetener to use?
For ice cream, powdered erythritol is often recommended because it dissolves well and has a clean taste with minimal aftertaste. Allulose is another excellent option as it has a very similar texture and mouthfeel to sugar and helps create a softer ice cream that doesn’t freeze rock-hard. Stevia or monk fruit can also be used, but their potency varies, and they can sometimes leave a slight aftertaste for some people. It’s best to taste your base mixture and adjust the sweetener to your preference, as different brands and types have varying levels of sweetness.