Instructions
- Prepare the Crust: In a medium bowl, combine the finely crushed vanilla wafer cookies or graham crackers with the melted butter. Mix well until all crumbs are moistened.
- Press the mixture firmly and evenly into the bottom of a 9-inch springform pan. You can use the bottom of a glass or your fingers to create a compact crust.
- Place the crust in the refrigerator to chill for at least 30 minutes while you prepare the filling.
- Make the Cream Cheese Filling: In a large mixing bowl, using an electric mixer, beat the softened cream cheese on medium speed until smooth and creamy, about 2-3 minutes. Ensure there are no lumps.
- Gradually add the granulated sugar to the cream cheese, beating until well combined and fluffy, about 2 more minutes.
- Stir in the pure vanilla extract and salt until just combined. Scrape down the sides of the bowl as needed.
- Prepare the Whipped Cream: In a separate, chilled bowl, pour the cold heavy cream. Using an electric mixer with a whisk attachment, beat the heavy cream on high speed until soft peaks form.
- Gradually add the powdered sugar and continue beating until stiff peaks form. Be careful not to overbeat, as it can turn grainy.
- Combine the Filling: Gently fold the prepared whipped cream into the cream cheese mixture using a spatula. Mix until just combined and no streaks of cream cheese or whipped cream remain. Do not overmix, as this will deflate the airy texture.
- Alternatively, if using thawed whipped topping, gently fold the entire 8 ounces of thawed whipped topping into the cream cheese mixture until smooth and uniform.
- Assemble the Cake: Retrieve the chilled crust from the refrigerator.
- Carefully spoon the creamy vanilla filling over the prepared crust, spreading it evenly to the edges of the pan with an offset spatula or the back of a spoon.
- Chill the Cake: Cover the springform pan loosely with plastic wrap.
- Refrigerate the No-Bake Creamy Vanilla Dream Cake for a minimum of 4-6 hours, or preferably overnight, to allow it to set completely. This chilling time is crucial for the cake to firm up and slice cleanly.
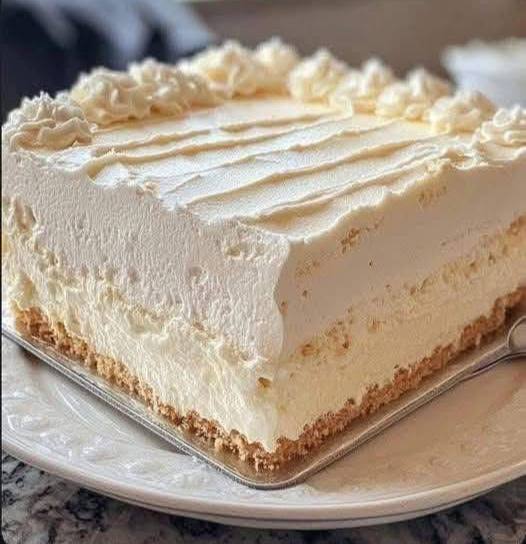
- Garnish and Serve: Once well-chilled, carefully remove the sides of the springform pan. You can run a thin knife around the edge of the cake before releasing the pan to ensure a clean release.
- If desired, decorate the top of the cake with additional whipped cream, fresh berries (like strawberries, blueberries, or raspberries), chocolate shavings, or a sprinkle of extra cookie crumbs.
- Slice the cake with a warm, sharp knife (wiping it clean between slices) and serve immediately.
Cooking Tips and Variations
For the smoothest cream cheese filling, ensure your cream cheese is at true room temperature. Cold cream cheese will result in a lumpy filling. You can speed up the softening process by removing it from the fridge an hour or two before, or by unwrapping it and microwaving it in 10-second intervals until slightly pliable but not melted.
To make cutting easier and cleaner, dip your knife in hot water and wipe it dry before each slice. This will ensure beautiful, pristine cuts every time.
For a richer crust, you can add 1 tablespoon of granulated sugar to your crushed cookies and melted butter mixture. This adds an extra layer of sweetness and crunch.
Experiment with different cookie crusts! Instead of vanilla wafers or graham crackers, try Oreo cookies (for a chocolate-vanilla twist), gingersnaps for a spiced flavor, or shortbread cookies for a buttery, delicate base.
Enhance the vanilla flavor by using vanilla bean paste instead of extract. The tiny specks of vanilla bean will also add a beautiful visual appeal to your creamy filling.
Introduce a citrusy zing by adding 1-2 tablespoons of lemon or orange zest to the cream cheese filling. This brightens the flavor profile beautifully.
Create a fruity variation by folding 1/2 cup of finely diced fresh fruit (like strawberries, peaches, or raspberries) into the cream cheese filling before spreading it over the crust. Alternatively, layer fresh fruit slices on top of the finished cake.
For a chocolate lover’s dream, swirl 1/4 cup of melted and cooled chocolate or chocolate syrup into a portion of the cream cheese filling for a marbled effect, or sprinkle mini chocolate chips directly into the filling.
If you’re short on time, you can prepare the crust and filling a day in advance and store them separately in the refrigerator. Assemble the cake the next day and allow it to chill for the final setting time.
When chilling, ensure the cake is covered loosely with plastic wrap to prevent it from absorbing odors from the refrigerator or developing a skin on top. However, avoid direct contact with the filling until it’s set to prevent indentations.
For an extra elegant presentation, consider using a piping bag with a star tip to create decorative swirls or rosettes of whipped cream around the edges of the cake before serving.
Storage and Reheating
This No-Bake Creamy Vanilla Dream Cake is best enjoyed fresh and well-chilled. To store leftovers, cover the cake tightly with plastic wrap or place individual slices in an airtight container. Keep the cake refrigerated at all times. It will maintain its best texture and flavor for up to 3-4 days in the refrigerator.
Due to its no-bake nature and creamy filling, this cake does not require reheating. In fact, reheating would cause the cream cheese filling to melt and the texture to be compromised. Always serve this cake cold, directly from the refrigerator, to ensure its refreshing and firm consistency. If you’ve decorated the cake with fresh fruit, it’s best to add these garnishes just before serving, as some fruits can release moisture or brown over time if stored on the cake.
While the cake can be frozen, the texture of the cream cheese filling might change slightly upon thawing, becoming a bit softer or more crumbly. If you wish to freeze it, wrap the entire cake (or individual slices) tightly in several layers of plastic wrap, followed by a layer of aluminum foil. Freeze for up to 1 month. Thaw the cake slowly in the refrigerator overnight before serving. Do not refreeze once thawed.
Frequently Asked Questions
How do I prevent my crust from being crumbly?
To ensure a firm and cohesive crust, it’s crucial to thoroughly mix the crushed cookies with the melted butter until all crumbs are moistened. Once in the pan, press the mixture down very firmly and evenly. You can use the bottom of a flat glass or a measuring cup to compact it well. Chilling the crust for at least 30 minutes before adding the filling also helps it set and become less crumbly when sliced.
Can I make this cake ahead of time for an event?
Absolutely! This No-Bake Creamy Vanilla Dream Cake is an excellent make-ahead dessert. In fact, it benefits from an extended chilling period. You can prepare the entire cake up to 2 days in advance and keep it covered in the refrigerator. This allows the flavors to meld beautifully and ensures the filling is perfectly set for easy slicing. Add any fresh garnishes, like berries or whipped cream swirls, just before serving for the best presentation.
My cream cheese filling is lumpy. What went wrong?
A lumpy filling is almost always due to using cold cream cheese. For a perfectly smooth and creamy filling, it’s essential that your cream cheese is softened to room temperature. This allows it to beat smoothly and incorporate easily with the other ingredients without forming lumps. If you find your filling is lumpy, you can try beating it for a longer period, scraping down the sides of the bowl frequently, or gently warming the mixing bowl in a warm water bath for a few minutes to encourage softening, then continue beating.