Introduction
Prepare to be utterly charmed by one of life’s simplest, yet most profoundly satisfying, sweet treats: Peanut Butter Balls! There’s an undeniable magic that happens when the creamy, nutty richness of peanut butter meets the smooth, indulgent embrace of chocolate. It’s a flavor combination that transcends generations, evoking nostalgic childhood memories and creating new moments of pure delight with every bite. These aren’t just any confections; they are a celebration of two beloved ingredients, brought together in perfect harmony without ever needing to touch an oven.
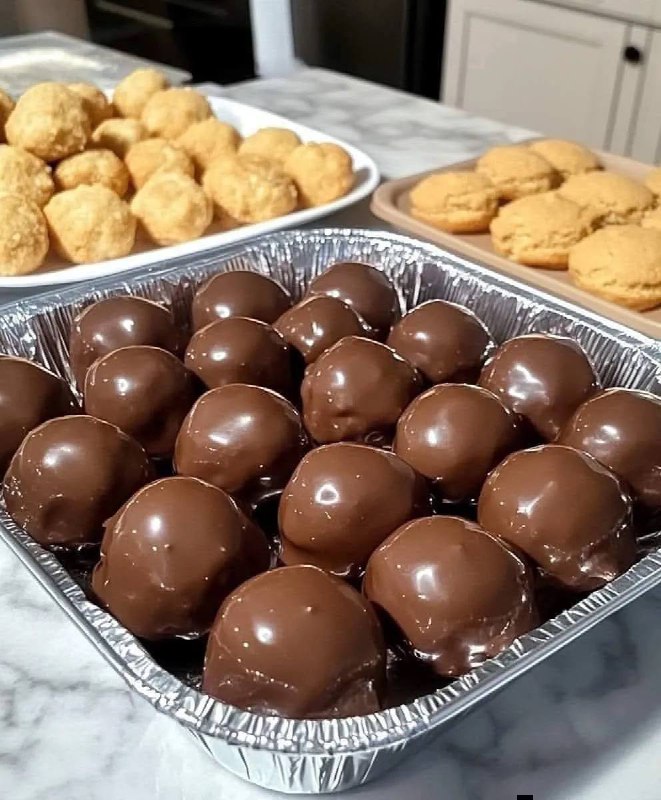
Peanut Butter Balls are the quintessential no-bake dessert, a true culinary marvel that allows you to whip up a batch of homemade candy with minimal effort and maximum reward. Imagine a luscious, sweet peanut butter filling, rolled into bite-sized spheres, then enrobed in a crisp, decadent chocolate shell. The textural contrast is simply divine: a firm, snappy coating giving way to a melt-in-your-mouth interior that is both rich and utterly satisfying. This recipe is designed for everyone, from seasoned bakers to kitchen novices, promising an easy, fun, and incredibly rewarding experience that culminates in a truly irresistible treat.
What makes this particular recipe stand out? It’s the perfect blend of simplicity, versatility, and sheer deliciousness. Whether you’re looking for a quick dessert to satisfy a sudden craving, a crowd-pleasing addition to a party spread, or a homemade gift that everyone will adore, these Peanut Butter Balls tick all the boxes. They’re infinitely customizable, allowing you to tailor them to your exact preferences, and best of all, they require no baking whatsoever. Get ready to create a batch of these delightful confections that will have everyone asking for more!
Nutritional Information
Per serving (approximate values):
- Calories: 180
- Protein: 4g
- Carbohydrates: 18g
- Fat: 11g
- Fiber: 1g
- Sodium: 75mg
Ingredients
- 1 ½ cups creamy peanut butter (good quality, such as Jif or Skippy)
- ½ cup (1 stick) unsalted butter, softened
- 3 cups powdered sugar (confectioners’ sugar), sifted
- 1 teaspoon vanilla extract
- ¼ teaspoon salt
- 12 ounces semi-sweet chocolate chips (or melting wafers)
- 2 tablespoons coconut oil or vegetable shortening (optional, for smoother chocolate)
Instructions
- Prepare Your Workspace: Line two large baking sheets with parchment paper or wax paper. Set aside.
- Combine Wet Ingredients: In a large mixing bowl, combine the softened peanut butter, softened butter, vanilla extract, and salt. Use an electric mixer on medium speed to beat these ingredients together until they are smooth and well combined. Scrape down the sides of the bowl as needed to ensure everything is incorporated.
- Add Powdered Sugar: Gradually add the sifted powdered sugar to the peanut butter mixture, ½ cup at a time, mixing on low speed until fully incorporated after each addition. Continue mixing until the mixture comes together to form a thick, pliable dough-like consistency. It should be firm enough to roll without being overly sticky. If the mixture seems too dry, add a tiny splash of milk (about ½ teaspoon) until it reaches the right consistency. If it’s too sticky, add a little more powdered sugar.
- Form the Peanut Butter Balls: Using a small cookie scoop (about 1-inch diameter) or a tablespoon, scoop out portions of the peanut butter mixture. Roll each portion between your palms to form smooth, uniform balls. Aim for balls that are approximately 1 inch in diameter. Place the formed peanut butter balls onto the prepared baking sheets.
- Chill the Peanut Butter Balls: Once all the balls are formed, place the baking sheets into the refrigerator for at least 30 minutes, or up to an hour. This chilling step is crucial as it helps the balls firm up, making them much easier to dip into the warm chocolate without falling apart.
- Melt the Chocolate: While the peanut butter balls are chilling, prepare your chocolate. You can do this using a microwave or a double boiler.
- Microwave Method: Place the chocolate chips (and coconut oil/shortening, if using) in a microwave-safe bowl. Microwave on high power in 30-second intervals, stirring well after each interval, until the chocolate is completely melted and smooth. Be careful not to overheat the chocolate, as it can seize.
- Double Boiler Method: Fill a saucepan with about an inch or two of water and bring it to a gentle simmer. Place a heat-proof bowl (that fits snugly over the saucepan without touching the water) over the simmering water. Add the chocolate chips (and coconut oil/shortening, if using) to the bowl. Stir continuously until the chocolate is completely melted and smooth. Remove the bowl from the heat once melted.
- Dip the Peanut Butter Balls: Remove the chilled peanut butter balls from the refrigerator. Working with one ball at a time, carefully drop a ball into the melted chocolate. Use a fork or a specialized candy dipping tool to roll the ball in the chocolate until it is fully coated.
- Remove Excess Chocolate: Lift the coated peanut butter ball out of the chocolate with the fork, gently tapping the fork against the edge of the bowl to allow any excess chocolate to drip off. This helps create a smooth, even coating and prevents pooling at the bottom.
- Place on Prepared Sheets: Carefully transfer the chocolate-coated peanut butter ball back onto the parchment-lined baking sheet. Repeat this process with the remaining peanut butter balls, dipping them one by one.
- Allow Chocolate to Set: Once all the peanut butter balls are coated, place the baking sheets back into the refrigerator for another 15-30 minutes, or until the chocolate coating is completely set and firm to the touch.
- Serve and Enjoy: Once the chocolate has set, your Peanut Butter Balls are ready to be enjoyed!
Cooking Tips and Variations
Achieving peanut butter ball perfection is all about a few key techniques and knowing how to have fun with flavors. Here are some pro tips and exciting variations to elevate your homemade candy game.
Pro Tips for Peanut Butter Ball Perfection:
- Quality Ingredients Matter: Since peanut butter is the star, using a good quality, creamy peanut butter is essential. Avoid natural peanut butter that separates easily, as its oil content can make the filling too oily or difficult to firm up. Stick to brands like Jif or Skippy for consistent results.
- Sift Your Powdered Sugar: This step is often overlooked but crucial for a silky-smooth peanut butter filling. Sifting removes any lumps, ensuring a uniform texture in your balls.
- Don’t Skip the Chill Time: Chilling the peanut butter balls before dipping is non-negotiable. Cold balls will hold their shape better and prevent the filling from melting or falling apart when introduced to the warm chocolate. A minimum of 30 minutes is recommended.
- Achieve Uniform Size: For aesthetically pleasing and evenly cooked (or in this case, evenly coated) treats, use a small cookie scoop to portion out the peanut butter mixture. This ensures all your balls are roughly the same size.
- Master the Melt: When melting chocolate, whether in the microwave or a double boiler, go slow and stir frequently. Overheating chocolate can cause it to seize (become thick and clumpy) or burn, rendering it unusable. If using the microwave, heat in short bursts (30 seconds) and stir well in between.
- Coconut Oil/Shortening for Smoothness: A small amount of coconut oil or vegetable shortening (about 1-2 tablespoons per 12 ounces of chocolate) added to your melting chocolate can make it thinner and smoother, resulting in an easier dipping process and a glossier finish.
- Dipping Technique: Use a fork or a specialized dipping tool. Drop the ball into the chocolate, roll it quickly to coat, then lift it out, tapping the fork gently against the side of the bowl to drip off excess chocolate. This prevents chocolate “feet” at the bottom of your balls.
- Parchment Paper is Your Friend: Always use parchment or wax paper to line your baking sheets. This prevents the chocolate from sticking and makes for easy removal of your finished treats.
- Work in Batches: If making a large quantity, keep some of the peanut butter balls chilling in the fridge while you dip others. This ensures they stay firm. You may also need to gently reheat your chocolate occasionally to maintain its fluidity.
Exciting Variations and Customizations:
- Chocolate Choices:
- Dark Chocolate: For a more sophisticated and less sweet treat, use dark chocolate (60-70% cocoa) for the coating. The bitterness beautifully complements the sweet peanut butter.
- Milk Chocolate: The classic choice, offering a creamy, sweet coating that appeals to most palates.
- White Chocolate: A fun and visually appealing option, especially when drizzled with other chocolate types or sprinkled with colorful toppings.
- Marble Swirl: Melt two different types of chocolate (e.g., dark and white) separately. Dip the ball in one, then drizzle lines of the other chocolate over it and swirl with a toothpick for a marbled effect.
- Mix-ins for the Peanut Butter Filling:
- Chopped Nuts: Add a crunchy texture by mixing in finely chopped peanuts, pecans, or walnuts into the peanut butter mixture.
- Mini Chocolate Chips: Stir in a handful of mini semi-sweet or milk chocolate chips for an extra chocolatey burst within the filling.
- Toffee Bits: For a buttery, caramel-like crunch, add crushed toffee bits.
- Graham Cracker Crumbs: A few tablespoons of graham cracker crumbs can add a subtle texture and flavor reminiscent of a peanut butter pie crust.
- Shredded Coconut: For a tropical twist, mix in some finely shredded coconut.
- Creative Toppings and Decorations:
- Sprinkles: Immediately after dipping, while the chocolate is still wet, sprinkle with colorful sprinkles, nonpareils, or sanding sugar for a festive look.
- Sea Salt: A sprinkle of flaky sea salt on top of the wet chocolate enhances the flavor profile, creating a popular sweet and salty contrast.
- Drizzles: After the main chocolate coating has set, melt a contrasting chocolate (e.g., white chocolate over dark chocolate) and drizzle it artfully over the balls using a spoon or a piping bag with a tiny hole.
- Crushed Cookies/Pretzels: For added crunch and flavor, sprinkle with crushed Oreos, Biscoff cookies, or pretzels.
- Powdered Sugar Dusting: For a rustic, simple look, skip the chocolate coating and just dust the peanut butter balls with extra powdered sugar.
- Flavor Extracts: Experiment with a few drops of other extracts in the peanut butter filling, such as almond extract or a tiny hint of maple extract, to subtly alter the flavor profile.
With these tips and variations, your Peanut Butter Balls will not only be delicious but also uniquely yours, perfect for any occasion or craving.
Storage and Reheating
Proper storage is key to keeping your homemade Peanut Butter Balls fresh, firm, and delicious for as long as possible. Since they contain butter and peanut butter, and are coated in chocolate, they are quite stable, but refrigeration is generally recommended for optimal texture and longevity.
Storage Instructions:
- Refrigeration: Once the chocolate coating has fully set, transfer the Peanut Butter Balls to an airtight container. You can layer them with parchment paper in between layers to prevent sticking. Store the container in the refrigerator for up to 2-3 weeks. The cold temperature will keep the chocolate firm and prevent the peanut butter filling from becoming too soft or oily.
- Freezing: For longer storage, Peanut Butter Balls freeze beautifully. Once the chocolate is completely set, arrange the balls in a single layer on a parchment-lined baking sheet and freeze for 1-2 hours, or until solid. This “flash freezing” prevents them from sticking together. Once solid, transfer the frozen balls to a freezer-safe airtight container or a heavy-duty freezer bag. They can be stored in the freezer for up to 2-3 months. Label the container with the date for easy tracking.
Reheating/Serving After Storage:
- From Refrigerator: Peanut Butter Balls are often enjoyed chilled, directly from the refrigerator. The chocolate will be firm and snappy, and the peanut butter filling will be dense and rich. If you prefer them slightly softer, you can let them sit at room temperature for 10-15 minutes before serving.
- From Freezer: When serving frozen Peanut Butter Balls, it’s best to thaw them first. Transfer the desired number of balls from the freezer to the refrigerator the night before, or let them sit at room temperature for 30-60 minutes until they are soft enough to enjoy. Avoid microwaving them to thaw, as this can melt the chocolate coating unevenly and alter the texture of the peanut butter filling.
Important Note: These treats do not require “reheating” in the traditional sense, as they are a no-bake dessert. The goal is to bring them to your preferred serving temperature and texture.
Frequently Asked Questions
Why did my chocolate seize when melting?
Chocolate seizes when it comes into contact with even a tiny amount of water or when it’s overheated. When melting chocolate, ensure all your bowls and utensils are completely dry. If using a double boiler, make sure the bottom of your chocolate bowl doesn’t touch the simmering water, and no steam escapes into the chocolate. If using a microwave, melt in short bursts (30 seconds) and stir thoroughly after each burst to distribute heat and prevent burning. If your chocolate does seize, sometimes you can rescue it by stirring in a tablespoon of hot vegetable oil or melted shortening, but it may not be as smooth.
My peanut butter mixture is too sticky/too dry. What can I do?
The consistency of the peanut butter mixture is crucial for easy rolling. If your mixture is too sticky, it likely needs more powdered sugar. Add it gradually, a tablespoon at a time, mixing until it reaches a firm, pliable dough-like consistency. If it’s too dry and crumbly, it might need a little more moisture. Add a very tiny amount of milk (start with ½ teaspoon) or a bit more softened butter, mixing until it comes together. Remember that different brands of peanut butter can vary in consistency, so minor adjustments are sometimes necessary.
Can I use natural peanut butter for this recipe?
While natural peanut butter is delicious, it’s generally not recommended for this specific recipe. Natural peanut butter tends to separate more easily, with the oil rising to the top. This higher oil content can make the peanut butter filling too oily, difficult to firm up, and prone to falling apart when rolled or dipped. For the best results and consistency, stick to conventional creamy peanut butter (like Jif or Skippy) which has a more stable, emulsified texture.
How can I make these ahead of time for a party?
Peanut Butter Balls are an excellent make-ahead treat! You can prepare them entirely up to a week in advance and store them in an airtight container in the refrigerator. For longer preparation, you can freeze them for up to 2-3 months. Just remember to thaw them in the refrigerator or at room temperature for an hour or so before serving. Their stable nature makes them perfect for holiday platters, potlucks, and gatherings, saving you time on the day of the event.