Introduction
Get ready to discover a dessert so utterly delightful, so effortlessly elegant, and so incredibly delicious that you’ll want to guard this recipe with your life. We’re talking about the Pineapple Heaven Cake – a true tropical dream that lives up to its name in every single bite. Imagine a cake that’s light, moist, and bursting with vibrant pineapple flavor, layered with a cloud-like, creamy filling, and crowned with a glistening, tangy pineapple glaze. It’s a showstopper, a crowd-pleaser, and quite possibly the easiest impressive cake you’ll ever bake. This isn’t just another dessert; it’s an experience, a slice of pure joy that transports your taste buds straight to a sun-drenched paradise.
What makes this Pineapple Heaven Cake so special? It’s the perfect marriage of convenience and homemade taste. We start with a simple white cake mix, but don’t let that fool you into thinking it’s anything less than spectacular. With a few clever additions, that humble box mix transforms into an incredibly moist, flavorful cake that tastes like it took hours of effort. The secret? Undrained crushed pineapple mixed directly into the batter, infusing every crumb with tropical sweetness and an irresistible tenderness. Then comes the heavenly, whipped cream filling – light, airy, and perfectly balanced with just a hint of vanilla and powdered sugar. Finally, a homemade pineapple glaze adds that extra layer of tangy sweetness and a gorgeous, glossy finish that makes the cake look straight out of a patisserie window. It’s a dessert that impresses without the stress, making it perfect for any occasion, from casual family dinners to festive celebrations.
Seriously, this is one of those recipes that will be requested again and again. It’s a testament to how simple ingredients, thoughtfully combined, can create something truly extraordinary. Whether you’re a seasoned baker or just starting your culinary journey, this recipe is designed for success. The steps are straightforward, the ingredients are accessible, and the results are consistently amazing. So, clear some space in your recipe box, because this Pineapple Heaven Cake is about to become your new go-to. Trust us, you absolutely positively DON’T LOSE THIS RECIPE!
Nutritional Information
Per serving (approximate values):
- Calories: 420-480
- Protein: 5-7g
- Carbohydrates: 55-65g
- Fat: 20-25g
- Fiber: 1-2g
- Sodium: 300-350mg
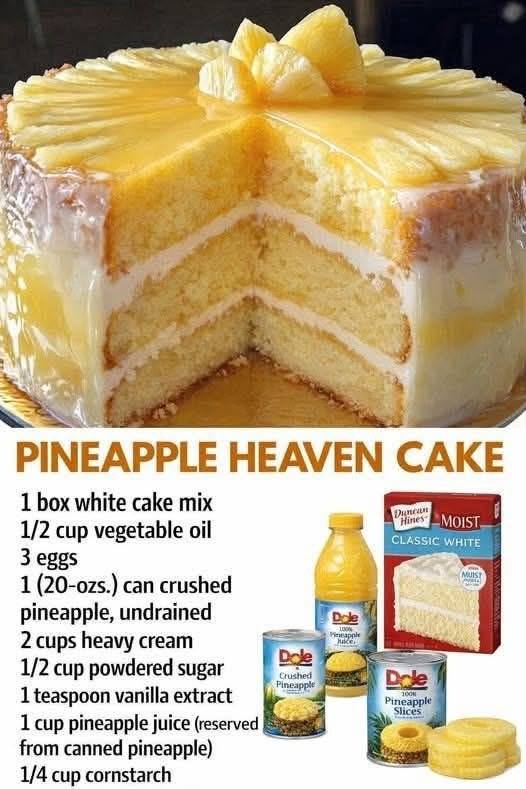
Ingredients
- For the Cake Base:
- 1 box (15.25 oz) white cake mix (e.g., Duncan Hines Classic White)
- 1/2 cup vegetable oil
- 3 large eggs
- 1 (20-oz.) can crushed pineapple, undrained
- For the Creamy Filling/Frosting:
- 2 cups heavy cream, very cold
- 1/2 cup powdered sugar (confectioners’ sugar)
- 1 teaspoon pure vanilla extract
- For the Pineapple Glaze/Topping:
- 1 cup pineapple juice (reserved from canned pineapple or separate purchase)
- 1/4 cup cornstarch
- For Garnish (Optional but recommended):
- 5-6 thin pineapple slices (from a can or fresh, for decoration)
Instructions
- Prepare the Cake:
- Preheat your oven to 350°F (175°C). Grease and flour two 8-inch or 9-inch round cake pans, or line with parchment paper circles.
- In a large mixing bowl, combine the white cake mix, vegetable oil, eggs, and the entire 20-oz can of undrained crushed pineapple. Mix with an electric mixer on low speed until just combined, then increase to medium speed and beat for 2 minutes until the batter is smooth and well-incorporated.
- Divide the batter evenly between the prepared cake pans.
- Bake according to package directions for your pan size (typically 25-30 minutes for 8-inch pans, 20-25 minutes for 9-inch pans), or until a wooden skewer or toothpick inserted into the center of the cakes comes out clean.
- Once baked, remove the cakes from the oven and let them cool in the pans on a wire rack for 10-15 minutes.
- Carefully invert the cakes onto the wire rack to cool completely. Ensure they are entirely cool to the touch before frosting, which can take 1-2 hours.
- Make the Creamy Filling:
- While the cakes are cooling, prepare the creamy filling. In a large, chilled mixing bowl (preferably metal or glass, chilled in the freezer for 10-15 minutes beforehand), pour the very cold heavy cream.
- Add the powdered sugar and vanilla extract to the cream.
- Using an electric mixer with the whisk attachment, start on low speed and gradually increase to high speed. Whip the mixture until stiff peaks form. This means when you lift the whisk, the cream holds its shape firmly and doesn’t droop. Be careful not to over-whip, or it will become grainy.
- Cover and refrigerate the whipped cream until ready to assemble the cake.
- Prepare the Pineapple Glaze:
- In a small saucepan, whisk together the pineapple juice and cornstarch until the cornstarch is completely dissolved and the mixture is smooth.
- Place the saucepan over medium heat, stirring constantly with a whisk.
- Continue to cook and stir until the mixture thickens significantly, becomes clear, and comes to a gentle boil. This usually takes about 3-5 minutes.
- Remove the saucepan from the heat and let the glaze cool for at least 15-20 minutes, stirring occasionally. It will continue to thicken as it cools.
- Assemble the Cake:
- If your cake layers have domed tops, use a serrated knife to carefully level them, creating flat surfaces for easy stacking.
- Place one cooled cake layer on your desired serving plate or cake stand.
- Spread about one-third to one-half of the creamy whipped cream filling evenly over the top of the first cake layer.
- Carefully place the second cake layer on top of the filling.
- Spread another generous layer of whipped cream filling over the top of the second cake layer.
- Use the remaining whipped cream to frost the sides of the cake, creating a smooth or rustic finish as desired.
- Once the pineapple glaze has cooled to a warm or room temperature (it should be thick but still pourable), slowly pour it over the very top center of the cake, allowing it to naturally spread and drip down the sides for a beautiful, rustic cascade.
- Arrange the pineapple slices decoratively on top of the glaze, as pictured, to create an appealing presentation. You can fan them out or place them in a pattern.
- Chill and Serve:
- Refrigerate the assembled Pineapple Heaven Cake for at least 1-2 hours. This chilling time is crucial for the cake to set, the flavors to meld, and the whipped cream and glaze to firm up, making it easier to slice and serve.
- Slice with a sharp, warm knife for clean cuts and serve chilled.
Cooking Tips and Variations
- The Undrained Pineapple Secret: Do not drain the crushed pineapple for the cake batter! The juice is essential for adding incredible moisture and pineapple flavor to the cake, making it taste far from a basic box mix.
- Perfectly Whipped Cream: For the best results, ensure your heavy cream, mixing bowl, and whisk attachment are all very cold. Chilling them in the freezer for 10-15 minutes before whipping can make a significant difference in how quickly and firmly your cream whips.
- Don’t Overmix the Cake Batter: Mix the cake batter only until just combined and smooth. Overmixing can develop the gluten in the flour, leading to a tougher cake.
- Cool Cakes Completely: This is non-negotiable! Attempting to frost a warm cake will result in melted, messy frosting. Patience is key here.
- Glaze Consistency: If your pineapple glaze seems too thick after cooling, you can gently warm it over low heat with a teaspoon or two of additional pineapple juice or water to reach a pourable consistency. If it’s too thin, return it to the heat and cook for another minute or two, stirring constantly.
- Leveling Cake Layers: For a professional-looking cake, use a serrated knife to carefully slice off any domed tops from your cooled cake layers. This creates flat surfaces for even stacking.
- Add Coconut: For an even more tropical twist, fold 1/2 cup of shredded coconut (sweetened or unsweetened) into the cake batter, or sprinkle some toasted coconut flakes over the top of the cake before serving.
- Nutty Crunch: Sprinkle some finely chopped and toasted macadamia nuts or pecans over the top of the cake for added texture and flavor.
- Adult Version: For a grown-up treat, add 1-2 tablespoons of rum extract to the cake batter or a splash of actual rum to the pineapple glaze (reduce pineapple juice slightly).
- Spice It Up: A pinch of ground cinnamon or nutmeg in the cake batter can add a subtle warmth that complements the pineapple beautifully.
- Make Ahead Tip: The cake layers can be baked a day in advance, wrapped tightly in plastic wrap, and stored at room temperature. The whipped cream can be made a few hours in advance and kept chilled, but it’s best when freshly whipped. The glaze can also be made ahead and gently reheated if needed.
Storage and Reheating
Storage: This Pineapple Heaven Cake, with its delicate whipped cream frosting and glaze, must be stored in the refrigerator. Cover the cake loosely with plastic wrap or place it in an airtight cake carrier to prevent it from drying out or absorbing odors from other foods in the fridge. It will stay fresh and delicious for 3-4 days when properly stored.
Reheating: This cake is typically served chilled, so reheating is not recommended. The whipped cream will melt, and the texture of the cake and glaze will be compromised if heated. Simply take a slice from the refrigerator and enjoy it cold!
Frequently Asked Questions
Can I use fresh pineapple instead of canned crushed pineapple?
While canned crushed pineapple is recommended for its convenience and the juice content, you can use fresh pineapple. If using fresh, you’ll need to finely mince or process about 2 cups of fresh pineapple. You will also need to supplement with 1 cup of store-bought pineapple juice for the glaze, as fresh pineapple won’t yield enough juice for both the cake and the glaze.
My whipped cream isn’t getting stiff. What am I doing wrong?
The most common reasons for whipped cream not stiffening are that the cream wasn’t cold enough, or the bowl/whisk wasn’t chilled. Ensure all components are very cold. Also, make sure you are using heavy cream (or heavy whipping cream) with at least 36% milk fat, as lighter creams won’t whip properly. If it’s still not working, sometimes adding a teaspoon of cornstarch or a packet of whipped cream stabilizer can help.
Can I make this cake ahead of time for an event?
Yes, you can definitely prepare components of this cake in advance. The cake layers can be baked up to 1-2 days ahead, cooled completely, wrapped tightly in plastic wrap, and stored at room temperature. The pineapple glaze can also be made a day in advance and stored in the refrigerator; you might need to gently warm it slightly before pouring if it becomes too thick. The whipped cream is best made right before assembly for optimal freshness and texture, though it can be made a few hours in advance and kept chilled.
What if I don’t have two cake pans?
If you only have one cake pan, you can still make this cake! Simply bake one layer at a time, allowing the pan to cool and be re-greased and floured between uses. Alternatively, you could bake the entire batter in a 9×13 inch rectangular pan, adjust baking time as needed, and then cut the cooled cake in half lengthwise to create two layers for stacking. This might result in a slightly less traditional “round cake” look but will still be delicious.