Introduction
Prepare to be amazed by the sheer simplicity and tropical delight of this 5-Ingredient Pineapple Pudding! In a world where dessert recipes often demand a never-ending list of obscure components and intricate techniques, this dish stands out as a beacon of effortless indulgence. Imagine a dessert that’s creamy, sweet, tangy, and bursting with the vibrant flavor of pineapple, all while requiring minimal effort and just a handful of readily available ingredients. This isn’t just a recipe; it’s a revelation for anyone who craves a delicious treat without the fuss, making it perfect for novice bakers, busy parents, or seasoned cooks looking for a quick win.
What makes this Pineapple Pudding truly special is its ability to deliver an impressive experience with such humble beginnings. It transforms basic pantry staples into a show-stopping dessert that looks far more complicated than it actually is. The magic lies in the harmonious blend of creamy textures and the bright, refreshing notes of pineapple, creating a dessert that’s incredibly satisfying yet surprisingly light. Whether you’re planning a casual family dinner, a summer barbecue, or simply looking to satisfy a sweet craving, this pudding is your new go-to. It’s a make-ahead marvel, allowing you to prepare it hours, or even a day, in advance, freeing you up to enjoy your time without last-minute kitchen stress. Get ready to embrace the magic of simplicity and savor every spoonful of this tropical dream.
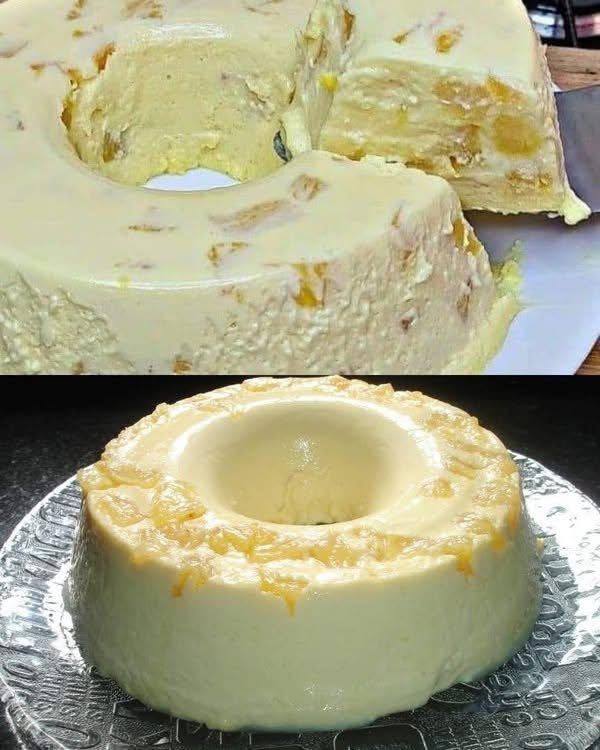
The beauty of this 5-Ingredient Pineapple Pudding extends beyond its ease; it’s a dessert that appeals to all senses. Visually, its pale yellow hue, often studded with golden pineapple chunks and elegantly molded, is inviting and promises a refreshing escape. The aroma alone transports you to a sunny, tropical paradise. And the taste? A perfect balance of sweetness and tang, encased in a smooth, jiggly texture that melts in your mouth. It’s a guaranteed crowd-pleaser, evoking nostalgic memories for some and creating new delightful experiences for others. This recipe proves that you don’t need a gourmet kitchen or culinary school training to create something truly extraordinary. Just five ingredients, a little patience for chilling, and you’re on your way to dessert perfection.
Nutritional Information
Per serving (approximate values):
- Calories: 320 kcal
- Protein: 7g
- Carbohydrates: 55g
- Fat: 8g
- Fiber: 2g
- Sodium: 120mg
Ingredients
- 20 ounces (567g) canned crushed pineapple in juice, undrained
- 1 (14-ounce / 397g) can sweetened condensed milk
- 1 (12-ounce / 340g) can evaporated milk
- 2 tablespoons unflavored gelatin powder (about 2 packets)
- 1/2 cup cold water
Instructions
- Begin by preparing your mold. Lightly grease a 6-cup bundt pan or ring mold with a neutral-flavored oil or non-stick cooking spray. Alternatively, you can rinse the mold with cold water and shake out the excess, leaving a thin film of water, which helps with unmolding. Set aside.
- In a small bowl, sprinkle the unflavored gelatin powder over the 1/2 cup of cold water. Let it sit for 5-10 minutes, allowing the gelatin to “bloom” or soften and swell. This step is crucial for ensuring the gelatin dissolves smoothly without lumps.
- While the gelatin is blooming, open the can of crushed pineapple. Do not drain the juice; the juice is integral to the flavor and consistency of the pudding. Pour the entire can of crushed pineapple (with its juice) into a large mixing bowl.
- Add the entire can of sweetened condensed milk to the bowl with the pineapple. Stir well to combine these two ingredients thoroughly. The condensed milk will add sweetness and a rich, creamy base to the pudding.
- Next, pour in the entire can of evaporated milk. This milk contributes to the pudding’s creamy texture and helps to balance the sweetness of the condensed milk without making it too heavy. Stir until all ingredients are uniformly mixed.
- Once the gelatin has bloomed, gently heat it. You can do this by placing the bowl over a pot of simmering water (double boiler method) and stirring until the gelatin is completely dissolved and clear, or by microwaving it for 15-30 seconds, stirring every 10 seconds, until clear. Be careful not to boil the gelatin, as this can reduce its setting power.
- Pour the dissolved gelatin mixture into the large bowl with the pineapple and milk mixture. Stir continuously for at least 2-3 minutes to ensure the gelatin is fully incorporated throughout the entire pudding base. This even distribution is key for a consistent set.
- Carefully pour the entire pudding mixture into your prepared bundt pan or ring mold. Ensure that the pineapple chunks are evenly distributed as you pour.
- Cover the mold loosely with plastic wrap. Place the mold in the refrigerator and chill for a minimum of 4-6 hours, or preferably overnight. The longer it chills, the firmer and more stable your pudding will be. Do not rush this step, as proper chilling is essential for the pudding to set correctly.
- To unmold, gently run a thin knife or spatula around the outer edge of the pudding where it meets the mold. If using a bundt pan, you may need to briefly dip the bottom of the mold in a shallow pan of warm water for 10-15 seconds to help release it. Place a serving plate upside down over the mold, then invert the mold and plate together. The pudding should slide out easily. If it doesn’t, gently tap the bottom of the mold or repeat the warm water dip.
- Serve chilled and enjoy your delightful 5-Ingredient Pineapple Pudding! Garnish with fresh mint leaves or a sprinkle of toasted coconut flakes if desired, though it is perfectly delicious on its own.
Cooking Tips and Variations
For the best results with your 5-Ingredient Pineapple Pudding, always ensure your gelatin is fully bloomed and completely dissolved before adding it to the main mixture. Undissolved gelatin can lead to a gritty texture or areas of the pudding that don’t set properly. When blooming, cold water is essential; hot water can cause the gelatin to clump. When dissolving, use gentle heat and stir until it’s clear, avoiding boiling temperatures at all costs. Another crucial tip is patience during the chilling phase. While 4-6 hours might seem sufficient, an overnight chill truly guarantees a firm, sliceable pudding that holds its shape beautifully, especially for unmolding. If you’re having trouble unmolding, a quick dip in warm water can be a lifesaver, but don’t leave it in too long, or the edges might start to melt.
When it comes to variations, this simple base is incredibly versatile. For a different tropical twist, consider substituting the crushed pineapple with canned mango pulp or even finely diced canned peaches, ensuring they are well-drained if using peaches to avoid excess moisture. If you want to enhance the tropical flavor, stir in 1/4 cup of shredded coconut or a teaspoon of coconut extract with the milk mixture. For those who love a bit of texture, you can fold in some toasted chopped pecans or macadamia nuts just before chilling. To make this pudding dairy-free, substitute the evaporated milk and sweetened condensed milk with full-fat canned coconut milk (you’ll need about 2.5 cans total, adjusting sweetness with a dairy-free condensed coconut milk if available, or a bit of agave/maple syrup). Just be aware that the flavor profile will shift more towards coconut.
Presentation-wise, don’t underestimate the power of a simple garnish. A few fresh mint leaves can add a pop of color and a refreshing aroma. Toasted coconut flakes sprinkled over the top or around the base of the unmolded pudding elevate its tropical appeal. You could also drizzle a little extra pineapple juice or a light fruit syrup around the serving plate for an elegant touch. For individual servings, consider pouring the mixture into small ramekins or decorative glasses instead of a large mold. This eliminates the need for unmolding and makes for a charming presentation. Remember to adjust the chilling time for smaller portions; they will set faster. No matter how you choose to serve it, this pudding is designed to impress with minimal effort.
Storage and Reheating
This 5-Ingredient Pineapple Pudding is a fantastic make-ahead dessert, and proper storage is key to maintaining its delightful texture and flavor. Once the pudding has fully set and been unmolded (or if you’re storing it in the mold), it should always be kept covered in the refrigerator. Use plastic wrap to cover the entire pudding or an airtight container if you’ve already sliced it. Stored correctly in the refrigerator, the pudding will remain fresh and delicious for up to 3-4 days. Beyond this, while it might still be safe to eat, the texture can start to degrade, becoming less firm or slightly watery due to syneresis (the expulsion of liquid from the gel). It’s best enjoyed within the first few days for optimal taste and consistency.
Freezing this pineapple pudding is generally not recommended. Gelatin-based desserts, especially those with dairy, do not typically freeze and thaw well. The freezing process can cause the water in the pudding to form ice crystals, which then break down the gelatin structure upon thawing. This results in a watery, grainy, and unappetizing texture that loses its characteristic smooth and jiggly consistency. The dairy components can also separate, leading to a curdled appearance. Therefore, plan to consume the pudding within its refrigerated shelf life rather than attempting to freeze it.
Since this is a chilled dessert, reheating is not necessary or recommended. In fact, reheating would cause the gelatin to melt, turning your pudding back into a liquid state. This dessert is designed to be served cold, directly from the refrigerator. If you’ve stored individual slices, simply take them out a few minutes before serving to allow them to lose some of their chill, enhancing the flavor perception. The refreshing, cool temperature is an integral part of this pudding’s appeal, especially for a tropical-inspired dish. Always serve it cold for the best experience.
Frequently Asked Questions
Can I use fresh pineapple instead of canned?
It is strongly advised to use canned pineapple for this recipe. Fresh pineapple contains an enzyme called bromelain, which breaks down proteins. Gelatin is a protein, and this enzyme will prevent the pudding from setting properly, leaving you with a liquid mixture. If you absolutely wish to use fresh pineapple, you would need to cook it first (boil or simmer for about 10 minutes) to deactivate the bromelain enzyme, then cool it completely before adding it to the mixture. However, canned pineapple is far more convenient and reliable for this specific pudding.
My pudding didn’t set. What went wrong?
Several factors can cause your pudding not to set. The most common reasons include not blooming the gelatin properly (it needs to fully absorb water before dissolving), not dissolving the gelatin completely (look for a clear, lump-free liquid), or adding the gelatin to a mixture that was too hot or too cold, which can affect its setting power. Another possibility is not chilling the pudding for a sufficient amount of time; it truly needs at least 4-6 hours, and often performs best with an overnight chill. Lastly, if you used fresh pineapple without cooking it, the enzymes would have prevented setting.
How can I make this pudding less sweet?
The sweetness in this pudding primarily comes from the sweetened condensed milk. To reduce the sweetness, you have a couple of options. You could try using a low-sugar or unsweetened version of condensed milk if available, though this might slightly alter the texture. Alternatively, you could slightly increase the amount of evaporated milk (by about 1/4 cup) to dilute the sweetness, but be cautious not to add too much liquid, as it could affect the pudding’s ability to set firmly. Another approach is to serve it with unsweetened garnishes like fresh berries or a dollop of plain whipped cream, which can balance the overall sweetness perception.
Can I use different molds or individual servings?
Absolutely! This pudding is very versatile when it comes to molding. While a bundt or ring mold creates a beautiful presentation, you can easily pour the mixture into individual ramekins, small glass bowls, or even decorative parfait glasses. If using individual molds, the chilling time might be slightly reduced, but still allow ample time for a firm set. For easier unmolding from individual ramekins, you can lightly grease them or line them with plastic wrap, leaving an overhang to pull the pudding out. Just ensure your chosen containers have enough capacity for the recipe volume.